I think I will not sin against the truth if I say: cable technologies in heating premises for various purposes are now not only widely used, but are being developed in the most active way - this is indicated by the dynamics of demand. The opinions of the specialists with whom I was able to communicate on this topic were divided. Some suggest that this trend will continue in the near future. Others are more inclined to favor the development of the so-called infrared heated floor (film-based). It seemed to me that the arguments were approximately equal on both sides. Therefore, it is too early to draw final conclusions. But I think that in just a couple of years the trends will be more obvious.
In general, the undoubted advantage of cable heating systems is the compactness of the cable and greater possibilities for transmitting electricity. You don't have to look far for examples.
If you intend to make a warm floor under the tiles with your own hands, study the technology. This in itself is not so difficult, but at the same time you must comply with a number of TB requirements, because this is a matter of the safety of your family
First of all, these are, of course, warm floors. For those who are “out of the loop” - we're talking about not just about insulated floors using various thermal insulation, but specifically about heating technologies under the general collective name “warm floor”. I wanted to say: “new technologies,” but I stopped short - as such, warm floors (with heating) have been known since ancient times. Although, of course, technology today is completely different than in Ancient Rome.
So, warm cable flooring under tiles is the most popular topic among everyone interested in this technology in relation to housing and commercial buildings.
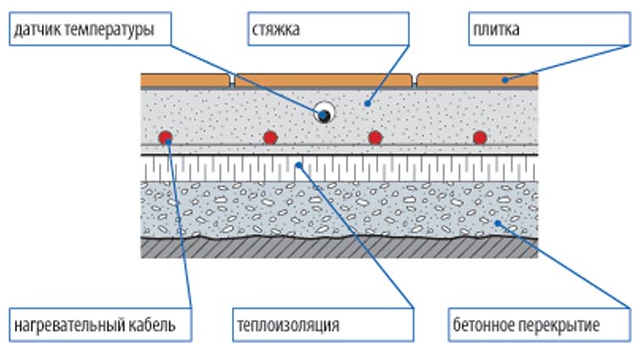
When installing such a floor, its cable is mounted either directly under the floor covering, or laid in the underlying layers of concrete, or placed in a specially prepared assembly (made of metal). This design actually provides floor heat, which significantly improves the comfort of the premises. Systems of this kind are sometimes used as a basic (independent) heating system, but more often they serve as an auxiliary heat source in the house.
Types of cable floors
Electric heated floors based on cable systems are presented on the market in the form of special heating sections or in the form of so-called heating mats and cable spools. They differ mainly in the installation methods.
The heating electric cable is installed in the floor in a special way. Electricity is supplied to it through a thermostat. Electric heating cable appearance similar to an ordinary cable, but it has a different purpose - a cable for underfloor heating is not intended to transmit signals or electrical power over a distance, but must appropriately convert the current passing through it into thermal energy. As a rule, a small amount of electricity is converted into heat in any wire, but this is not a large amount at all - only about 1-3%. Regarding the heating cable (mats), the opposite is true here - energy must be (completely) converted into heat, and the specific level of heat release (we are talking about the release of power per unit length) is an essential technical parameter of heating cables. In this context, a heating cable is simply a heating element manufactured using cable technology.
Electric heated floors using cable technology are presented modern market in two forms:
- heating sections;
- heating mats.
The first ones are mounted directly in cement-sand screed. The second ones are laid directly into layers of tile adhesive, along the old screed.
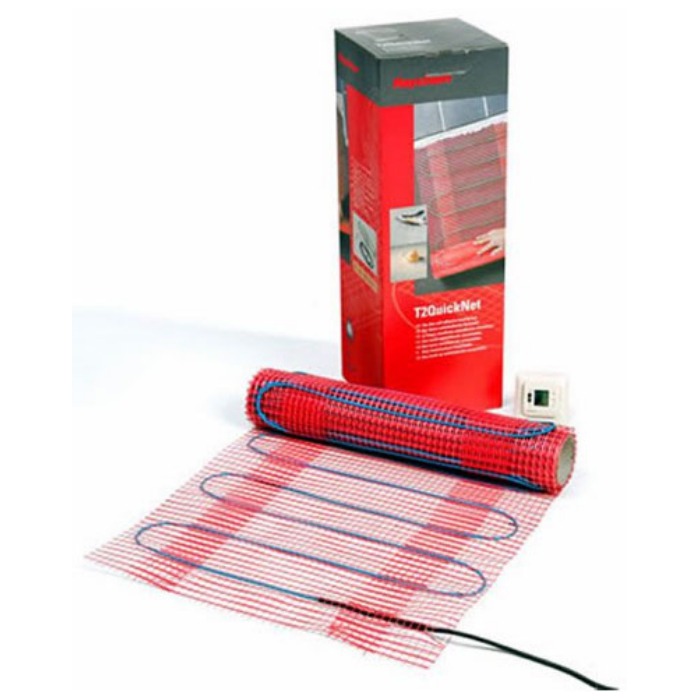
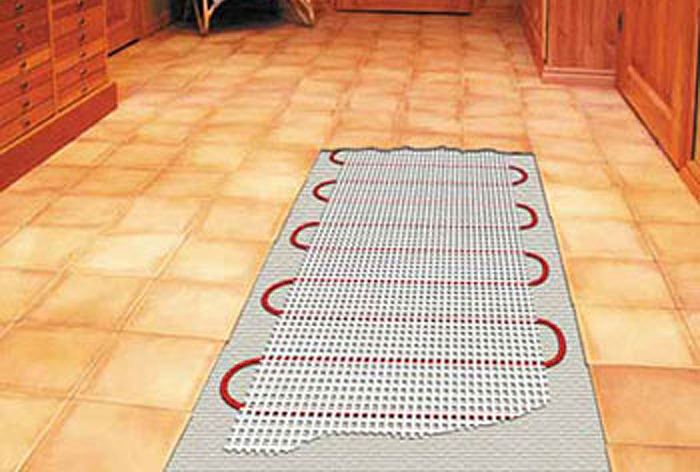
Heating mats
Perhaps, due to their ease of use, it is heating mats that are most popular, and they deserve it. As I already said, this type heated floors involve laying directly into tile adhesive. Installation - it seems it couldn't be easier. It does not require any special skills or knowledge. Heating mats have proven themselves both as a heated floor and as additional heating.
Most often, consumers buy mats with a one-sided connection with a power of 180 W/sq.m (less often 160 W/sq.m) for laying in tile adhesive.
What are they?
- Only 2.9 mm thick, two-core shielded cable with one-way connection, mounted on a mat (fiberglass mesh);
- Teflon insulation;
- Full Copper;
- Slave. voltage 220-230 V;
- Cold connection wires 2-3 m;
- Mat dimensions: width 50 cm, length from 2-20 m;
- Power 180 W x 1 sq. m.
- Mesh mats are intended for direct installation into the floor (i.e., no concrete/cement-sand screed is required).
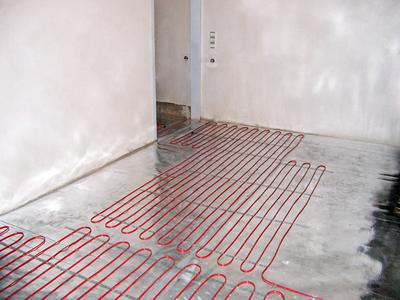
Cable heated floor in screed
Such a floor is laid directly at the moment of formation concrete screed. Can also serve for both main and additional heating. Since the cable is located in the screed, you can later easily replace the floor covering - tiles or something else - without replacing the heating cable. The warm floor in this case acquires, one might say, a certain fundamental character. A cable tie often has an additional reinforcing structure - special reinforcing threads that allow the cable to withstand high tensile loads - up to 300 kg.
Due to this, it is used in heating systems and anti-icing systems for various types of open areas, as well as steps, ramps, and driveways.
What cable is used in this option? - Two-core cable for a tie with a power of 20 W p/m with the following parameters:
- Thickness 6.9 mm. Double insulation made of silicone and PVC;
- Screen made of polyester aluminum foil, tinned copper;
- Operating voltage: 220-230 V;
- Power 20 W/rm;
- Purpose: for laying in concrete floor screed, as well as for open areas, steps, ramps, soil;
- Cold wires 3 m;
Cable for heated floor
Both in the case of heating sections and in the case of heating mats, two types of cable are used:
- single-core;
- two-wire.
When laying a single-core cable, both ends ultimately return to one point.
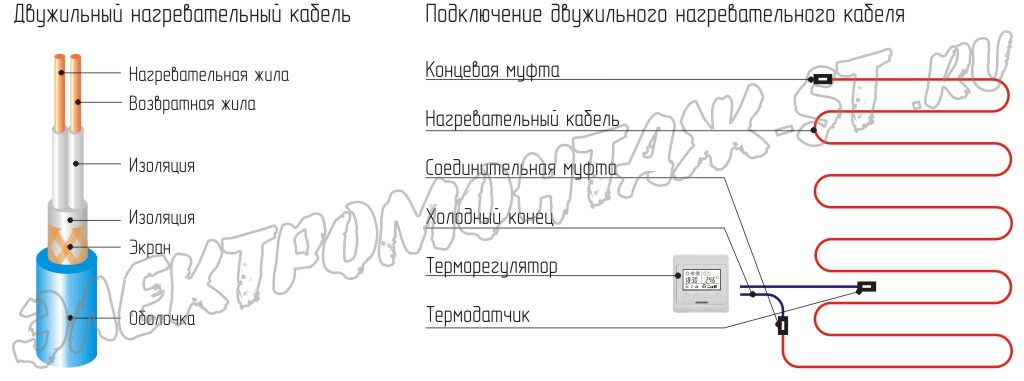
In two-core cables for underfloor heating, two heating cores are used, or one heating core and one supply core (the latter is made of copper wire). In the heating section, at one end the wires are connected with an end cap, and at the opposite end there is a coupling and “cold” ends for connecting to the network
A two-core cable does not require this during installation.
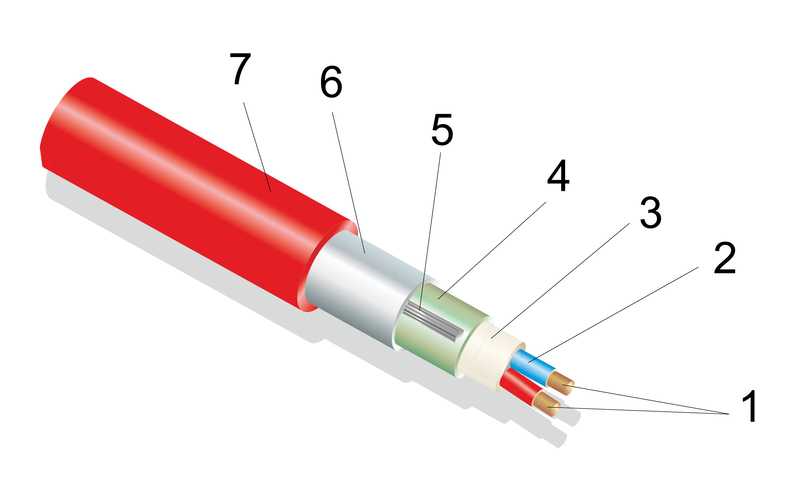
Structure of a two-core heating cable
- A pair of current-carrying wires;
- Silicone gasket;
- Reinforced surface for cable based on glass fiber monofilaments;
- Polyester film;
- Copper stranded conductor;
- Aluminum screen;
- PVC layer protection.
The thin heating cable for installation in tile adhesive differs from mats in that it is supplied complete with mounting tape, rather than attached to a mesh. This provides more possibilities (flexibility) in installing heated floors in particularly narrow passages and other hard-to-reach areas of the room. In addition, you can adjust the laying step yourself and accordingly evaluate the required power of the heated floor. A cable-based floor can be used not only as auxiliary (additional) heating, but even as the main one.
There is also such a thing as a universal two-core cable. They have their own specific characteristics:
- Teflon insulation;
- A pair of heating wires (heats up faster and minimizes wear and tear.
- Dimensions: 2.7 x 4.5 mm.
- Power 25 W/ linear m.
- Teflon cold connection wires 1 m.
The universal two-core cable is intended not only for laying under tiles and other types of floors, but also for heating roofs and gutters.
Cable floor or infrared film?
This question arises every now and then among potential consumers who are faced with choosing a type heating system in the floor.
Cable flooring is rightfully considered the founder of electric underfloor heating systems. Film heated floors appeared many years after the successful launch of cable floors. Carbon rod mats also appeared later. Certain ease of installation and maintenance of infrared heated floors have predetermined its fairly wide distribution in recent years, which is generally fair. But despite the pressing competition, cable underfloor heating continues to be produced today, being in demand due to its strength, reliability and other parameters, and also, of course, due to the wide variety of types, power and purpose.
When we need to make a difficult choice, we turn to the Internet and the first thing we are interested in is, of course, reviews. So, I studied a lot of reviews on the subject of heated floors on the Internet. And I can give you some more or less objective summary.
In total, three types of heated floors are known: water, cable, film (to which, apparently, as a result of successful marketing, the name “infrared” also stuck).
So as not to take up your time, I'll get to the point. Quantity worth attention Frankly speaking, there are not many reviews out of their entire mass. And if we talk about the “bottom line”, then in recent years the trend is as follows: everything more people are inclined to choose film. The main motive: it’s easier with her. In general, at the moment, the number of reviews and the number of requests indicate that the water floor is in first place among the three (about 9 thousand requests and a maximum of positive reviews). Cable flooring takes second place (about 4 thousand requests and 3rd place in terms of positive reviews). But in recent years it has been crowded out by the so-called infrared film floor (about 3.5 thousand requests and 2nd place in the number of positive reviews).
When choosing electric heated floors, many people pay attention to the cable floor. It requires large installation costs, but in the future it is durable, relatively economical and performs its heating functions well. It is believed that only cable systems can be designed for full heating, while lighter heating mats serve only to maintain a comfortable temperature, and not to heat the room.
Electric cable floors are widely used in the construction of private and country houses. The fact is that installing them requires additional screed and good thermal insulation in the lower part of the floor, so it is not always possible to install them in an apartment.
Many sellers of cable floors offer their own installation. You can use the services of a construction team that carries out all other repairs if they have sufficient experience working with this type of floor.
Finally, with due care and intelligence, you can install a heated floor and lay the tiles yourself, although this is quite technically difficult. In any case, presence during the installation of the floor is necessary in order to track some details and advise the builders on the peculiarities of this room.
Overview of main components
The operation of a cable floor is based on the action of a so-called heating cable. If ordinary cables must conduct current with minimal losses and heating, then heating cables, on the contrary, must generate heat in proportion to their size and current strength. Standard cables have a heat dissipation of 17–21 W per meter of length. It is not recommended to take non-standard, especially large values for reasons of electrical safety.
The electrical cable can be either single-core or two-core. The fundamental difference lies in the installation method. A single-core electrical cable must be connected to the power supply at both ends, that is, form a closed figure when laid out on the floor. The two-core wire can be positioned however you like, which simplifies the task. Of its two wires, both can emit heat, or only one can be heating, and the second can be supplying.
In addition, although both cables comply with building codes for electromagnetic radiation, the two-core cable emits several times less. They also differ in cost: a two-wire one costs more, but is easier to install. The cable contains not only heating and power cores, but also appropriate insulation and a shielding layer to reduce radiation.
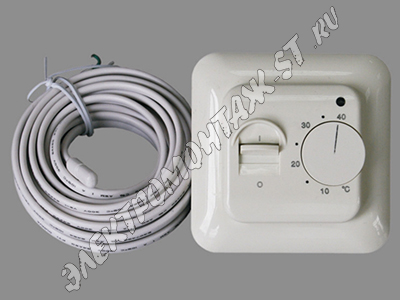
The thermostat is an essential component in a heated floor system. It is installed in the same room as the heating cable going to it, but it is not advisable to place it in the bathroom due to high humidity. The essence of the thermostat is to increase or decrease the power of the system and, accordingly, the floor temperature.
The best thermostats with system elements smart home, that is, programmable and responsive to external factors. For example, a popular design is to heat the floor in the morning and evening and cool it during the day because family members are away from home during business hours. TO
Of course, you can manually set the temperature, but it is much more convenient when the system does it automatically. There are systems that correlate their modes with electricity tariffs, sometimes this can be quite convenient, given that the concrete screed in which the system is located retains heat for a long time and distributes it well throughout the room. Yes and ceramic tiles distinguished by its ability to retain heat.
For a programmable thermostat to operate effectively, it must receive internal and external system data. There are temperature sensors for this. They can be located either inside the system, in the floor, or in the room where they monitor the air temperature. Sensors serve for more effective control over the operation of heated floors.
Installation subtleties

Even if the installation of an electric heated floor is carried out by craftsmen, the presence of the apartment owner is required during the work. For example, if heating pipes run under the floor, installers will need a formal diagram of all services to ensure they are not affected.
In addition, you need to know the intended layout of the room. The fact is that electric heated floors cannot be placed under furniture or electrical equipment. This is unsafe and may damage the furniture. At the same time, to fully heat the air, you need to occupy 70% of the floor area. Therefore, you need to carefully consider which part of the room will go under heated floors.
There should be a distance of at least five centimeters between the walls and the electric heating cable. Generally speaking, the issue of layout for a cable floor is more relevant than for a floor consisting of heating mats. There the cable is already fixed to the mesh, and you just need to lay it under the tile, but here you will have to lay the cable on the floor yourself, taking into account all the conditions.
For example, you need to lay an electrical cable over a certain area, which is specified by the manufacturer. The more heat required, the greater the power and smaller area, but not less than the value declared by the manufacturer.

The length of the cable must be calculated when purchasing, as the cable cannot be cut. At the same time, if the cable suddenly turns out to be too long, it should not be laid too tightly for reasons of electrical safety. The cable should not be spread too large either, since when turned on, the so-called zebra effect may occur, when the floor will warm up in stripes that will alternate with cold areas.
It is also forbidden to sharply bend the cable or lay it so that it intersects its own bends. You cannot cross other communications located in the same plane. When laying out, the minimum cable pitch must be observed.
In general, layout is a logical task in which you need to take into account many technical requirements and at the same time create effective system heating, hidden under a layer of screed and tiles.
Cable heated floor is laid under different types coverings, for example, under tiles and laminate (not forgetting the necessary screed). However, it is undesirable to use cable heated floors in rooms where different coatings are combined. It is also undesirable to lay electric floors in rooms with parquet or similar coverings made of real wood, since it dries out and deteriorates, and it has practically no thermal conductivity properties.
If the heated floor is laid under the tiles, this is the most beneficial option in terms of heat conservation. The tile retains heat for a long time, like stone, and produces a pleasant tactile impression when warm.
When installing electric heated floors, you need to make an additional concrete screed, and its height should be at least three centimeters, and ideally at least five. Not all apartment owners can afford such a screed for tiles, since it additionally raises the floor level by these same three to five centimeters. If you can’t install the screed, then it’s better to choose heating mats rather than try to get around technical requirements to cable floors.
After installing the cable heated floor and screed, you need to:
- Get it from a specialist or create a detailed one yourself technical diagram, which includes not only the location of the cable, but also the location of all connecting parts. When remodeling, including rearranging furniture, you need to keep in mind the location of the heating cables.
- Check system functionality. A correctly installed cable heated floor begins to heat up within a few minutes after switching on.
- After completing the screed, you need to wait until it dries completely - about one month. During this time, you cannot walk on the floors.
- If the electrical cable is placed under the tiles, then before laying the tiles you need to check the system again so that you do not have to change both the tile and the screed in the event of a breakdown.
Electric heated floors have a long warranty period and an even longer service life. When installed correctly, they serve without breakdowns for a very long time and can solve heating problems even in fairly northern regions. You can lay laminate and tiles on top of them without worrying about the heating systems being visible.
Installing electric underfloor heating is not a very difficult job. You can handle it even if you have no electrical experience. installation work. After all, all you need is the determination to see it through to the end and a little theory, which is offered to your attention below in the text.
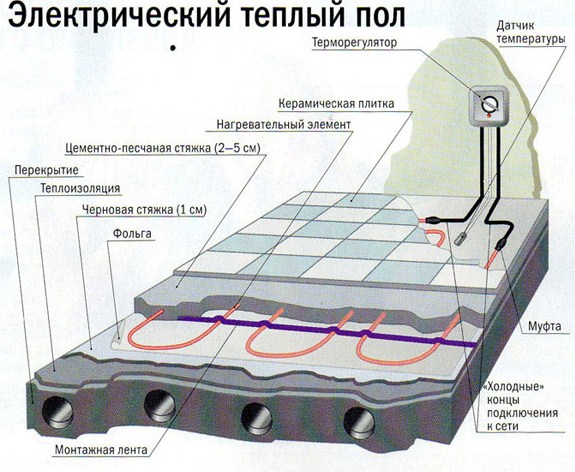
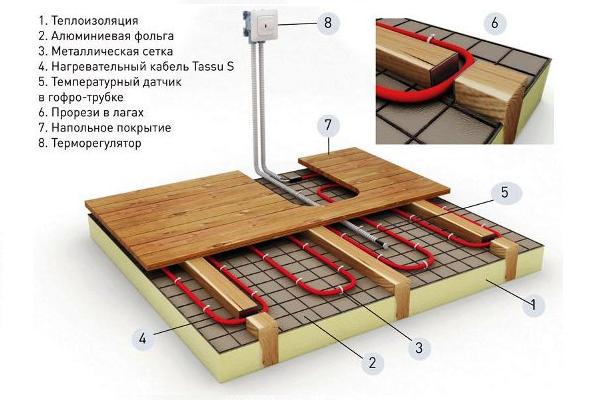
A warm floor is a kind of high-tech “sandwich”, which consists of a shielding film (bottom layer), a heating element (filling) and cladding (top layer). In addition to these layers, the “sandwich” includes temperature sensors that monitor the performance of the heating elements. Without such sensors, the floor will simply burn out.
In addition to the “sandwich”, the structure of the heated floor also includes a control unit. It is mounted in an easily accessible place, close to the heating circuit terminals. Moreover, the energy line feeding the heated floor circuit is supplied precisely to the control unit, which “distributes” energy, dosing both the power of the heater and its operating time.
Types of warm electric floors
As a screening film, as a rule, I use foamed polymer applied to foil. The maximum thickness of such a screen is 2-5 millimeters. If such a screen is not enough, then a two or three centimeter layer of polystyrene foam covered with foil acts as a substrate. In the role finishing material Any traditional flooring can be used - tiles, laminate, linoleum.
|
|
However, the classification of types of heated floor construction is built regardless of the type of substrate or finish. The basis for sorting circuits and models of heating devices is the type of heating element, which can be cable, panel or film. Moreover, cable and panel floors are, in fact, one type of design. After all, the panel is formed on the basis of a cable glued to a reinforcing frame (mesh).
Well, the cable heater itself is a tube filled with a semiconductor, inside of which two uninsulated conductors are laid. A current is “passed” through the conductors, which heats up the semiconductor “filling” of the cable. As a result, the cable heater transforms electrical energy into thermal energy. Next, the energy passes into the concrete screed, which is poured into the heating circuit, and then into the heated space.
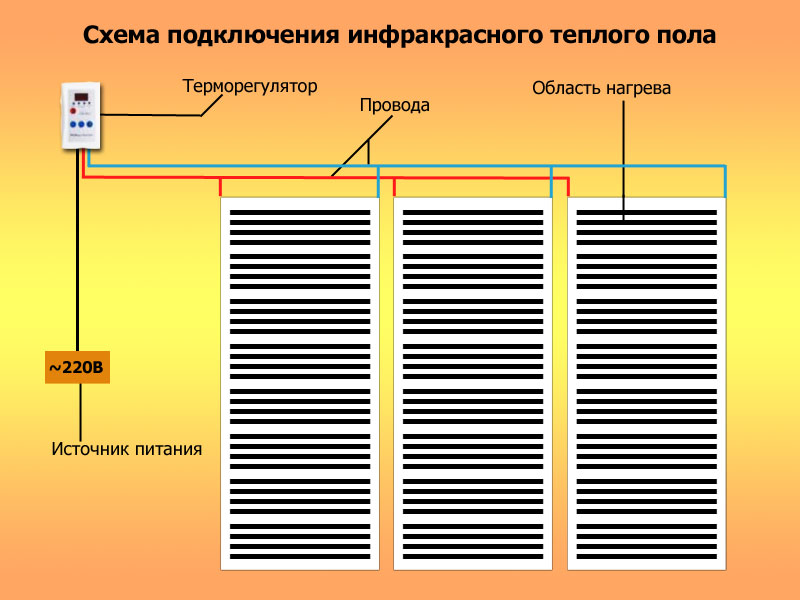
The design of the film heater is completely different. Such a heater consists of a number of plates deposited on a plastic (polymer) base. They transform electrical energy into thermal radiation (electromagnetic waves with a frequency in the infrared spectrum).
Moreover, the plates are closed to flexible conductive buses through which electrical energy is transmitted. As a result, the “heater” is supplied to the consumer in the form of a roll of a fixed width, from which a “strip” of the required length can be cut, laid directly under the cladding (laminate, tile, linoleum).
What to choose?
Most experts are in favor of film heaters. After all, they are more economical than cable ones by at least 50-60 percent. And when heating with electricity, this is a very significant argument.
However, the “film” technology for laying warm electric floors does not tolerate errors. That is, the base must be perfectly flat, and the heating “strip” must be correctly cut and oriented. Moreover, any noticeable operating load is contraindicated for a “film” heater.
In turn, the cable heating circuit can be laid on a simply flat floor slab. After which the contour is filled with a concrete screed, which levels out a fairly noticeable operational load.
By the way, really any floor covering can be laid on this screed. But it is recommended to lay only laminate and linoleum on a film heater.
As a result, both versions of the heated floor design have the “right to life”, so below in the text we will consider the installation technologies of both the film and cable versions of such a heating system.
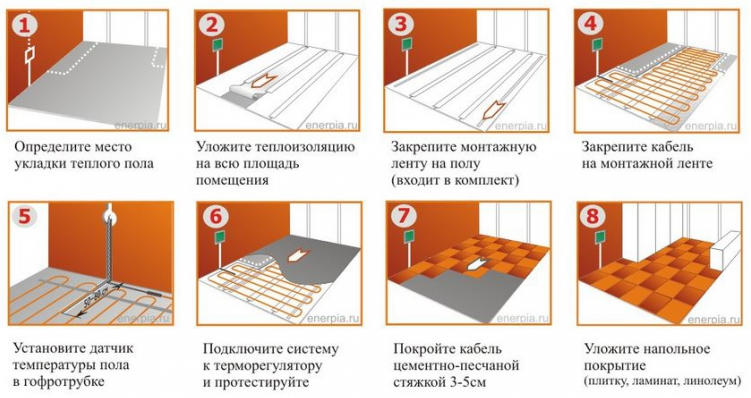
Installation of cable heated floors is carried out in three stages. At first, the base is prepared, then the cable filled with the screed is distributed over the base, and finally, the connection point of the cable to the household electrical network is assembled through the control unit and the screed is finished with cladding.
Moreover, each stage of installation work is replete with many nuances and limitations imposed by the technology of installing electric heated floors. And before making a warm electric floor, inexperienced home craftsmen need to become familiar with these nuances and limitations. Therefore, next we will consider all three stages of assembling a heated floor in detail.
Preparing the base
This stage is implemented according to the following scheme:
- The floor slab is freed from traces of the old floor covering.
All cracks more than one millimeter wide are expanded with a perforator to 1-1.5 centimeters. Loose areas of concrete become loose. All garbage is disposed of, and the slab itself is wetted with water.
- Next, all widened cracks are filled with concrete. Do the same with holes or chips.
- The next step is to control the horizontal position of the floor slab. If depressions or bulges are found on it, then the surface of the slab will have to be leveled using the “self-leveling floor” composition.
- After the patches or leveling screed has dried, it is impregnated with liquid waterproofing.
- After a couple of hours, shielding thermal insulation, for example, Penofol film, can be laid on the prepared surface, or expanded polystyrene slabs can be laid on top of which aluminum foil is spread.
Heating circuit installation
The heating circuit is assembled as follows:
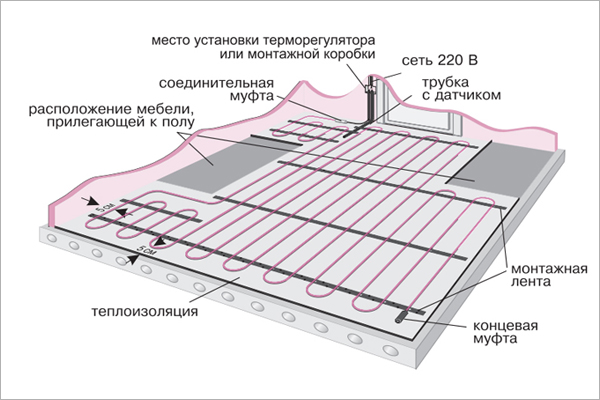
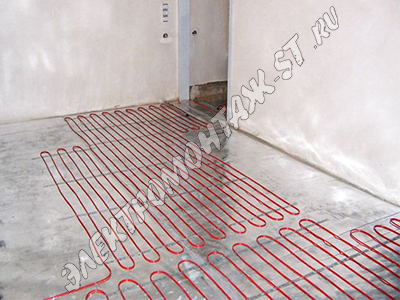
- Mounting rails - steel, aluminum or polymer strips with cable-fixing latches - are placed on the foil (or the foil part of the covering). Moreover, the slats must be laid perpendicular to the wall on which the control unit will be mounted. And the outer slats should be 20 centimeters from the walls, and the edges of all mounting strips should be 5-10 centimeters.
- The cable itself begins to be laid from the intended location of the control unit. Moreover, the installation is carried out in a “snake” fashion, in increments of 10-15 centimeters. That is, the cable is laid parallel to the wall on which the block is placed, fixed in the clips of the mounting strips, and the rotation to the next “turn” is carried out beyond the boundaries of the outermost slats. The radius of “turn” for the next turn should be equal to the pitch of the mounting rails. And the insulated end of the cable must “reach” the opposite wall. However, another scheme is also possible, when the cable begins to be laid from the end, starting from the opposite wall and moving towards the connection point.
- The next step is to install temperature sensors. They are placed between the “turns” of the cable, leading the wires to the baseboard and then to the point of attachment of the control unit. The number of sensors and their spacing are determined by the heating cable manufacturer.
- After fixing the heating cable and sensors, they are filled with a concrete screed up to 5-6 centimeters thick. Moreover, the screed is poured from the wall opposite the doorway. And in the process of leveling the screed, you cannot use needle rollers.
Installation of the connection point
The connection point is assembled as follows:

- The connection diagram for an electric heated floor requires the presence of a special unit - a control unit, to which both the wires from the temperature sensors and the heating element (cable) are connected. Therefore, the assembly of the connection point begins with the installation of the control unit box. It is mounted on a wall in which a groove is punched for laying the heating cable and wires from temperature sensors.
- The connection itself is performed sequentially - first, the temperature sensor wires are connected to “their” connectors, after which the heating cable is connected to individual connectors. And at the very end, a household electrical line, drawn from the central fuse of the apartment, is connected to the control unit.
It should be noted that connecting the control unit to a line drawn from regular socket- categorically not recommended. Indeed, in this case, you can “overload” the electrical wiring, creating a fire hazard. Therefore, the “warm floor” needs to be connected only to “its own” line, which is installed separately.
Laying film-type heated floors
Laying a film floor occurs a little differently than in the case of a cable analogue. After all, the film heater is placed directly under the floor covering, bypassing the stage of pouring the concrete screed. Otherwise, the entire operation is similar to the technology described above and occurs in the same three stages, the features of which we will consider below.
Preparing the base
The base for a film floor is prepared in the same way as for a cable analogue. Only completely different requirements are imposed on the quality of the operation: after all, the film can only be laid on a perfectly flat surface.
Therefore, before laying the film screen, a perfectly even screed is applied to the patched floor slab using self-leveling compounds. And “Penofol” is used as a screen, laying the strips end-to-end and fixing them with tape.
Installation of the heating element
The heating element of this floor is supplied in rolls. Therefore, before installation, it is cut into measured sections - strips, the length of which is measured from the point where the control unit is located to the opposite wall.
The measuring strips are laid parallel. The distance from the wall to the outermost strip is 10 centimeters. The distance from the walls to the end of the strips is 5-10 centimeters. The distance between adjacent stripes is one centimeter.
Moreover, the centimeter gap between the strips is useful for laying the cable for the temperature sensor, which is laid under the film.
Installation of the connection point
Installation of the connection point begins with crimping the terminals placed on the conductive strips of the film heaters. Moreover, the terminals are mounted on strips on the side of the wall on which the control unit will be hung.
Next, you need to punch a groove in the wall and lead wires from the temperature sensors and the terminals of the heating film itself through it to the body of the block. The connection is made in series - each wire goes into its “own” socket.
Finally, a waterproofing agent (polyethylene film) can be laid on the film and laminate flooring can be laid. But in the case of linoleum, you can do without a waterproofing agent.
Depending on technical characteristics cable, cable underfloor heating is of two types: resistive (constant heating of the cable occurs due to the resistance of the conductor when passing electric current through a conductor) and self-regulating(changes heating depending on own temperature and temperature environment).
Installation of a heated floor from a heating cable is carried out only under a screed, and therefore requires significant material and labor costs. However, with a competent approach to the selection of materials, professional installation and good thermal insulation of the selected room, the costs of materials can be significantly recouped by reducing costs with rational operation of the system. Let's look at what determines the functionality and reliability of the entire cable underfloor heating system.
As a rule, a cable underfloor heating kit consists of a heating cable, corrugated pipe, mounting tape, product data sheet and installation instructions.
Types of heating cables for cable heated floors
Single core heating cable(resistive) - one conductive core acts as a conductor and heating element. It is the most inexpensive type of heating cable, but requires more careful installation. Due to the fact that the current propagates through one conductor, it is necessary to close the circuit. To do this, installation conductors ("cold ends") are connected to the ends of the heating cable using couplings, which must converge at one point and connect to the control device (thermostat).
Twin-core heating cable(resistive) - two conductive wires act as a heating element, or one wire is heating, and the second is supplying (return). Connects the heating cores and insulates the cable - an end coupling, which is located at the end of a two-core heating cable. The two-core cable has one “cold end”, which greatly simplifies the installation scheme and there is no need to return the second end of the cable to the thermostat (thermostat). The cost of such a cable is higher than a single-core one.
Single-core and double-core heating cables are supplied in sections of a certain length, which cannot be changed due to the specific power generated by one linear meter of cable (the standard range is from 10 to 20 W/m). An increase in power density will lead to overheating and cable failure. The length of the supplied sections is from 10 to 110 meters, so, based on your calculations, you can choose a heating cable of the required length.
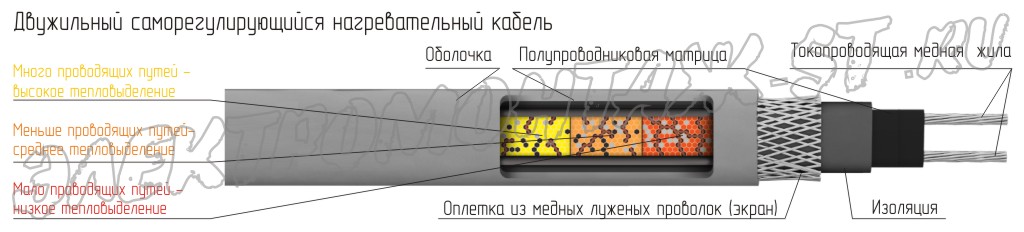
Twin-core self-regulating heating cable with a semiconductor matrix is significantly different from its resistive counterpart. In addition to two current-carrying wires located parallel to each other, in self-regulating cable there is a semiconductor matrix, which is a heating element. This design allows the cable to independently change the heating temperature, turning on or off various areas cable in accordance with the ambient temperature, as well as change the temperature of the floor heating in accordance with the air temperature. For example, if part of the wire passes under a window, if necessary, the heating in the cable sections will increase, and if part of the wire is under the carpet, then the heating intensity in this place will automatically decrease. A two-core self-regulating heating cable can be installed under furniture and carpets; overlapping the cable will also not cause it to heat up.
The cable installation is similar to resistive, with the difference that the cable length can be changed at your discretion and this will not lead to a change in its power density. The disadvantages include the limited service life of the semiconductor matrix, high starting currents (which obliges the installation of class C circuit breakers) and an extremely high price.
Once you have decided on the choice of heating cable, you need to draw up a diagram for laying the “warm floor”. In this case, it is necessary to take into account some rules:
- To connect a cable heated floor, it is necessary to lay a separate 220V power supply line with a wire with a cross-section of at least 1.5 mm 2, and install the appropriate one in the distribution board circuit breaker or RCD;
- the heating cable is connected to the power supply only through a thermostat (thermostat). Place it at a height of 500-1500 mm from the floor in a place where there will be constant unhindered access to it for monitoring and control;
- The temperature sensor is located under the screed at a distance of 0.5 m from the wall, placed in corrugated pipe and connects to the thermostat;
- Under no circumstances should heating cables intersect or form loops or twists;
- heating elements are never laid closely, the laying step should be greater than 6-10 outer diameters of the cable (the necessary parameters are usually indicated in the instructions);
- heating cables (except for self-regulating ones) are not placed under carpets, furniture and household appliances;
- indentations from the walls, metal structures and furniture elements must be at least 50 mm;
- distances from stationary heating devices of at least 100 mm;
- the entire heating part of the cable must be in a homogeneous material; the formation of voids in the screed is not allowed;
Calculation of the power of heating cables for heated floors
Calculation of thermal power consumption will depend on the purpose of laying the cable heated floor. When using a cable heated floor as an auxiliary heating system, 1 m2 will require from 110 to 150 W. And if you plan to use a heated floor as the main heating system, you will need 180 W or more. In many ways, the amount of heat will depend on the quality of the floor insulation and the thermal insulation of the room. Approximate calculations of thermal power for middle zone Russia, are given in the table.
Approximate norms of thermal power depending on the room
| Power of underfloor heating laid per 1 m2 | |
| Additional heating | |
| Kitchen, rooms (ground floor) | 140-150 W |
| Kitchen, rooms (not first floor) | 120-130 W |
| Bathroom | 140-150 W |
| Loggia, balcony | 180 W |
| Main heating | |
| Heating area is at least 70% of the total area of the room | 180 W |
Next, you need calculate the area for cable layout. From the total area of the room, we subtract the amount of areas on which installation will not be carried out (furniture, plumbing and all necessary indents). Having determined the actual area for installation, we multiply it by the norm for 1 m2 and get the total power of the electric floor.
Next you can calculate the length of the required cable: we divide the total power of the electric floor by the thermal performance of one meter of the selected heating cable (data for 1 m 2 is indicated in the product data sheet). And then choose a bay with a length as close as possible to the calculated figure.
 Particular attention should be paid to such monitoring and control elements as a thermostat and temperature sensor. They will have to be purchased separately, since they are not always included in the cable heated floor kit. The operation of the entire cable underfloor heating system will depend on these devices.
The thermostat (thermostat) can be either quite simple, with mechanical temperature control, or more complex electronic system control, which can control the temperature of the floor, air and have several operating modes.
Thermal sensor is a necessary element of a heated floor. It serves to record and transmit temperature data to the thermostat. With its help, the thermostat turns the system on/off, controls and maintains the required heating temperature, and also (depending on the thermostat model) can significantly reduce energy consumption.
 Cable heated floors can be installed in any room and under any floor covering. It fits best under tiles or porcelain stoneware. When laying tiles, choose glue and grout for heated floors; they are more elastic and have greater thermal conductivity. Laminate, parquet board or linoleum for cable heated floors must be selected without an insulation layer, marked “suitable for heated floors.” And remember that after installing a cable heated floor, rearranging the furniture in the room is practically impossible!
Installing a cable heated floor is quite a labor-intensive task, requiring some skills in construction and electrical work. Before making a decision, check out other options electric floors, perhaps you will find a “warm floor” option that is more suitable for you.
Company "Electromontazh- ST "will quickly, efficiently and with a guarantee install cable heated floors in your apartment or house.
Materials related