The Mitlider Greenhouse was created by an American hobbyist, a real agricultural specialist. Jacob Mitlider has done many experiments with greenhouse crops, seeking to obtain the highest and highest quality yield. Based on the results of his observations, he gradually improved the technology for creating a greenhouse structure. Now the structures called "American" are popular in many countries of the world, and the craftsmen assemble them on their own according to the drawings.
Pros and cons of a greenhouse according to Mitlider

Many are wondering why make such complex greenhouses, and even with a long slot. After all, the design is designed to maximize heat retention. However, this is where the Mitlider greenhouse has its advantage.

The problem of creating an optimal microclimate in any greenhouse is poor ventilation. Warm air, together with moisture, accumulates under the ceiling. In contact with the cold walls of the greenhouse sheathing, condensation forms. The physical phenomenon is dangerous for all plants, but tomatoes are especially affected. Natural ventilation through the windows and doors gives little positive results. If we take greenhouses longer than 6 m, then here the process is even more complicated. Even additional vents help a little. The air is ventilated unevenly.
At the farm greenhouse according to Mitlider, the ventilation problem is completely solved. This is her main advantage. The design is equipped with a transom at the top. Fresh air entering through it mixes with warm masses and falls to the floor. It turns out uniform ventilation of all areas. The same humidity and temperature are maintained. The microclimate created in the Mitlider design has a positive effect on the development of plants. In addition to the transom, no vents, hoods, fans need to be installed.
If we talk about the shortcomings, then Mitlider's greenhouse designs are expensive for the owner. Extra costs go to the creation of a reinforced frame. The disadvantages include the complexity of the device. To create a frame, experience is required. In addition, the Mitlider greenhouse design provides for the installation of a transom. For ventilation, the gap creates a big plus, but pathogens of dangerous diseases, such as phytophthora, are brought in through it by the wind.
Types of greenhouses according to Mitlider
Two types of Mitlider greenhouse structures are considered popular:
- The building with a gable roof is made by a house. The design is easier to build. Snow accumulations do not linger on the roof.
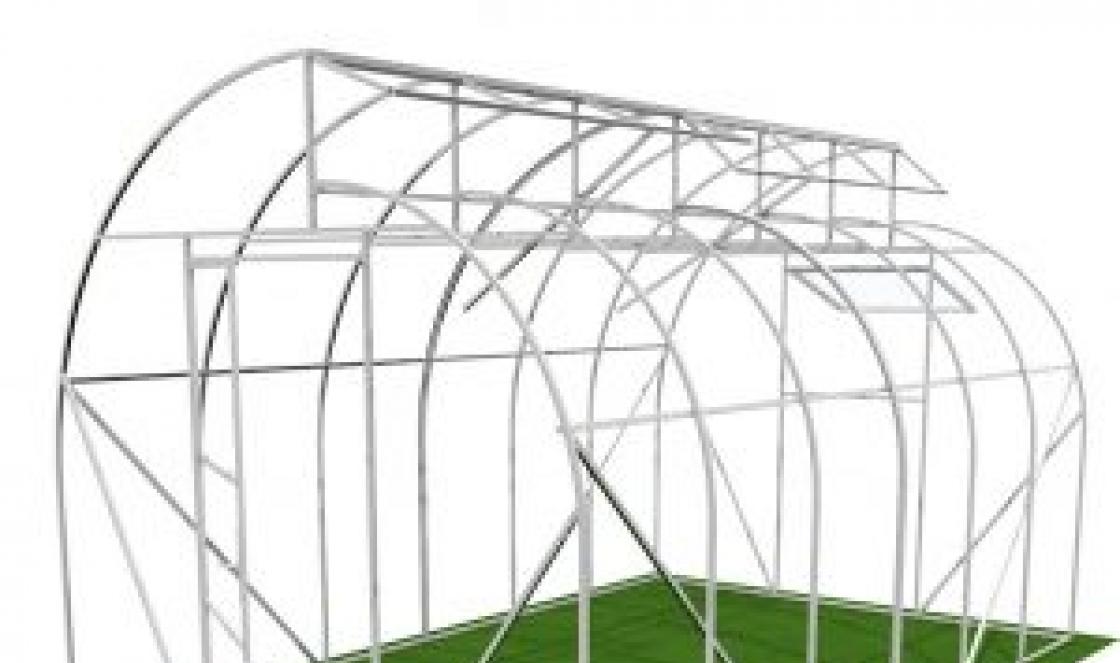
- The arched greenhouse according to Mitlider is considered difficult, since its frame requires bending pipes. However, a streamlined roof resists wind loads better.
If, during the independent manufacture of the frame, it is not possible to find access to a pipe bending machine, it is optimal to stop at a structure with a gable roof.
Materials and tools
Square pipes with 50x50 mm wall sides are considered a good material for the frame. You can use a beam. The base is assembled from elements with a section of 100x100 mm. For walls and roofs, beams with a section of 50x75 mm are used. The steel frame of the Mitlider greenhouse structure is sheathed with polycarbonate sheets. The wooden skeleton is often covered with a film.
Important! The metal frame is more often in demand in the construction of an arched structure. Gable houses are more convenient to assemble from a bar.
Metal greenhouses made of polycarbonate according to Mitlider are installed on a foundation of concrete blocks or a strip base is poured. A gable wooden structure is sometimes placed on a frame made of timber.
The set of necessary tools depends on what material is chosen for construction. If the design of the Mitlider is made of timber, then you will need a saw, a circular machine, a planer, a screwdriver, a grinder. To assemble the steel frame, you will first need a welding machine and a grinder. Additionally, you need a marking tool, a stepladder.
Greenhouse scheme according to Mitlider with dimensions
The complexity of the design does not allow mistakes in construction. For a greenhouse from a professional pipe according to Mitlider, it is better to find a ready-made drawing drawn up by specialists. A similar requirement applies to a wooden structure. If there is a need to adjust the "American" to fit your size, then the ratio of the proportions of width and length is taken 1: 2.

It’s easier to build a Mitlider wooden greenhouse with a house, where you can even do the calculations yourself if you have experience. The roof is designed so that on the north side the slope is 400 mm higher than the south. The gap resulting from the differences is equipped with vents.
According to the standard, the Mitlider design has a width of 6 m, and a length twice as large - 12 m. The distance from floor to ceiling at the highest point is 2.7 m.
Subject to the standards, the height of the walls is 2 m. The slope on the north side is made at an angle of 35 o. The slope of the slope on the south side is 20 o.
Mitlider greenhouse assembly instructions
Construction begins when the project is completely ready, materials are purchased. The design of the Mitlider is complex. In order to avoid mistakes, during the construction it is necessary to strictly observe the sequence of actions.
Choosing a plot for a greenhouse
Work begins with the selection and preparation of the site. The Mitlider design, like any other greenhouse, is placed in a bright area well lit by the sun. Choose a hill or a plain, but not a depression. Otherwise, melt and rainwater will flood the greenhouse. If the site has a complex terrain with numerous slopes, they resort to terracing technology. The site is equipped on one of the slopes.
Important! When preparing the site, you need to remember that the greenhouse should be in the direction from west to east.
Foundation pouring
For a reinforced Mitlider greenhouse with a metal frame, a concrete foundation is being built. Ready-made blocks will go under the base, but it is difficult to mount them, as lifting equipment will be required. It is easier to fill the strip foundation. First, markings are made on the site with pegs and cords, and a trench is dug. The bottom is covered with sand with crushed stone 15-20 cm thick. The sides of the trench are covered with roofing material. A reinforcing frame is connected from the reinforcement. Lay the metal structure in the trench. The side walls of the frame should not touch the roofing material. Usually they make a gap of about 5-10 cm. Formwork is installed above the trench, concrete is poured.
Advice! The steel frame of the greenhouse to the concrete base can be fixed with anchors or the metal embedded elements to which it is welded can be walled up in advance.
A wooden greenhouse is placed on the beam according to Mitlider, but first a trench is dug under the base in the same way. So that the wood does not quickly rot, it is impregnated with protective solutions. The beam in the trench is subjected to reliable waterproofing.
In the video, an example of laying the foundation for a greenhouse:
wooden frame
The step-by-step assembly of the frame of the Mitlider greenhouse structure is shown in the photo. The process is similar to building a wooden shed. First of all, the lower frame is assembled from a thick beam. A similar strapping of the greenhouse racks will be at the top. At the corners, the timber is connected with screws, bolts or nails. A reliable joint will turn out if you make gashes.
Racks are placed in all corners, every 60-80 cm around the entire perimeter of the future greenhouse and necessarily additional elements in the places where the doorway is formed. Connections are reinforced with mounting angles. To prevent the frame from loosening, jibs are placed between the uprights. You can install 2 elements on each long wall in the form of the letter "V". One end of the braces rests against the upper opposite corners of the wall, and the other two edges converge at one point at the bottom in the center of the wall.
Profile pipe frame

The principle of manufacturing a greenhouse according to Mitlider from a metal profiled pipe differs only in that the elements will have to be welded together. The vents for the transom are welded from a profile of a smaller section, fastened with hinges, but this work is done when it comes to the roof. The doors of the greenhouse are similarly made from a profile with a section of 20x20 mm.
Important! A properly built greenhouse should have three transoms. It is difficult for an inexperienced welder to make them.
roof construction
The elements of the roof of the greenhouse are assembled on the ground, and then lifted onto the frame. The number of rafters matches the number of intermediate racks. The elements are assembled so that the slope on the north side is steeper and is 400-470 mm higher than the opposite slope on the south side.
The finished rafters are alternately placed on the frame of the Mitlider greenhouse, set according to the level, fixed with temporary struts. If these are wooden rafters, then they are fastened to the timber frame with nails, reinforced with mounting corners. The metal elements of the greenhouse are welded to the steel frame. You can make a bolted connection. At the junction of the slopes, a bar or profile is provided (depending on the type of frame) to fix the transom windows. When the truss system of the Mitlider greenhouse will stand securely, the temporary supports are removed.
Greenhouse sheathing with polycarbonate
Frame glazing begins with polycarbonate cutting. Fragments are cut out of the sheets first for the roof of the greenhouse. Mark fixing points with self-tapping screws. Holes are drilled on polycarbonate. Their diameter should be 1-2 mm more than the thickness of the screw part of the self-tapping screw. If the frame is metal, then holes will similarly have to be drilled on its elements, but of a smaller diameter. The self-tapping screw must be tightly screwed into the body of the profiled pipe.
Polycarbonate is laid with a small gap in case of expansion. The joints of the sheets are closed with a docking profile. Similarly, the ends of the polycarbonate are closed with plugs to prevent water and dirt from entering the cells.
After the roof, they begin to glaze the walls of the Mitlider greenhouse. Polycarbonate is fixed so that the inner cells are vertical. In the event of condensation, moisture will flow through them. Lastly, end walls, transoms, doors are sheathed.
More information about working with polycarbonate is shown in the video:
Interior arrangement

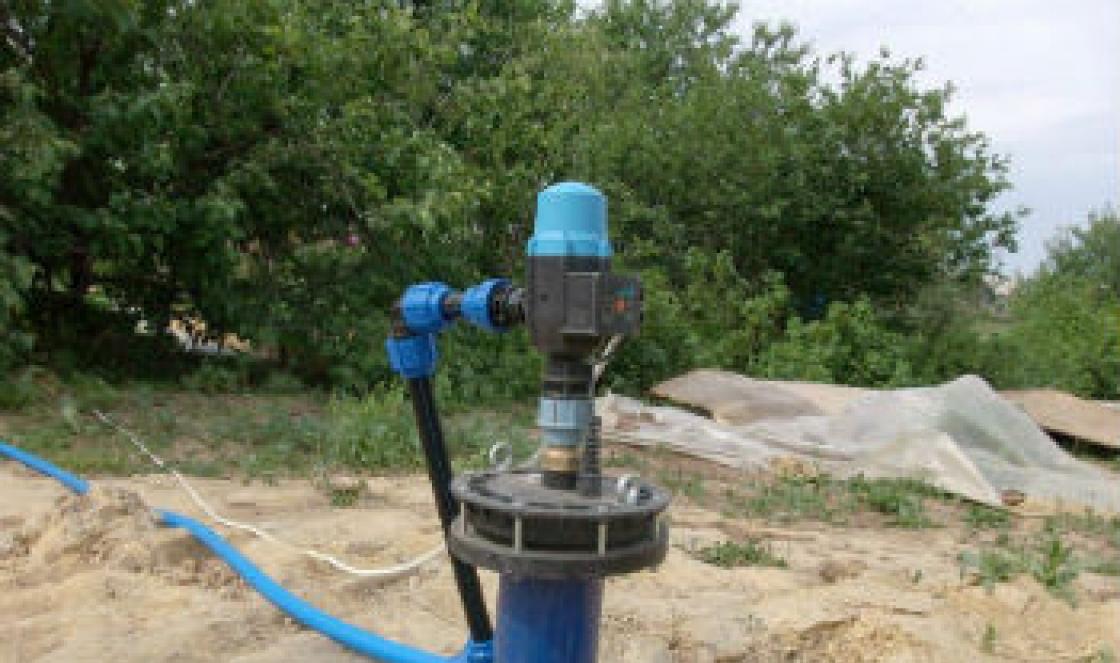
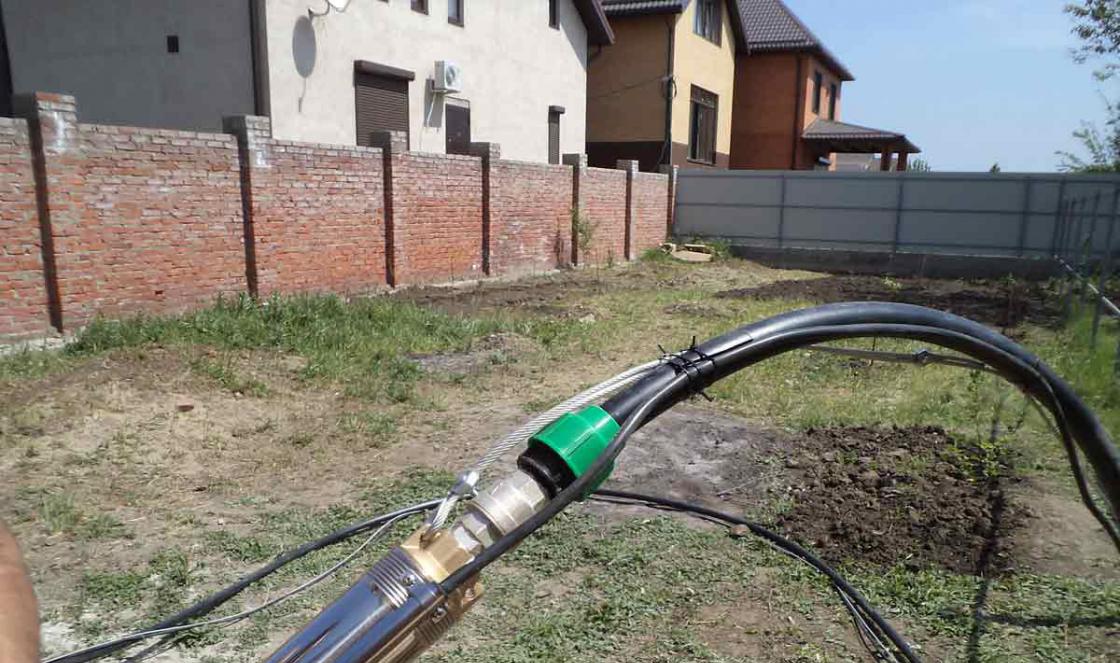
When the frame of the Mitlider structure is glazed, proceed to the internal arrangement. Inside the greenhouse they conduct electricity, hang artificial lighting lamps. Plumbing is used to water the plants. Large greenhouses along the Mitlider are especially in need of autonomous water supply. Manually watering many beds is quite difficult.
Before starting the interior arrangement, they think over the layout. The beds are arranged according to a convenient scheme, for example, along the walls and in the center. Between them make a track with a hard non-slip coating. It is necessary to install heating in a greenhouse according to Mitlider if it is intended to be used all year round or to obtain ultra-early harvests.
Conclusion
The Mitlider greenhouse has many supporters and opponents. To decide whether such a design is needed, it will not be superfluous to read the reviews of the owners.
One of the main criteria for the proper growth and productivity of crops is the effective ventilation of the greenhouse. In agricultural practice, different types of greenhouses are used, however, to create a favorable microclimate, it is better to use a greenhouse of a special design, like the Mitlider greenhouse. Given the simplicity of this structure, it is quite possible to build it with your own hands.
What is it, description of the design, difference from conventional greenhouses
The greenhouse according to Mitlider is a greenhouse of a cubic or arched shape. Due to the special design of the roof slopes and the arrangement of windows for ventilation, a high-quality air exchange takes place inside such a structure.
American Doctor of Agricultural Sciences Jacob Mitlider proposed to make a gable roof in such a greenhouse, with a vent, in which each inclined plane is located at a different height.
These design features distinguish the Mitlider greenhouse from simple greenhouses. Conventional greenhouses are ventilated with open doors. In this case, part of the warm air stagnates under the ceiling, creating an unfavorable atmosphere. In the Mitlider design, warm flows freely exit through the ventilation in the roof, being replaced by fresh air masses.
To cover these greenhouses, a double layer of polyethylene is allowed, provided that the distance between each of them is 5 cm.
Mitlider's greenhouses in the form of arches have gained great popularity. The design of this form is much easier to manufacture, and it is more convenient to maintain it. Due to the rounded shape of the ceiling, warm air currents are better removed, leaving room for fresh air.
Greenhouse according to Mitlider: calculations and project drawings
Before carrying out all construction activities, it is necessary to choose the right place for the construction of this structure. The site for the Mitlider greenhouse should be well lit by the sun. For development, it is preferable to choose land with a flat surface. The site must be cleared of debris, stones and roots.
If the greenhouse will be built on a slope, then you need to take care of creating terraces. The walls of such steps must be strengthened to avoid slipping of the soil masses.
At the preparatory stage, it is extremely important to determine the cardinal points, since the structure should be located from west to east.
The standard dimensions of this greenhouse are 6 m wide, 12 m long, and 2.5 to 2.7 m high. These parameters define the classic version of the structure, but are not limiting. This makes it possible to build a greenhouse in accordance with the size of the site. The optimal material for its coating is cellular polycarbonate.
Any building, even as simple as a greenhouse, requires drawing up drawings and diagrams.
The durability of the structure and the properties of the microclimate inside it depend on the correctly chosen material. Since the light penetrating coating is placed on all sides of the Mitlider greenhouse, it is extremely important to choose a quality material for this.
Cellular polycarbonate
The most popular and effective coating for greenhouses and greenhouses is cellular polycarbonate.
When choosing a cellular polycarbonate used for structures of this kind, you need to pay attention to the following points:
- The thickness of the sheets and their light transmission. For the Mitlider greenhouse, polycarbonate with a thickness of 6 to 8 mm should be used. These material parameters are most suitable for creating a favorable microclimate inside the greenhouse. A sufficient amount of sunlight necessary for the normal life of plants penetrates through such sheets. In the cold months of the year, walls made of material with such parameters prevent the rapid cooling of the air inside the greenhouse. For regions with a cold climate, it is necessary to use a material with a thickness of 8 to 10 mm. Cellular polycarbonate with a thickness of 4 mm is not used for such greenhouses and greenhouses, since its thermal insulation properties do not meet the requirements of cultivation. Thin sheets are more suitable for decorative design and finishing work. The light transmission of this material is almost as good as glass, which is only 10% lower than it.
- Resistant to moisture, sunlight and temperature extremes. When purchasing a coating, you need to ask about its chemical composition and characteristics. Preference should be given to more expensive polycarbonate, since cheap material after a while can burn out in the sun, become cloudy from exposure to water, or become cracked after the first wintering. To avoid these unpleasant moments, a protective film layer is applied to the material. In any case, you will have to buy high-quality, and accordingly expensive coverage.
- Flexibility. This criterion is especially important in the manufacture of arched structures.
- thermal insulation qualities. If you choose a high quality material, then there is no need to use additional insulating layers.
- Manufacturer firm. To date, well-known manufacturers of cellular polycarbonate are the following companies:
- Polygal is an Israeli manufacturing company that has become an innovator of this type of product;
- Palram is a joint German and Israeli company;
- Brett Nartin is an English firm;
- Poligal Vostok is a Russian-Israeli manufacturer.
Despite the effectiveness and popularity of cellular polycarbonate, this material has advantages and disadvantages.
Table: pros and cons of cellular polycarbonate
Wood is used for the frame, as well as pipes made of metal, polypropylene or polyvinyl chloride. Each material is widely used for the construction of such greenhouses, however, their individual characteristics differ significantly.
wood frame
Due to the high humidity inside the greenhouse, the wooden frame will quickly become unusable. Mold and fungal formations will appear on all elements and details of this design. In this regard, before using the material for the construction of greenhouses and greenhouses, it must be treated with special antiseptic impregnations, mastics and biocides. An important condition for such substances is the absence of toxic compounds that will poison the soil and crops. Therefore, the wooden frame of greenhouses is treated with oil-based preservatives.
An important role is played by the type of wood, which is more resistant to the specific environment of the greenhouse. For this purpose, it is necessary to use bars made of oak, hornbeam, beech, spruce, pine.
When buying this material, you should ask about its moisture content, which should not exceed 20–22%. To determine this degree, you can use a special measuring device - a moisture meter.
Also, during the acquisition, you need to inspect the bars in order to detect traces of woodworm insects.
Bars should not contain many knots, cracks and chips of wood.
Table: the pros and cons of wood
Frame made of polypropylene or PVC
These materials are plastic alloys. Pipes made of polyvinyl chloride (PVC) or polypropylene (PP) are used for the manufacture of water and sewer channels. This material is used in mechanical engineering, electrical engineering, construction. Due to their properties, such pipes have found application in the construction of greenhouses and greenhouses.
The main criterion for choosing such pipes is their stiffness and wall thickness. Too thin pipes will not hold their shape well.
Table: the pros and cons of greenhouses, the frame of which is made of polypropylene or PVC pipes
| Advantages | Flaws |
|
|
Metal carcass
The designs of greenhouses according to Mitlider from metal tubes have gained great popularity. This material allows you to make structures of any shape.
Table: advantages and disadvantages of Mitlider greenhouses with a metal frame
Calculation of the required amount of material, necessary tools
To eliminate unnecessary costs or troubles with a lack of materials, it is necessary to make a calculation according to their quantity. For the construction of the greenhouse according to Mitlider, a project with a frame made of wood with a polycarbonate coating was chosen. The structure will be located on a concrete foundation (strip or pile). The greenhouse will be made with dimensions: height - 2.7 m, width - 3 m, length - 6 m.
Foundation calculation
To lay the foundation, you will need concrete grade M 200, sand, reinforcement and roofing material.
The sand poured into the trench and the poured concrete will have the shape of an elongated parallelepiped. To calculate the volumes of these materials, you need to remember the school geometry course and use the formula for finding the volume of a cube, which looks like this: V \u003d h³, where h is the width, height and length of the figure.
For convenience, calculations will be made separately for each side of the perimeter, and the results will be added up.
The sand will be filled into a trench 200 mm wide with a layer height of 100 mm. These figures must be converted to meters. Substitute the values: 0.2∙6.0∙0.1=0.12 m³ sand is required for one side of the foundation 6 m long. Since there are two of these sides, then: 0.12∙2=0.24 m³.
Now you need to calculate the volume of sand on two sides 3 m long. To do this, subtract the width of the two-perpendicular tapes (0.2 m each) from three meters: 3.0–0.4 \u003d 2.6 m. Calculate the volume of sand for these sides : 0.2∙2.6∙0.1=0.052 m³. Since there are two of these sides: 0.052 ∙ 2 \u003d 0.104 m³.
We add up the volumes of the sides: 0.24 + 0.104 = 0.344 m³ will require material to create a sand cushion of a concrete base.
According to the same formula, the volume of the concrete mixture is calculated. The width of the foundation tape will be 0.2 m, the height is 0.3 m. As in the first case, the calculations will be made separately for each side of the perimeter. We make the calculation: 0.2 ∙ 0.3 ∙ 6.0 \u003d 0.36 m³. We multiply this value: 0.36 ∙ 2 \u003d 0.72 m³, concrete will be required for two sides of the foundation 6 m long.
We make a calculation on two sides of the base, the length of which is 3 m each. Let's substitute the values: 0.2 ∙ 0.3 ∙ 2.6 \u003d 0.156 m³. We multiply this figure by two: 0.156 ∙ 2 \u003d 0.312 m³.
Now it is necessary to add up the results of calculations on all sides of the perimeter of the concrete base: 0.72 + 0.312 \u003d 1.032 m³, a concrete mixture will be required to fill the strip foundation of the Mitlider greenhouse.
Calculation of cellular polycarbonate
To determine the total number of polycarbonate sheets, it is necessary to make calculations for each side of the greenhouse. For calculations, you need a formula for calculating the area of \u200b\u200ba rectangle, which looks like this: S \u003d a ∙ b, where a is the height of the figure, b is its length.
Let's make a calculation for two sides, the length of which is 6 m each. Let's substitute the values: 6.0∙2.2=13.2 m². Since the structure has two similar sides: 13.2∙2=26.4 m².
Calculation for two sides 3 m long: 3∙2.2=6.6 m². Multiply by half: 6.6∙2=14.52 m².
Let's do the calculations for the roof. First, we calculate a roof section with parameters of 1.87x6.0 m. Let's substitute the values: 1.87∙6.0=11.22 m². Now for the second section of the roof: 1.55∙6.0=9.3 m².
Having calculated the area of all sides of the structure, it is necessary to add the obtained values: 26.4 + 14.52 + 11.22 + 9.3 = 61.44 m².
Sheets of cellular polycarbonate must be purchased with a margin, as this material will be required for finishing the sides of the roof, vents and doors.
Reinforcement calculation
To strengthen the tape base, it is reinforced with metal rods. For this, reinforcement with a thickness of 0.8 cm is used. A three-dimensional frame is made from it, in which the rods are fixed with connecting elements of a similar material. The size of one such detail is 15x20x15x20 cm or 70 cm of its total length. These elements are located in the frame at a distance of 30 cm from each other.
Now you need to find out how many connecting elements are required for the entire perimeter: 36: 0.3 = 120 pieces. To find out the total length of all elements, you need: 120 ∙ 0.7 \u003d 84 m.
The total length of all reinforcement for strengthening the foundation: 36 + 84 = 120 m.
Wood calculation
The design of the greenhouse according to Mitlider provides for the presence of vents (transoms) located at the junction of the roof slopes, as well as on the sides. In a structure 6 m long, a continuous transom or several separate vents are usually made. This length of the greenhouse allows you to make 4 vents 150 cm long, 30 cm high. The sides of the greenhouse are equipped with two or three vents with these parameters.
For the manufacture of a greenhouse frame, wood of the following sizes will be required:
- For the manufacture of vertical racks - bars, section 100x150 mm, length 220 cm, in the amount of 18 pieces.
- For the supporting frame (roof) - bars with a similar section, 270 cm long, in the amount of 4 pieces.
- For the manufacture of the truss system, a material with a section of 55x80 mm is required: 5 bars 200 cm long and 5 more pieces 140 cm each.
- For the manufacture of the lower harness, bars with a section of 100x150 mm are needed: 2 6 m long and 2–3 m.
- For the upper strapping, bars with the same length are needed, but with a section of 100x100 mm.
- For the manufacture of vents, bars with a section of 60x60 mm are needed:
- 14 pieces of 150 cm;
- 14 - 30 cm.
- For the manufacture of doors, bars with the same cross section:
- 4 pieces with a length of 200 cm;
- 4 - 75 cm each.
Required Tools
When building a Mitlider greenhouse, you will need the following tools:
- Bayonet and shovel.
- Concrete mixer.
- Water tanks.
- Sleeve for pouring concrete.
- Hacksaw.
- Hammer.
- Screwdriver.
- Yardstick.
- Plumb.
- Building level.
- Big square.
- Sander or sandpaper.
- Molar brush.
- Bulgarian.
- Perforator.
- Electric jigsaw and file with fine teeth.
- Sharp construction knife.
- Cord with stakes.
- Pencil or marker.
Do-it-yourself step-by-step instructions for building a Mitlider greenhouse
After making the calculations and purchasing all the necessary materials, you can proceed with the construction of the greenhouse according to the Mitlider:
- Make markings on the prepared plot of land. To do this, you need to pull the cord, which is fixed to the stakes. In order for the shape of the future foundation to have a strictly planned (rectangular) shape, it is necessary to check the markup. To do this, a cord is pulled diagonally from the corners of the perimeter. If the intersection is in the middle of the rectangle, then the markup was done correctly.
- Dig a trench 20 cm deep and 20 cm wide along the marking perimeter. Its bottom must be rammed and the walls leveled.
- Pour sand inside the trench to form a layer 10 cm thick. Tamp it down. It should be noted that wet sand compresses better.
- On top of the sand cushion, lay a waterproofing layer around the entire perimeter. For this, roofing material or thick polyethylene folded in several layers is used. Waterproofing should cover not only the top of the sand layer, but also the walls of the trench.
- Formwork is made from boards, plywood sheets or OSB boards. The height of its side should be at least 25–30 cm. So that the formwork structure does not fall apart under the pressure of uncured concrete, it must be strengthened. For this, various spacers and stops are used.
- To strengthen the tape base, it must be reinforced. To do this, make a three-dimensional frame from reinforcing bars 0.8 cm thick. Intersections can be fixed by welding or twisted with wire. The connecting elements are made of the same material. Therefore, to cut them, you need a grinder. They look like a rectangle, the dimensions of which are 15x20 cm. These parts must be placed at a distance of 30 cm from each other inside the entire perimeter of the reinforcing frame. It should be noted that the metal structure should not touch the waterproofing layer. Therefore, it is installed on bars or fragments of bricks, 3–5 cm high.
- Now you can pour the concrete base. To do this, you need to use a mixture of brand M 200. To facilitate your work when pouring, you must use a special sleeve through which the mixture will flow directly into the formwork. The incoming concrete mixture must be raked with a shovel. Thus, air bubbles are removed from the liquid foundation, and the concrete is evenly laid inside the trench. The mixture should completely cover the metal structure. The height of the tape base is 30 cm. Its upper part will rise 20 cm above ground level. It should be noted that the filling must be carried out immediately around the entire perimeter. Layer-by-layer laying of the mixture is allowed.
- When the concrete base is poured into the formwork, it must be covered with a waterproofing material. Such a layer will prevent the rapid evaporation of moisture, and protect it from drying out under the rays of the sun. It should be noted that the first two days, every 10-12 hours, you need to open the waterproofing for 20-30 minutes. This will ensure uniform hardening of the concrete mixture. After 4-6 days, the foundation will completely harden.
- When the tape base becomes solid, it is necessary to remove the formwork. Clean the top surface of the base from debris, dust and protruding particles.
- Lay a layer of roofing material on top of the concrete tape. It will protect the wooden frame from moisture.
- From the bars with a section of 100x150 mm, make a rectangular frame of the lower harness. The joints of the material are made using the method in half a tree. Fasten the bars with nails.
- Install the bottom trim on the foundation.
- Drill holes in the corners of the bottom trim to install anchor bolts. Such holes must be made every 120–150 cm. The bolts will hold the entire structure.
- Install the corner posts of the frame (beam 100x150 mm). To keep them vertical, it is necessary to use pins and slopes.
- Install the rest of the racks. The distance between them should be 75 cm. The wood joints must be reinforced with metal corners.
- From the bars with a section of 100x100 mm, make the upper harness. To do this, in the bar, every 75 cm, make grooves for complete cutting. The result is a part that must be installed on the upper ends of the vertical racks.
- Install 4 support posts supporting the roof.
- From bars with a section of 60x60, make and install vents and doors.
- Install the rafter system using bars with a section of 55x80 mm, 200 and 140 cm long. Use metal plates and corners as connecting elements.
- Using a jigsaw and a fine-toothed file, cut the polycarbonate sheets to the required length.
- Using an electric drill, prepare holes in these sheets for further screwing them to a wooden frame. For fastening this material, it is necessary to use self-tapping screws with a rubber gasket. During installation, polycarbonate sheets should not be strongly clamped with self-tapping screws. Having a cellular structure, this material is easily damaged. When installing this coating, it is important not to confuse the inner and outer surfaces of the material, since only one side of it is covered with a protective film.
- After installing polycarbonate, it is necessary to check the entire structure in order to eliminate cracks and gaps in the coating.
Since the microclimate favorable for growing is organized inside the Mitlider greenhouse, every centimeter of the internal space must be effectively used. The surface for growing crops can be placed not only on the floor.
From wood or plastic, you can make racks or shelves in which you can grow any crop.
A convenient alternative to such designs are PVC pipes of large diameter. This material is cut lengthwise. The result is a chute into which soil can be poured and useful herbs can be grown.
PVC pipes can be used in a vertical position, if round holes are cut at a small distance from each other, and, for example, strawberries are planted inside.
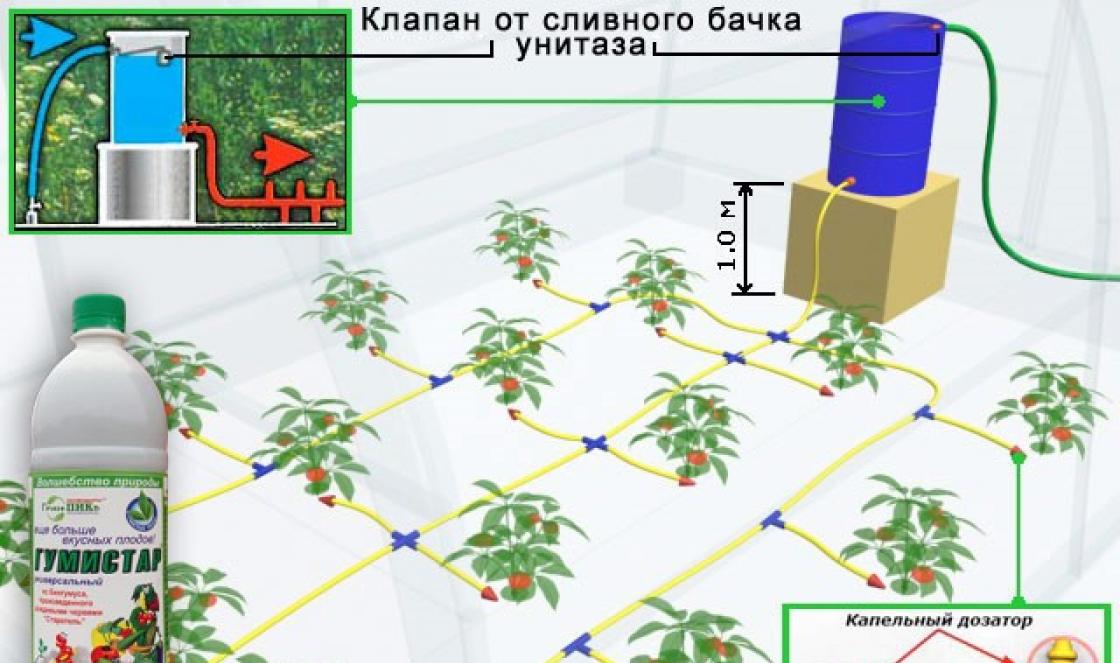
Watering such a bed will be carried out through a tube with small holes of a smaller diameter, inserted into the middle of the main pipe. The space between the pipes is filled with earth. Such a bed will not take up much space.
In this greenhouse, you can stretch cords vertically, which will give direction for the growth of tomatoes, cucumbers, beans or other vegetables.
Video: we build our own greenhouse
Having built the Mitlider greenhouse with your own hands, you organize high-quality ventilation and a favorable microclimate for cultivated garden crops. Your hard work will be rewarded with a bountiful harvest.
Evgeny Sedov
When hands grow from the right place, life is more fun :)
Content
Farming should be not only productive, but also minimally costly. The Mitlider greenhouse was designed specifically for this purpose. It is easy to mount and provides all the conditions for the rapid growth of crops. The price of the structure is relatively affordable. Especially if you collect it yourself.
What is a Mitlider greenhouse
This is a medium-sized greenhouse with vertical walls and a gable roof. Moreover, the levels of its slopes differ: one of them is higher and is located to the north, and the other is lower, facing south. In the middle of the roof (at the junction of the slopes) a vertical wall with transoms is built. They provide ventilation - the warm air accumulated in the greenhouse rises and exits through these openings. Ventilation is provided by vents on the "southern" wall.
The design of this greenhouse was developed by the American agricultural engineer Jacob Mitlider. He is the author of many ways to grow and transport various crops. Its main achievement is the creation of a new alternative to conventional greenhouses. Such designs are also common in domestic regions - our gardeners call them "American".
Features of the Mitlider greenhouses
The greenhouse of an American specialist is equipped with a roof that does not close in the area of \u200b\u200bthe ridge. This technology provides vertical circulation of air masses, preventing them from stagnation. The transoms between the slopes face south. So the plants are protected from hypothermia during ventilation. The rest of the advantages of Mitlider's greenhouses lie in smaller nuances:
- Efficient ventilation. Air vents located along the entire length of the southern wall provide a balanced air exchange inside the greenhouse.
- Condensation protection. The wood from which the American frame is traditionally made prevents the accumulation of moisture.
- Dimensions. The volume of the structure allows you to maintain an optimal microclimate. The height of the greenhouse provides comfort for the person inside it.
- Strength. The rigidity of the structure is provided by braces and beams along the perimeter of the frame. Snow covers and gusty winds are not a threat to the greenhouse.
- Mobility. The collapsible "American" can be completely reinstalled to another suitable point using only the drawing of the greenhouse.
Given the advantages of a greenhouse, it still cannot be called ideal. The design has several disadvantages:
- The Mitlider greenhouse is an affordable option, but not frankly cheap either. The construction of the frame will require a large amount of materials.
- Inconvenient opening of transoms located at the junction of the roof slopes.
- Snow settles only on one side of the greenhouse. So the structure can warp if it is built on an uneven site.

Constructions
Any greenhouse according to Mitlider is built either from metal profile pipes with a section of 50x50 mm, or from wooden beams (75x100x50 mm). There are three options for the design of the "American":
|
classical |
Vertical walls, gable roof and only one vent at the junction of the roof slopes. |
|
Classic Enhanced |
The design is similar to the previous one, but several transoms are already installed at the junction of the slopes. The south wall along its entire length is equipped with vents. This scheme provides intensive and uniform air exchange inside the greenhouse. |
|
Easy to install and not so effective in terms of ventilation. The rounded roof of the greenhouse traps some of the warm air underneath. It can only be vented with fully open doors and transoms. |
Construction of Mitlider's greenhouse
The parameters of the building can be changed at your discretion. The standard dimensions are defined in the following calculation:
- width - 6 meters;
- length - 12 meters;
- height at the peak point - 2.7 meters;
- wall height - 2 meters;
- the slope of the northern slope is 35°;
- the slope of the southern slope is 20°.
If you still change the parameters of the greenhouse according to the Mitlider method, then it is desirable to leave its width as standard. Otherwise, the load from the snow cover settling on the roof will increase. When the drawing is ready, you can start building a greenhouse. Construction work is carried out using a screwdriver, a jigsaw / saw, a Phillips screwdriver, a tape measure with a pencil, a level and a stepladder.
Location selection
The construction of the greenhouse begins even before the purchase of materials. First, a suitable point is determined for it. The place is selected according to the following criteria:
- Flat landscape. The greenhouse can also be placed on a slope, but before that it needs to be terraced.
- Orientation to the cardinal points. The upper slope of the "American" should be directed to the north, the lower - to the south. The ends face west and east.
- Avoid the northern slopes of hills. The temperature in such places is below the norm by 2-3 ° C, which negatively affects the yield inside the greenhouse.
- Avoid shading. Trees, buildings and other objects blocking the sun's rays are undesirable.
- Lowlands and peat soils are not the best substrate. The reason for this is the colder air in these places.

erection
If the frame of the greenhouse is built from wooden materials, then they must be pre-treated with drying oil or an antiseptic. Such a coating will significantly increase the durability of the building. The full material base for the "American" is as follows:
- bars 10x10 cm - 10 pieces 2.15 m long and 5 pieces 3.05 m long;
- bars 5x5 cm - windows;
- boards 2.5x20 cm - spacers and lower parts;
- bars for a skate with guides;
- boards 30x60 cm - beds;
- film or polycarbonate;
- screws, nails, rails.
The best construction algorithm is a clear example. The sample will be a standard Mitlider greenhouse measuring 3x6 m:
- The first step is the installation of the foundation. The perimeter of the future greenhouse is furnished with racks of bars 2.15 m long, deepening them into the ground by 40-45 cm. The installation step for the side walls is 1 m, for the end walls - 0.7 m. The bars are leveled in height using a level.
- The central ridge posts are installed using bars 3.05 m long. The installation step is 2 m.
- Frames for vents are mounted on central supports using 5x5 cm bars.
- The upper trim of the frame is made of the same beams, the lower one is made of boards 2.5x20 cm. The structure is reinforced with slopes mounted on the end walls.
- Next, frames are assembled from 5x5 cm bars and the window vents are installed.
- Rafter installation. The step for a greenhouse sheathed with polycarbonate is 1 m, and in the case of a film - 0.5 m.
- Arrangement of ridges inside the structure. Their frames are assembled from boards 30 cm high and 60 cm wide. A 3x6 m greenhouse contains 3 such beds.
- The free space between the ridges is 60 cm - these will be the tracks. The stability of the paths will be provided by stakes. They are driven into the ground, attaching the sides of the beds to them with the help of self-tapping screws.
- Ready beds are covered with soil and fertilized.
The final step is sheathing the frame with a film or polycarbonate. The first option is applied in two layers, leaving an empty space of 5-7 cm between them. This protects the plants in the "American" from the cold. Polycarbonate is fixed in one layer with screws. Holes for them in the frame of the greenhouse are prepared in advance. Sheets from the factory must be coated with a special layer. It is a protective substance with a blue tint. It protects plants in the greenhouse from ultraviolet radiation.

Do-it-yourself greenhouses according to Mitlider
The frame can be assembled from different materials. Two options won popular popularity:
- wooden bars and boards;
- metal profile pipes.
The material of construction also affects the method of sheathing. If the frame is made of a metal profile, then it is fixed with metal screws. The wooden structure is sheathed with a stapler or nails. The cover can be polyethylene film or polycarbonate sheets. Both options differ from each other both in characteristics and in cost.
Polycarbonate
Efficient and inexpensive plating option. Polycarbonate is stronger and more durable than polyethylene film. Its main advantage is that it keeps the heat inside the greenhouse better. Although this does not eliminate the material from obvious shortcomings:
Another disadvantage of polycarbonate over film is that it is more difficult to choose. Several material parameters must be taken into account:
- Sheet thickness. The optimal value for the Mitlider greenhouse is 6-8 mm. Regions with a cold climate require a thicker coating - 8-10 mm.
- Resistant to adverse effects. Moisture, temperature changes, sunlight - none of this should affect the material. Manufacturers of high-quality durable polycarbonate cover it with a special protective layer. Cheap products burn out in the sun, become cloudy from condensation and crack after the first wintering.
- Flexibility. This parameter is especially relevant for covering arched greenhouses.
from wood
Such a frame will cost less than pipes made of profiled metal. The disadvantage of the material is that high humidity is harmful to untreated wood. It will simply become covered with a fungus and become unusable. Drying oil or antiseptics will help to avoid this. Bars coated with a protective substance will last longer. The general picture of the material is as follows:
Any wood needs pre-treatment. This does not mean that different bars are no different from each other. The choice of such material consists of the following criteria:
- Type of wood. Oak, spruce, pine, beech and hornbeam are the most sustainable options for greenhouse conditions.
- material moisture. It should not exceed 20-22%. This parameter is determined by a moisture meter.
- No knots, cracks, chips or wood-boring insects.
Video
Did you find an error in the text? Select it, press Ctrl + Enter and we'll fix it!» From the material presented by the author, you will learn how to independently build a greenhouse according to Mitlider. The design feature is that the shape of the roof has 2 slopes, while they are not symmetrical and are located at different angles. The main feature is that due to this geometry, a gap is formed between 2 slopes, where it is necessary to place transoms for ventilation and natural air circulation in the greenhouse.
Attention! Ventilation windows should be located and look exclusively on the south side, so that cold air does not blow in. The opposite side of the roof is naturally to the north.
As everyone knows very well, greenhouses accumulate a lot of carbon dioxide CO 2, which adversely affects plant growth. It is precisely for this reason that the American Professor of Agricultural Sciences Joseph R. Mitlider developed and successfully implemented this feature in the design of greenhouses in professional vegetable growing.
Also in the greenhouse it is desirable to have a warm floor and narrow beds about 45 cm wide, this will also give an indisputable plus in the course of growing vegetables. To cover the greenhouse, you can use plastic film, glass or polycarbonate, a fairly good material.
And so, let's consider what exactly the author needed to build a greenhouse?
materials
1. timber 100x100
2. polycarbonate
3.board 30mm
4. nails
5. self-tapping screws with a press washer
6. foam
7. corrugated pipe
8. furniture and door hinges
9. bolts
Tools
1. shovel
2. jigsaw
3. drill
4. screwdriver
5. hammer
6. tape measure
7. level
8. corner
9. hacksaw
10. ladder
Step-by-step instructions for building a greenhouse according to Mitlider.
And so, the first thing to do is to study the drawings and diagrams presented by the author, the most important thing here is the angles at which the slopes are located, they must be observed, because this is very important.


In each individual case, the dimensions will naturally be different, because someone has a large plot and needs a large greenhouse, and on 6 acres, of course, a compact and small greenhouse is needed, the main thing here is to observe the slope angles and location, transoms to the SOUTH and the opposite side naturally to the NORTH, this is necessary so that cold wind does not enter the greenhouse through the transoms.
After the diagrams and drawings are drawn up, it is required to choose the best place on the site, naturally it should be sunny and not darkened. Next, you should clear the building perimeter from shrubs, debris, stones and other things, as well as remove the turf layer (if any). The author used a special technique for this, because in his plans to build a large and solid greenhouse 12 x 6 m.

As mentioned above, it is desirable to lay warm floors in the greenhouse. Since the author has grandiose plans, he is laying a whole heating main))) Digging a trench with an excavator.

Laying pipes.

The walls are covered with foam.

Fill the hole with soil and level the surface.

After the work done, the author proceeds to dig in wooden poles. The best way, of course, is to make a shallow foundation, and build a wooden frame on its basis, so it will last much longer. But well, as they say "Master Barin" or, as M. Zadornov would put it, "Well, you understand")))

The pillars should be at the same level, for which you should stretch the white rope.


At the edges of the timber, you should first drill holes for driving nails into them, so you can avoid cracking the wood. It is also desirable to use galvanized nails, because they do not rust after some time.

The beam is fastened with an assistant, one edge will need to be held, otherwise it will simply fall to the ground from a hammer blow.

And so, it turned out 3 rows of columns made of wooden beams.

Then the rafters are laid.

The edges are cut at an angle.

Holes are drilled and nails driven in.

On the opposite side at a different angle indicated in the drawing.

Here is actually such a 2-pitched roof is obtained.

After that, the laying of polycarbonate foxes begins on the prepared surface.


One slope, then another.

The work is carried out together, so it is more convenient and more fun.

The walls are also sheathed with polycarbonate.

Finishing the greenhouse with polycarbonate is finished. Pay attention to the walls also have vents, this is necessary for better ventilation.

The wall where the front door is located will be deaf from the board.
Mitlider's greenhouse, also known as "American greenhouse", has characteristic features that distinguish it from other greenhouse structures.
Here are the main ones:
- unusual ventilation system. The upper part of the roof is equipped with transoms that allow warm air to pass through. Fresh air flows through open doors or auxiliary windows that are located below the roof;
- the design has strong frame, thanks to the often installed beams and struts. Such a structure is not afraid of hail and strong winds;
- the greenhouse can be dismantled and moved to another place if the installation was done with bolts or screws, without using nails;
- the structure is installed in such a way that it is located in length from west to east. As a result, the ventilation flaps are facing south, which protects the greenhouse from the penetration of the cold north wind. At the same time, plants receive good lighting and a sufficient amount of solar heat;
- "American" does not require additional equipment or dispensers for feeding gas, since natural ventilation supplies growing crops with carbon dioxide in the required quantities.
Types and materials for the manufacture of the frame
One of the most commonly used design options is the construction with a gable roof and vertical walls.
The north side of the greenhouse is equipped, as a rule, with a high slope, which protects the plants from cold winds. The low slope faces south.
Arched greenhouse according to Mitlider(photo on the right) is another type that has gained some popularity today. While with a standard arched design there are certain problems with ventilation, the two-level "American" roof perfectly helps to cope with this task.
It is worth noting here that the construction of an arched greenhouse is associated with certain difficulties, namely, with the need to bend pipes. Such a process requires a pipe bender, which is not available to all gardeners.
As for materials, for the construction of a metal frame, the best option would be to use a profile pipe with a section of 50x50 mm.
It is also possible to get by with the installation wooden frame, for which a bar with a section of 75-100x50 mm is used.
Profile pipe frame most often they are made during the construction of a polycarbonate greenhouse, and a timber structure is used for film coating.
However, this is not important and is connected only with the method of fixing the coating: for polycarbonate, in this case, metal screws are used, and the film is fixed with a stapler or wooden lath and nails.
Preparing for construction
Preparatory work should include next steps:
- development of a drawing according to the dimensions of the future structure. Recommended greenhouse dimensions: length - 6 m, width - 3 m, height - 2.7 m. The distance between the upper and lower slopes is 0.45 m;
- purchase of material in accordance with the drawn up drawing;
- choice of construction site. The selected area must be freed from debris and grass and well leveled.
For the construction of a polycarbonate greenhouse according to the Mitlider, the most suitable option is shallow strip foundation.
Foundation pouring
The construction of the strip foundation includes the following procedures:
- The base is marked with stakes and a rope that is stretched between them.
- According to the markup, a trench is dug. Its depth is 0.6 m, width is 0.25 m.
- Mix one part sand with one part gravel.
- The resulting mixture is poured into the trench with a layer of about 10 cm, thereby forming a pillow.
- Formwork is built with the help of boards and stakes. Stakes must be dug in, while the distance between them should be 0.3-0.4 m.
- The frame of the reinforcement can be built using electric welding or by tying the rods together with steel wire.
- The finished frame is placed in the formwork.
- Next, you need to prepare a cement mortar. To do this, mix 5 parts of crushed stone, 3 parts of sand and one part of cement.
- The solution is poured into the formwork.
Foundation sample:

Formwork should be removed no earlier than a week after pouring. The construction of the greenhouse can be taken a month after the foundation was erected.
Polycarbonate
How to build a greenhouse according to the Mitlider for polycarbonate with your own hands? The process of building an "American" with a polycarbonate coating consists of several stages:
- On top of the foundation, it is necessary to lay the foundation of the future structure, for the construction of which bars with a section of 10x10 cm are used. They are laid around the perimeter of the structure and connected to each other using self-tapping screws.
- The side walls are assembled in accordance with the dimensions planned in advance. Wall parts are also interconnected by means of self-tapping screws.
- The next step is the construction of the end walls, the distance between the posts of which should be 0.7 m. For mounting the walls, a bar with a section of 75x50 cm is used.
- The door frame is being assembled.
- Hinges are installed on the door frame.
- Next is the installation of windows. In a Mitlider greenhouse, the window frame has an angle of inclination identical to that of the roof slope, which is 30 degrees. The presence of two windows is quite a suitable option for such a design.
After laying the bars, it is worth checking whether the rectangle is correct. To do this, you need to measure the distance between the corners diagonally - if the dimensions are the same, then everything is in order. Further, along the perimeter of the base, stakes are driven in, which are connected by bars using self-tapping screws.
Photo of the greenhouse according to Mitlider: diagram-drawing, calculations.

The final stage of mounting the frame - roof construction. For this you will need the following materials:
- 5 beams 1.9 meters long;
- 5 beams to be used as supports, 32.7 cm long. The corners of the beams must be cut;
- 5 triangular wedges with equal sides of 0.5 m. For their manufacture, plywood 0.7 cm thick should be used.
With the help of these materials, five truss structures are assembled. The distance from one extreme point to the other should be 240 cm. Next, wedges are attached with nails.
Finished structures are mounted on top of the walls. First the side elements, and then the rest, while the distance between them should be the same. The installed structures are fastened with self-tapping screws.
Further, at the very top under the roof, it is necessary to install a bar with a section of 75x50 mm - window sashes will be attached to it. An auxiliary board is mounted on top. Under the windows between the rafters, several short bars should be fixed.
Wooden parts of the structure that will be in contact with wet ground, should be covered with oil, which will make the material more resistant to destruction.
After the frame is ready, you can proceed to the coating. When installing polycarbonate you have to follow some rules:
- holes for self-tapping screws are best drilled in advance. In this case, the thickness of the drill should exceed the diameter of the holes by 2-3 mm;
- polycarbonate sheets should not be too pressed against the frame;
- the material must be laid on the frame with the side that is equipped with ultraviolet protection. As a rule, it has a bluish tint due to the presence of a protective membrane.
Greenhouse according to Mitlider - great option for backyard.
Design features have a positive effect on the vital activity of plants, providing them with healthy growth, which allows you to count on a bountiful harvest at the end of the summer season.
Useful video
Here is a video about the Mitlider method in a greenhouse (principle, structures, frame):
Another video about a polycarbonate Mitlider greenhouse.
If you find an error, please highlight a piece of text and click Ctrl+Enter.