
A stool is one of the popular and comfortable pieces of furniture. Unlike a classic chair, it is smaller in size and can be easily moved. But the main advantage of a wooden stool is the ability to make it yourself and choose a design.
The latter affects the performance and labor intensity of production at home.
Recently, a children's stool made of wood has become very popular. It has a simple design, ideal for a child. But besides this, such furniture can be used by adults - additional seating for guests, mobile wooden stools are often taken for fishing and picnics.

To analyze the qualities, you need to familiarize yourself with the popular types of this type of furniture. Most often, do-it-yourself stools are made in the following shapes:
- Children's version. Characterized by small size and light weight. A prerequisite is the absence of sharp corners. Recommended material of manufacture: solid board. The legs of the stool should have a maximum area of contact with the floor for better stability.
- Foldable design. It will be useful for hiking, fishing, and in the country. Making a folding stool is more difficult, but the result will be maximum comfort and mobility.
- For the dacha. It is made from solid timber, then treated with protective compounds. These measures are necessary to reduce the influence of moisture and sunlight on the material, since it will most often be outdoors.
- Combined structures. You can make a step stool with your own hands or make a box instead of a traditional seat. The choice depends on the required functionality.
A homemade round stool has the best performance characteristics and is well suited as a children's stool. But it is not suitable for permanent sitting. Therefore, most often they opt for the classic rectangular or square seat shape.
The video shows how to make a classic stool:
Review of drawings
At the first stage, you need to decide on the sizes. Seat dimensions vary from 300*300 to 450*450 mm. If this children's version– 250*250 mm. The height directly depends on the height of the person and can range from 260 to 480 mm. In exceptional situations, a children's chair can be 200 mm high. But this is rarely done. In some cases, high stools will fit at the bar counter.

There are many stool drawings - for beginners and professionals. In the first case, it is recommended to choose simple designs. People with carpentry skills opt for folding or combined (ladder, box) assembly schemes.

All drawings are conditionally divided by complexity:
- The number of parts varies from three to five. The more components there are, the more stable the structure will be. But this affects the complexity of production.
- Material of manufacture. The easiest way is to make a stool, but in the future difficulties may arise with its operation - the influence of moisture and temperature changes will affect appearance and reliability. It is recommended to choose chipboard or timber, wooden board.
- Available tools. To make a wooden stool, you will need a minimum of tools: a tape measure, a ruler, a wood saw, sandpaper, a drill or a screwdriver.
Selection of tools and materials
Before making wooden stools, you need to consider in detail the list of materials and tools. For a solid wood product you will need a minimum set. It is important to consider the original state of the material. The easiest way is to make it from plywood with your own hands, since it is easy to process, there will be no difficulties with painting, and there is no need to sand the entire surface.

The optimal list of tools: carpenter's square, tape measure, electric drill (screwdriver), pencil, grinder, confirmations with plugs, metal furniture corners, self-tapping screws. To process chipboard sheets, you will need an electric jigsaw.
In addition, you need to study the properties of materials. You can make a stool from the following blanks:
- Solid wood and beams. Best option for home production. Recommended thickness - up to 5 cm. Advantages - reliability, good aesthetic properties, durability. The disadvantage is that it is difficult to process; the product needs to be coated with varnish or paint.
- Chipboard. Sheet thickness – 10 mm. For manufacturing, you will need three blanks measuring 400*300 mm (legs), 300*300 mm (seat) and 200*120 (lintel). It is better to use moisture-resistant chipboard. It is from this that children's stools are most often made.
- Plywood. In this case, you need to carefully choose the model. It is recommended to use sheets of the FSF, FSF-TV and FK brands. Thickness from 10 to 18 mm. The grade of plywood must be at least second. For production, a sheet with dimensions of 1250 * 1250 mm is sufficient. It is advisable to make a children's chair from moisture-resistant plywood.
It is not necessary to use only wood; structures consisting of several materials - timber, plywood, chipboard - will be convenient. It is important to have drawing skills in order to draw up the correct assembly diagram.

Manufacturing procedure
Is it difficult and how to make a stool with your own hands? First you need to decide on the drawing and choose the optimal design. The next stage is preparing the material for manufacturing. Wood, chipboard or plywood must be dried and checked for defects. Then settles down workplace, special attention is paid to lighting.

As an example, we can consider how to make a stool from chipboard.
Production stages:
- Sheet marking. This is necessary for the formation of blanks. Beginners are recommended to make patterns from paper or thick cardboard. This way you can avoid sizing errors. It is important to consider the kerf width tolerances.
- Formation of blanks. The optimal tool is . The edges need to be sanded with sandpaper or a sanding machine.
- Fastening components. Depending on the design, you can use the slotting method, connecting with furniture corners or using wooden tenons. If the structure is made of wood with your own hands, you can use confirmations. This screw fastener secures various components well and improves stability.
- Painting and varnishing. The finishing surface can be matte or glossy. If it is important to preserve the original texture, use translucent or transparent varnishes. Acrylic compounds are most often used.
- Additions. Often special shock absorbers are installed on the legs. They minimize the appearance of scratches on the floor and reduce noise when moving furniture.
An ordinary wooden stool is guaranteed to be in every home. Despite the fact that the simple design is noticeably inferior in terms of comfort to modern armchairs, such pieces of furniture do not lose their relevance.
The stool looks equally at home in the kitchen, garage and country house, it is ideal for small apartments and always comes to the rescue if there are a lot of guests who need to be placed at the table.
Making a wooden stool with your own hands is not difficult. There is no backrest or armrests, so craftsmen who plan to practice self-production furniture, it is better to start with such structures.
Where to start
It is immediately necessary to clarify that there are several options for homemade stools. The product can be folded or combine the function of a stepladder; there are high chairs and practical benches, complemented by drawers. If we talk about a classic stool, it consists of the following elements:
- a rectangular or square seat with a side of 300 mm; a round seat with a radius of about 350 mm is often made;
- legs - 4 pieces, made of rectangular timber 400-500 mm high;
- drawers - the upper trim of the legs in the amount of 4 pieces, giving the structure the necessary rigidity;
- The legs are additional stiffening ribs that are installed in the middle of the support posts.
Simple scheme assumes straight wooden legs. They are the easiest to cut and secure. This is exactly what the configuration of an ordinary wooden stool looks like, capable of taking its rightful place in the kitchen. The sizes vary and depend on the height of who will most often use such furniture and for what purpose, but most often the height is about 40 cm.
Before production, you must carefully study the drawing. You can take a ready-made version from the Internet or draw it yourself by hand. A simple diagram will help you not to miss anything.
Selecting materials
Having prepared drawings and diagrams of a plywood stool, which is supposed to be made with your own hands, you can begin preparing the raw materials. Of course, plywood is used as a seat only in cases where high loads are not expected. In other cases, it is better to give preference to denser wood, such as edged boards.
There are no strict requirements here, but experienced home craftsmen do not recommend choosing alder, aspen, willow and poplar for homemade products. These are soft wood species that quickly lose their original properties upon prolonged contact with a humid environment.
Good stool seats are made from coniferous species: pine, spruce. Oak, birch or maple bars are more suitable for making legs. If suitable tree no, the landing part can be made from chipboard, but here you need to take into account that the fibrous structure makes the material fragile, therefore, you will have to be careful when processing.
Required Tools
Stools are made using various technologies from wood, plywood, and chipboard. In any case, for production you will need:
- roulette;
- square;
- fasteners: screws or nails;
- wood hacksaw;
- drill with a set of drills;
- screwdriver or screwdriver.
To make wood processing easier, it is recommended to use a circular saw or milling machine. It is convenient to cut plywood with a jigsaw. In order for a wooden stool to turn out beautiful, all parts must be sanded, and after assembly they must be painted or covered with stain or varnish. Treatment with a nylon sanding attachment and staining will give the wooden product an antique look.
Assembly steps
First you need to make blanks for the seat. It makes sense to take a board 200 mm wide and cut two pieces 400 mm long. If you put them together, you get a perfect square. The boards are usually glued together with PVA wood glue and clamped in a special clamp for boards (vamp).
Then, four blanks for the legs are cut from a square block with a cross-section of 3 x 3 cm. The height of the stool is determined individually, depending on the preferences of family members, but if the length of the leg is less than 40 cm, it will not be very uncomfortable for an adult to sit on such a product.
Drawers and legs can be made from the remnants of the board, spreading it lengthwise to create parts 100 mm wide. A total of 8 such elements will be required, the length is determined by the distance between the inner sides of the legs and is about 350 mm. After sawing, all prepared parts are treated with sandpaper to remove burrs and irregularities.
To assemble a stool from prepared parts, the legs are marked at the locations where the frames and stiffeners are installed. In accordance with the markings, holes are drilled for self-tapping screws, after which the parts are fastened together. For additional adhesion, glue is used.
The stool seat boards are installed on the finished frame, which are also fixed with self-tapping screws.
At the final stage, the product is varnished or painted. If desired, the seat can be made soft by placing a piece of foam rubber and covering it with leatherette on top.
Plywood stool
If, after renovation, a large sheet of plywood with a thickness of 9-15 mm remains in the apartment, it can be turned into a small stool, which can be useful in the garage or while fishing. The advantage is that it creates a lightweight, collapsible stool that is convenient to take on trips. The chair is made according to the following scheme.
Two U-shaped posts are cut out of a sheet of plywood. The width of the legs is about 5 cm, the upper crossbar is 10-15 cm thick. The length of the legs is chosen arbitrarily, depending on personal preferences. A protrusion 15 cm long and 2.5 cm high is left on the top surface of each rack.
A cut is made in the central part of the transverse strip of each rack. The cutout should be in the lower and upper parts so that the supporting elements are connected to each other during assembly.
Two identical squares are cut out to serve as a seat. A cross-shaped cut is made in the part that will be installed on the legs, corresponding in length to the protrusion left on the posts.
The stool is assembled as follows. The racks are joined with grooves crosswise. The seat parts are glued together and installed on the seat groove.
Folding stool
A folding wooden stool is a rather complex, but more functional and practical design. It is suitable for cottages, fishing and city apartments. To make a folding stool from wood with your own hands, prepare a drawing that determines the shape of the seat and the dimensions of the main parts. Such products look most interesting if the seat has a round shape, but this point remains at the discretion of the master.
As in the previous case, blanks for the stool are cut out of wood according to the prepared drawing. However, when making legs you need to take into account 2 nuances.
When assembled, the legs will be arranged crosswise, so the supporting elements are conventionally divided into an internal and external frame. The bars that will be used to make the internal frame must have an angle of 30 degrees at the point of contact with the seat. If you do not take this point into account, the chair will turn out to be unstable.
The legs are drilled through the middle. There will be a pin running through here, connecting the posts together and simplifying the folding process.
When the blanks are cut, you can start assembling. Markings are made on the inside of the seat for installing hinges. The outer legs usually have a wide distance between them and are located closer to the edge of the seat. The internal racks are placed a little further from the center, closer to each other. After marking, loops are screwed to the legs, then the posts are connected to the seat.
The structure is brought into the assembled position, a pin is passed into the drilled groove, which is fixed on both sides with nuts. The finished chair is varnished or painted.
Children's bench
A small high chair will be useful not only for kids, but also for adults. The attractiveness of this model lies in its compact dimensions and light weight, so even a child can move his bench to a place convenient for playing.
It is recommended to use linden for production. This array has a beautiful natural texture and low density, which allows you to reduce the weight of a small stool without losing strength. The bench consists of only 3 elements: a seat and two racks. The optimal starting material is a board 30-40 mm thick. It is better to make the legs carved, which will give the chair an original appearance.
It is important to understand here that products for children should not have sharp corners, so it is recommended that all components be given a rounded shape. The parts are fastened together with dowels; additional fasteners are usually not required. After assembly, the product must be carefully sanded so that the baby does not get a splinter.
Stool with drawer
This model is made by analogy with a classic wooden stool, but has a small drawer that can be used to store various household items. To do this, the drawers are made from a full-size board, the width of which will determine the depth of the box. It is better to place additional stiffening ribs not in the middle, but in the lower part of the support posts, so that the finished product has a symmetrical shape.
The seat of the stool is made of chipboard or thick plywood; a curved hole is cut out in the middle part, which will be convenient to grasp with your hand when opening the lid. The seat itself is mounted on 2 hinges, the bottom wall of the box is filled with a sheet of thin plywood, cut to the size of the walls.
Some home craftsmen create more complex options. In particular, the top cover is made monolithic and tightly attached to the legs and drawers. The box is made retractable and installed on metal guides.
Step stool
Enough interesting option, which consists of two articulated parts. During production, the general concept of a folding stool is retained, but with some differences. In particular, a high bar stool with long legs is made. The structure is assembled according to the standard scheme: seat, drawers and 4 legs.
Then a small ladder of 2-3 steps is made from thick plywood, depending on the height of the stool. The total length of the ladder is calculated so that when folded it fits completely under the seat. Holes are drilled in the two legs of the stool through which two pins will be passed connecting the stool and the ladder.
Wicker seat
To create a stool with a wicker seat, you only need to assemble a frame from bars: four legs, upper and middle crossbars. To give the structure a more elegant look, it is better to make the support posts carved, like a figured bas-relief. The frame can be made square, rectangular or round.
The function of the seat will be performed by belts: leather trouser belts or synthetic ones, which are used for safety in cars. The belts are stretched along the length of the frame, the edges are folded to the inside, secured with decorative nails. Then, according to a similar pattern, a transverse row is stretched. Thus, the belts are intertwined with each other, forming a pattern.
Even an ordinary wooden stool, made by a skilled craftsman, can turn into a real work of art. A little work - and the wooden block left after cutting down the trees turns into two spectacular stools on 3 legs. For those who love original things, you can make a homemade chair seat in the shape of a puzzle. Three or four of these chairs, placed in a row, will form a bench; if necessary, the structure can be easily divided into separate seats.
In handicraft production there are no standard solutions, so the shape and size of the product depend only on the imagination of the craftsman.
All photos from the article
Simple, regular furniture in your home will always come in handy, even if you prefer more extravagant pieces. This is especially true suburban area, which you don't appear on very often. Today we will talk about a wooden stool, the dignity and functionality of which can be discussed for quite a long time. Most likely, you once made the first model in labor lessons, however, a lot of water has passed under the bridge since then, so it is advisable to refresh your memory.

In the photo - a simple wooden stool for the kitchen
The article will provide professional advice as the process is described. So by the time the story ends, you will be quite savvy in theory and will know some of the secrets of the masters. It is even possible that making wooden stools will become your hobby. Why not - any model is always in demand by buyers.
Material
Any product consists of parts, so before work you should take care of the workpieces. You should purchase or find it at your dacha for:
Advice: the legs can be made not of a trapezoidal shape, especially when there is little experience in furniture making, but of a rectangular shape.

Tool
To work with your own hands, you should use a reliable and properly sharpened tool:
- A metal ruler is suitable for measuring;
- for marking - a metal square;
- wood hacksaw;
- hammer;
- chisel;
- screwdriver;
- sandpaper.
Sometimes this set is added to:
- glue;
- additional fasteners;
- paint (varnish);
- brushes
The price of this set of materials is quite affordable for everyone.

Preparation
It starts with coming up with the shape of the stool, keeping in mind that it should be as stable as possible. Therefore, we do not recommend taking into account elongated products, which can often be found near the bar counter ().
Tip: the height of the stool should not be more than 600 mm from the floor. The shape is as close as possible to cubic.
Ordinary standard models can be used in different ways - for relaxation, in the form of a stand, from which you can carry out home renovation work or harvest from trees in the garden.
The seat area should not be small, it is better when the range is from 350 to 500 mm. After determining the model, make a preliminary drawing of it, indicating all dimensions. This will allow you to determine your material needs.

Process
The proposed instructions will sort everything out:
- Make a drawing, and there is no need to try to create them, observing GOST. A simple sketch with exactly specified dimensions will be sufficient.
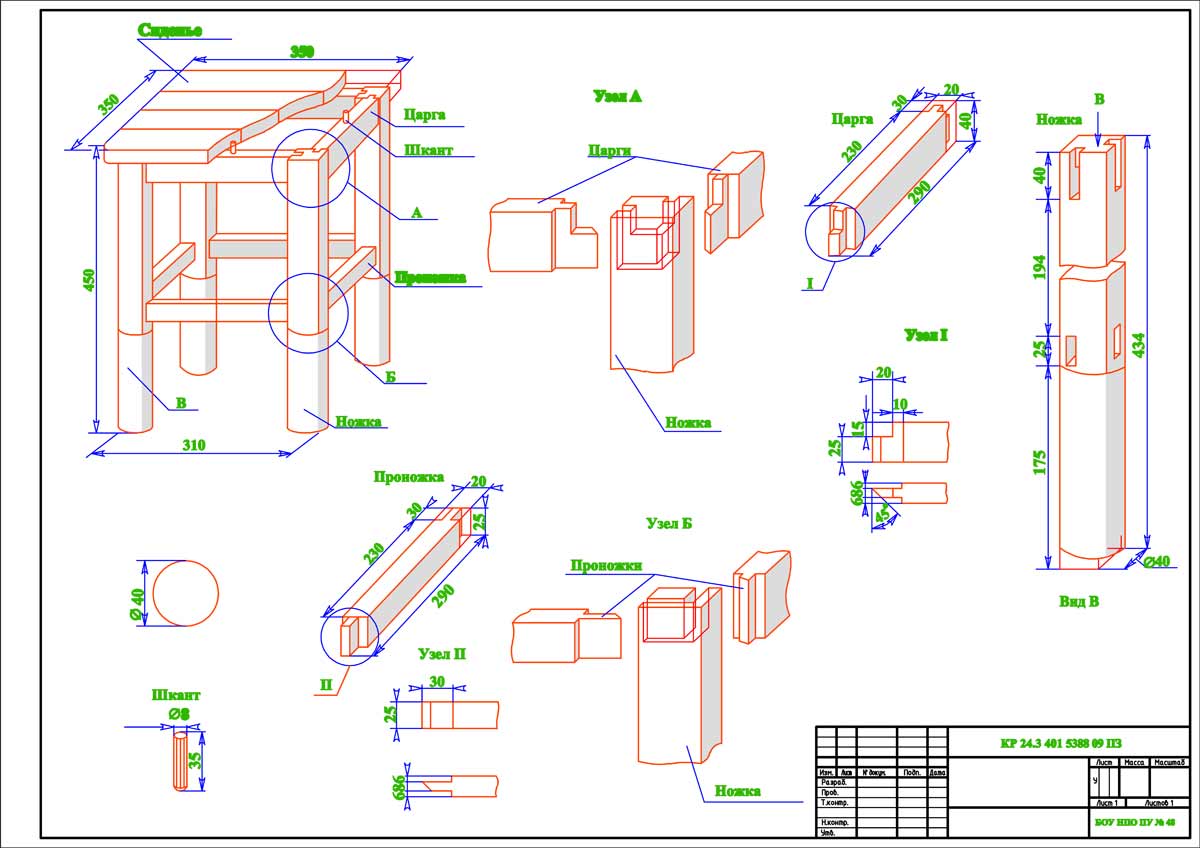
There are two distinct elements to highlight:
- drawers - necessary for fixing the legs of the stool and serve as the basis for the seat;
- Progs - allow you to ensure the rigidity and stability of the structure.
To make a stool with your own hands, no special skills required. Implement this type Can be done by a person who has no experience. In addition, this is a creative process that will require minimal costs and will bring a lot of positive emotions. You can show your imagination and make a unique stool that will delight the owners of the apartment with its appearance. You can also give it to someone as a gift. Beautiful wooden stool combines individual style and functionality.
Stages
First of all, you should prepare for the work ahead. To do this, it is necessary to highlight the main stages. First, you need to determine what material the stool will be made from. Secondly, you need to make a drawing. Next, prepare all the necessary tools that will be needed during works, and purchase material.
Material for production
The stool can be made from different materials, such as glass, metal, plastic and others. You can also combine metal and wood or metal and glass. There are many options for making stools. But at the initial stage it is recommended to start with wood. 
Stool drawing

For clarity and to simplify the work, you should make a drawing. On it you need to draw all the details from which it will be made. wooden stool, and indicate their sizes. In the drawing, all details must be indicated proportionally and a certain scale must be used. It is recommended to start with a simple stool with rectangular legs. But if you have confidence in your abilities, then, as an option, you can do DIY wooden stool using carved legs. Now in stores there are ready-made blanks for carpentry work. Therefore, it is worth taking a closer look at this assortment of products; perhaps you will find ready-made carved legs in order to use them to make DIY wooden stool. Drawings should be supplemented with such details.
The drawing is a kind of design project for a stool. Therefore, you should draw the finished product on it, and also place separately all the details that will be needed to create this piece of furniture. Next to each part you must indicate its size and quantity. Dimensions are usually indicated in millimeters.

Tools
In order for the process of making a stool to be a pleasure and without anything distracting from the work, it is necessary to prepare the tools.
1. You will need a saw. Since the parts of the stool are small, a small tool will do. You can also use a miter saw.
2. A screwdriver is a necessary tool for assembling the stool.
3. Drill and drill bit of the right size.
4. Planer.
5. Jigsaw.
6. Self-tapping screws.
7. Ruler for measuring sizes.
8. Pencil.
9. Corner.
10. Brush for coloring.
Step-by-step instructions: how to make a stool from wood
After the workplace and everything necessary materials and the tools for future work are prepared, you can proceed to the process of creating a stool. In order to understand how to make a stool out of wood with your own hands , at the initial stage you should follow the step-by-step instructions.
1. You should start working with the legs. You need to take and measure the length of each leg on it; it is 430 millimeters. You need to draw lines on the block using a ruler and pencil. Next, cut the block into 4 parts.
2. The next stage of work is preparing the seat of the future stool. To do this, take 2 boards 145 millimeters wide and 300 millimeters long. You can also make the seat from one piece, then you should take a wide board so that it matches its width. It is better if the seat is solid. This option will simplify the assembly process and provide the stool with greater strength.
3. Next you need to make the parts for the frame. They are made from plywood. It is necessary to cut blanks for the frame measuring 100 millimeters by 270 millimeters. We make a stool frame from plywood blanks. The plates are folded into a square, and the legs are placed in the corners of the square.
4. Then we assemble the stool. To do this, lubricate the pre-prepared holes with glue and tighten the screws.
5. Ready-made solid wood stool must be sanded using sandpaper.
6. The final stage of work is varnishing. It is better to do this in several layers. Each layer must be given time to dry and only then apply the next one.
Stool with spread legs
Those who already have some experience in carpentry can be offered to make a stool with spread legs.

1. First we make the bars. In order to avoid unevenness, you need to take 4 identical bars, set the miter saw to 5 degrees and cut them all at once.
3. Then you need to take small bars for spacers. To attach them, you need to make holes in the inside legs When attaching the spacers, you should first apply glue and then screw in the bolts.
4. In the upper part of the stool you need to make holes for attaching the legs, lubricate them with glue, and then attach the legs.
6. The final stage of the work is the manufacture of the lid, it is better if it is made of a solid board.

This stool will look good with a soft seat. The process of its manufacture is also not at all complicated. Foam rubber is cut to the size of the seat and covered with fabric on top. It can be any material, for example leather, fur, velvet, etc. The color scheme can also be varied. The seat can be patterned or plain. It all depends on taste preferences and interior style. The fabric is attached to the chair using a special furniture stapler.

You can also leave the seat just wooden. In this case, it must be sanded and covered with stain and varnish, or use paints for woodwork. Perhaps someone would like to paint a stool, apply a floral design or some kind of ornament. Since the manufacturing process is creative, you can use colored enamel instead of varnish or come up with other design options.
Manufacturing options
You can make the process of making a stool easier by ordering all the parts from a carpentry workshop. All you have to do on your own is to assemble everything into a single structure and start decorating. This option is more suitable for women, as it does not require much effort. Also, finished parts can be sold in specialized construction stores. At home, all that remains is to assemble the stool like a construction set and start decorating.

Decoration options
First of all, you need to know for which room the stool is being made. Depending on the stylistic orientation, you should choose its appearance. Perhaps at the carpentry stage it will be necessary to make carved legs or include some non-standard element in the design; it can also be made of wood. Much depends on the style of the interior in which this piece of furniture is supposed to be placed. For example, you can make a model with a colored fur seat for a girl’s nursery. And for a boy, a stool in a nautical or military style is suitable. There are a lot of execution options. If you don’t have enough imagination, you can look at special design publications that specialize in this area and make original chairs and stools from wood.
When purchasing furniture, you can notice a clear discrepancy between the prices of materials for their manufacture and the final price of the product. This is especially noticeable when purchasing fairly simple pieces of furniture, such as stools.
Stools are most often made from chipboard.
Stools are most often made from chipboard. It is a fairly cheap material, easy to work with, durable and perfect for indoor use. Taking one look at a chipboard stool, it’s easy to understand that making one with your own hands is quite easy. We invite you to familiarize yourself with detailed instructions for making various configurations of stools at home.

Taking one look at a chipboard stool, it’s easy to understand that making one with your own hands is quite easy.

You can make a stool with your own hands, having professional and non-professional elements and devices at hand.

Required tools include:
- electric jigsaw, complete with a fine file;
- screwdriver

To decorate the seat of the stool, you can also prepare foam rubber and upholstery materials.
You may also need a drill with a drill and a stapler for construction purposes.

The upholstery can be fabric, oilcloth, leatherette.

To simplify the assembly task, you can first glue the parts together and then secure them with self-tapping screws.
Materials for production:
- chipboard sheets, new, substandard or remaining spare parts from old furniture;
- self-tapping screws, no longer than the thickness of the chipboard;
- confirmations 4 pieces. Dimensions 6.4 mm by 50 mm;
- metal corners 4 pieces;
- adhesive tape for processing sheet edges;
- thrust bearings made of any acceptable materials;
- sandpaper for sanding.

Creating a stool from chipboard with your own hands allows the master not to limit himself to standard models.
Non-professional tools that can be found in any home:
- pencil or marker;
- cardboard for making templates;
- ruler or tape measure;
- knife of any configuration, most importantly sharp.

The seemingly simple design of a stool has several dozen different models.

The parts of the stool are assembled using confirmations and self-tapping screws.
To decorate the seat of the stool, you can also prepare foam rubber and upholstery materials. The upholstery can be fabric, oilcloth, leatherette.

You can look at visual examples in furniture stores, from neighbors or on the Internet.
Create a project
Creating a stool from chipboard with your own hands allows the master not to limit himself to standard models. The seemingly simple design of a stool has several dozen different models. You can look at visual examples in furniture stores, from neighbors or on the Internet.

Usually several stools are needed at once, so it is extremely important to choose one shape you like and make identical objects according to the chosen drawing.

When starting the final assembly of parts, it is necessary to pre-treat all cut edges with a special tape.
Usually several stools are needed at once, so it is extremely important to choose one shape you like and make identical objects according to the chosen drawing. When making a drawing, it is important to remember that the design of a stool requires a strict balance between its lower and upper parts. A discrepancy between the dimensions of the seat and the width of the legs can lead to an imbalance, as a result of which the object will be very unstable and therefore dangerous.

When making a drawing, it is important to remember that the design of a stool requires a strict balance between its lower and upper parts.
Choosing material for manufacturing
Stools can be made from different materials. Chipboard, multi-layer plywood, wooden blocks and boards are suitable. The cheapest and easiest to use material is chipboard. Sheets can be purchased in a store, at furniture factories, or you can buy scraps from small companies that make custom-made furniture. Sheets of old chipboard that were previously parts of other furniture are also suitable.

A discrepancy between the dimensions of the seat and the width of the legs can lead to an imbalance, as a result of which the object will be very unstable and therefore dangerous.

The final step in preparation before assembly will be drilling the necessary holes.
We apply graphic markings

Stools can be made from different materials.
Having decided on the model of the future stool, you need to mark a sheet of chipboard, thereby preparing it for further work. If you plan to make several identical stools, then it is better to make a pattern for all parts of the furniture. It is convenient to make the template from thick cardboard.
For further ease of use of the manufactured furniture, the corners of the parts should be rounded. It is better to make even curves using a compass. The absence of this item can be compensated for, for example, with a plate of suitable diameter.

The cheapest and easiest to use material is chipboard.

High speed will ensure cutting of sheets without chips or nicks.
After trimming, you need to sand all the edges of the stool with sandpaper.
Depending on the chosen shape and model, the dimensions of the elements may be as follows.
No. Stool model Seat dimensions Leg dimensions Crossbar dimensions
- 1 30x30 30x40 20x12
- 2 30x40 30x40 30x15
- (3 pieces)
- 3 40x40 20x35 (8 pieces) 30x20
- (4 pieces)

Sheets of old chipboard that were previously parts of other furniture are also suitable.
Cutting out elements for the future stool

The main thing is to decide in advance on the number of finished products and calculate the required volumes of materials.

Cutting out elements from existing pieces of chipboard is done using an electric jigsaw.
Cutting out elements from existing pieces of chipboard is done using an electric jigsaw. You can make a good edge cut using a fine file and high speed jigsaw. High speed will ensure cutting of sheets without chips or nicks.
After trimming, you need to sand all the edges of the stool with sandpaper. This processing will ensure a good fit of one part to another and simplify assembly.
The final step in preparation before assembly will be drilling the necessary holes. Make sure the holes are drilled at the same level.

Having decided on the model of the future stool, you need to mark a sheet of chipboard, thereby preparing it for further work.
Assembling the stool
When starting the final assembly of parts, it is necessary to pre-treat all cut edges with a special tape. The tape must be chosen to match the color of the sheet or, conversely, contrasting shades.
The tape is applied to the cut of the legs and seat and glued with a hot iron. The iron must be applied with quick and short movements. The warm tape should be pressed down with a clean cloth. The glue, which is on the back of the tape, sets very quickly and does not require long heating or cooling.
The parts of the stool are assembled using confirmations and self-tapping screws. To simplify the assembly task, you can first glue the parts together and then secure them with self-tapping screws.
The seat of the resulting chair can be made soft using foam rubber and upholstery material.

For further ease of use of the manufactured furniture, the corners of the parts should be rounded.

It is better to make even curves using a compass.
VIDEO: Do-it-yourself stools made from chipboard scraps.
50 photo ideas on how to make a stool with your own hands from chipboard