
So, if all the tools specified in the paragraph above are prepared, then you can get to work.
Step 1 Power outage
To begin repairs door lock, you must first turn it off. But it is worth considering the fact that the table lamp must also be powered by something. To do this, you just need to turn off one automatic plug. Most often, the doorbell is powered by the same circuit breaker as the chandelier, so you need to turn on the chandelier and turn off the plugs one by one until it turns off. Once the required plug is disconnected, you can begin to work. At the same time, it will be possible to connect a table lamp to the outlet.
Step 2 Check for a network break
Before you begin repairs, you need to check the network for a break. To do this, you need to first wear gloves and remove the insulation from the bell wires. Then you need to temporarily connect the socket to the wires, and connect the lamp to the socket. After this, you should turn on the corresponding machine. If the lamp turns on, there is no network break. If switching does not occur, then this is direct evidence of a break in the network. This damage should not be repaired. on our own, and you need to call an electrician.
Step 3 Checking the Equipment Using an Ohmmeter
Again you need to turn off the corresponding machine. Then you need to turn off the temporary outlet. Afterwards, you should connect the ohmmeter to the wires, holding them by the insulated parts. Your partner must press the button, and if at this moment the arrow deviates, this means that both the wire and the button are in good condition.
Step 4 If the ohmmeter needle does not deviate
If the arrow does not deflect, then you need to disassemble the button. Then check the tightness of the ohmmeter contacts and carry out the testing procedure again. If necessary, clean the button contacts. Also, in order to avoid burnout, it is necessary to check the contacts to see if they are constantly occupied.
Step 5 Call verification
After all the above measures have been carried out, it is worth checking it. To do this, you need to connect all the contacts in place, turn on the corresponding machine and perform a test run. If after this the call does not work, then it cannot be repaired. You need to buy a new device and install it as indicated in the manufacturer's instructions. If the call starts working, it means you have done a good job. It is necessary to attach all the elements in place so that the wires do not get tangled or stick out.
Dwelling not only on electrical circuits, but also on detailed description actions. Now I would like to devote more time to the existing options for connecting wires. There are 3 possible schemes for connecting a bell in an apartment, which we will consider in more detail.
Method number 1 – One button
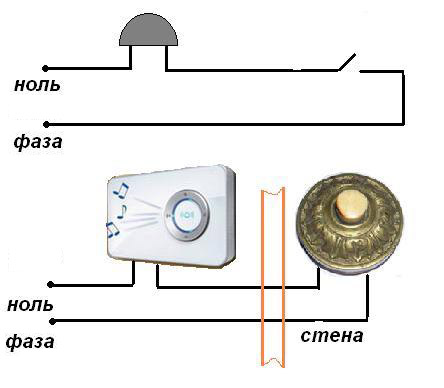
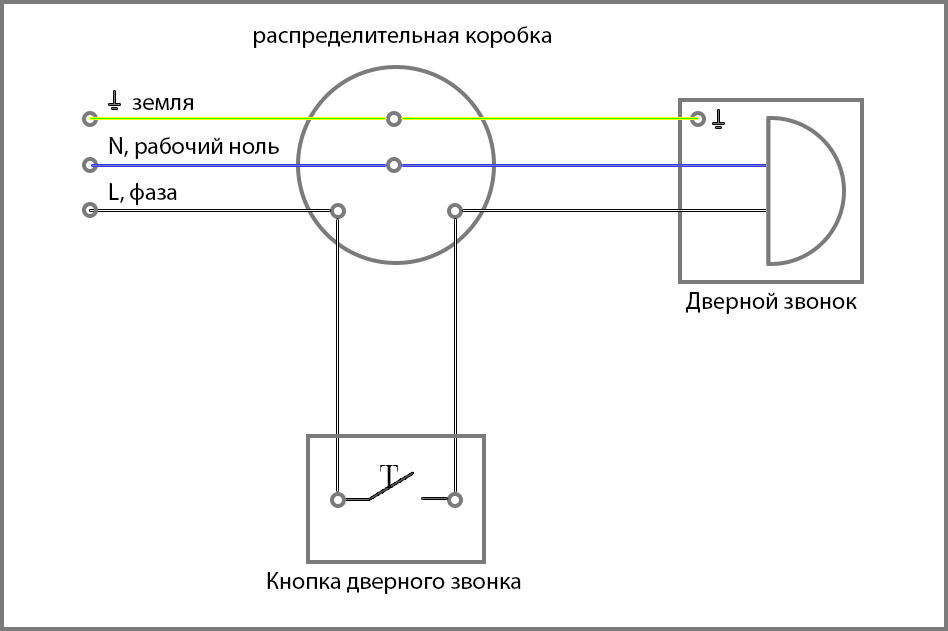
The most simple option Installing an apartment bell involves connecting the main unit to one button located at the door. This type of connection is used in most apartments, both old and new buildings. Switching wires to a 220V network is not difficult, because There are only 4 of them (with grounding 5): the zero must be connected immediately to the main unit, and the phase goes into break. Electrical diagram The doorbell connection is provided below:
A simplified version looks like this:
Method number 2 – Two buttons
If you want the signal to be triggered from two places, which is very convenient in private homes, then you will have to install two buttons. This connection method is best used if you can get to your home from the front entrance and through any other door. Also, connecting a doorbell with two buttons is often used in production. The connection diagram in this case looks like this:
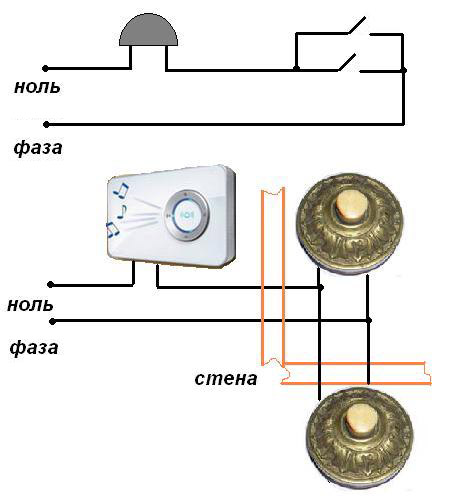
There is nothing complicated, just the buttons are connected in parallel. Please note that it is the phase conductor that must go to the break, and not the zero. We talked about this in the corresponding article.
Method No. 3 – Two main blocks
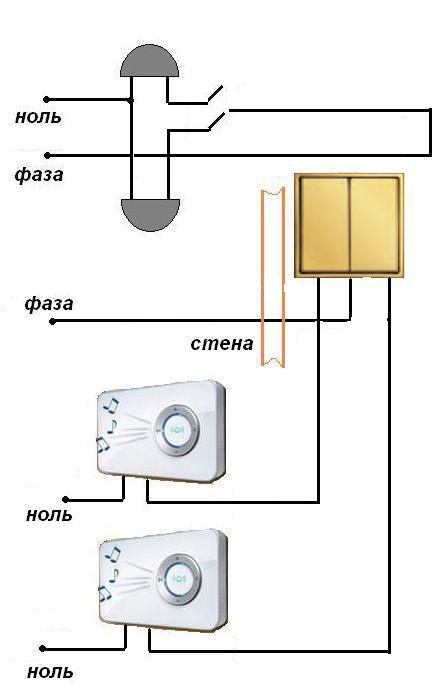
Well, the last, no less popular scheme for connecting an input call is with two main blocks. Again, this option is not used in apartments, because... and one alarm will be enough to hear that guests have arrived. However, in two-story private houses, you can’t hear the bell ringing on the first floor from the second floor. In this case, it is recommended that each button of which will be responsible for its own floor. To make it clear to guests, label each key and warn them in advance about how to use this unusual method of notifying your visit. The circuit diagram for connecting the bell to 220V will look like this:
There are an incredible number of doorbell models, and each of them can be assembled independently. Installing and connecting a ready-made doorbell is much easier than making your own, but now there are still those craftsmen who prefer to make such a device themselves. To decide which design to choose, it is best to pay attention to technical specifications all types of calls.
Features of the doorbell device and 220V connection diagram
The diagram for connecting a door lock to 220V is actually very simple, but before work you need to turn off the electricity, prepare necessary tool, wear special rubber gloves.
The choice of a specific model depends entirely on personal preference, as well as what parts are available, if we're talking about about hand-made assembly.
Every person is familiar with how the device works, but what is under its body? A button is placed outside the apartment, through which a signal is sent to a speaker installed inside the room. This is the most simple model, which can only be found on sale.

There are more modern models, which can be passed from the button:
- Signal;
- Picture;
- High definition video.
It is important to remember that working with electricity is not safe, and therefore you need to familiarize yourself with the technical data of the device so as not to encounter a short circuit when connecting.
How to connect a door lock: types of devices
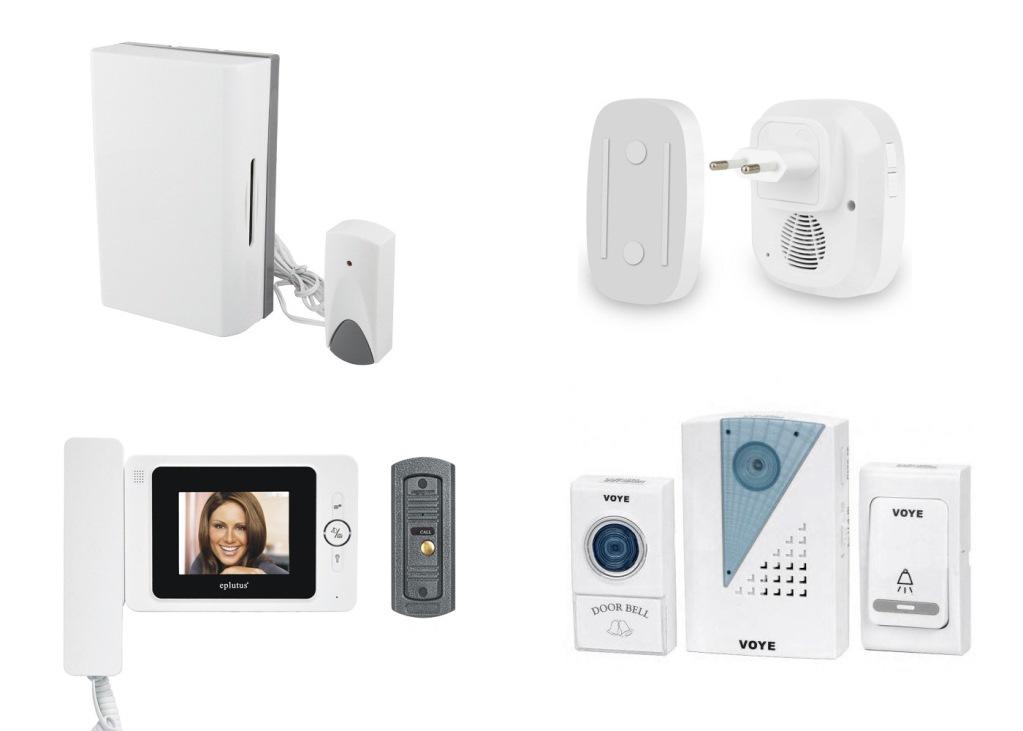
It is much easier to understand what parts may be required and whether the product needs to be connected to 220 volts. A wired bell is a simple design in which all elements, of which there are only 2, are connected via a wire.
This product works for a long time, works properly and rarely causes problems, since there is simply nothing in it to break.
Installing a wireless bell is a little more complicated, since you need to take into account the distance between the button and the speaker so that the radio transmission signal is not lost, otherwise the product will not perform its intended task. In addition to the call button and speaker, installation of a power supply is required. In addition, calls are divided into 3 additional groups. In audio, a melody or voice recording is used as a notification.
Video call has:
- Button connection;
- Speaker activation;
- Miniature camera;
- Anti-vandal coating.
Intercoms allow you not only to notify your home about your arrival, but also to communicate with your opponent, as well as open the door with a button through a special mechanism that connects the lock and the panel installed in the house itself. As a rule, such designs are used only by professional manufacturers, since they must be reliable, of the highest quality and, most importantly, work properly.
Door lock connection diagram
Due to the fact that they exist various types calls, then the connection is carried out completely in different ways. Initially, before you start building a doorbell, you need to decide on certain points.
Namely:
- His appearance;
- Connection method;
- Location.
This determines whether you will need to purchase additional cables, or whether it will be battery-powered, which is much more convenient and also safer, especially for a homemade design. You also need to predict in advance the moment when you need to repair the device, so that you do not have to carry out serious dismantling work, for example, if you sew up a power unit or part of the wires into the wall. If the connection is made to electricity, then access to the product must be open.
The connection diagram of a wireless lock is very simple, and this type of design is most often chosen. First, the call button is installed so that it is convenient for the guest to reach it, and then the location of the speaker is determined, taking into account the range of the radio wave.
To install the elements, it is enough to use bolts or adhesive tape.
To connect a wired call, you will have to work a little more. It is worth considering the fact that pulling the wire is required to connect 2 elements, and therefore you need to first think about the route for placing the cable. It is advisable to lay it through the wall located around the door. This way you won’t need to install a cable channel to disguise it or even hide it under wallpaper or suspended ceiling, if there is one. As for the connection principle, you first need to bring out 2 ends of the wire, in other words, phase and zero. The power cord is inserted into the speaker housing and secured to the terminals. The second end is connected to the call button, and then an electrical cable is mounted to the bell. Before the tool is put away, it is necessary to test the product for the absence of sparks and proper operation in order to prevent a fire in the absence of residents of the house. Video calls require additional connection panels for viewing the room outside the apartment and a panel on which the picture will be directly displayed.
Instructions: how to make a doorbell with your own hands
What is a doorbell for? Is it possible to repair the old one or is it easier to assemble a new one? It is worth noting that repair is an interesting business, but assembling a bell with your own hands can bring a lot of pleasure. It is worth noting that it was previously fashionable to use a base in the form of an old telephone that makes a ding-dong sound to make doorbells.
The Soviet apparatus is the last century, now they began to take the most ordinary children's toys as a basis, since it is possible to choose:
- Melody;
- Operating mode;
- Volume;
- Control to decrease or increase volume;
- Product dimensions.
To make a call with your own hands as simply as possible, you need to prepare a musical toy or even a postcard, a meter-long two-core wire, an indicator screwdriver, and electrical tape. When disassembling the toy, you can find a small circuit board, a chip, a place to install a battery and a speaker. If you take an electric toy that operates by pressure, then it does not have an external button, and the board and speaker are located in a special box inside the product. This box must be very carefully removed and opened, and on the board you can see that very treasured button, which in appearance resembles a rubber tip attached to the contacts of the board.
You need to not only not lose it, but also remember the exact location.
Next, you should pay attention to the wire going to the speaker. It is replaced with a two-core cable. The ends of the cable are stripped on each core. The wires going to the speaker must be carefully trimmed and also cleaned. Actions must be as careful as possible so as not to tear off thin wires from the board. Next, the speaker wires and cable are connected, the other end of which is connected to the board wires. Once the structure is assembled, you need to install a button on the board and check the functionality of the product. To improve the quality of work, you need to insulate the ends with electrical tape. The peculiarity of the design is that it is completely safe, since the probability of a short circuit and fire is 0.
How to connect a doorbell: 2 wires (video)