
Brick is an “aristocrat” among building materials. Many architectural monuments of the world are built from its different types. It is worth noting that a house lined with brick has advantages over other houses, as it is beautiful and looks expensive.
Covering a house with bricks
To this day, a sign of respectability is a house made of many pieces of clay, which were given the correct shape by caring hands and hardened in a kiln at high temperature using a common technology developed back in the Stone Age.
The labor-intensive manufacturing process and high demand due to the unique properties of brick make it very expensive for use as the main building material in the construction of individual housing.
However, its use for finishing facades allows you to give even a budget cottage or an old hut that has lost its former attractiveness a solid look, additional protection and even save significantly in the long-term period of operation of the house on cosmetic repairs by abandoning expensive and short-lived plaster, as well as painting the external surface. And if you line the house with brick yourself, which is not at all difficult, you can use the money saved in this way to finance a bathhouse.
Where to start?
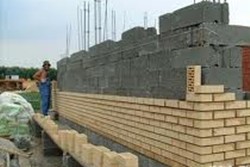
Covering the house with bricks in parallel with the construction of walls
You always need to start with a solution. What if it is accepted when the house has already been built or has been standing for many years, and its foundation (basement) does not have the necessary width (protrusion) to support a very massive structure, such as masonry, even a single-layer one?
In this case, this drawback is eliminated by bringing the base to the required width (i.e. thickens by 20-30cm) by pouring an additional layer of concrete into the formwork, reinforced with a 6-8mm iron rod attached to the “body” capital foundation and (or) base.
Experienced craftsmen recommend laying out the first row “dry” as a “try-on”, without mortar, in order to clarify how the subsequent rows will be located, what gaps, locations of window openings, doors and other architectural elements will have to be taken into account.
Masonry
Brick cladding of external walls. Of course, it’s a costly affair, but this is one of the few finishes that can be called eternal
Single brick laying is not at all complex process. You just need to follow some simple, well-known building rules, which include, in particular, the use of measuring instruments such as a level and a plumb line for masonry work, and a stretched string for even laying of rows.
The main thing is not to be lazy and check their readings more often in order to prevent distortions, deviations from the vertical, unevenness, and other possible errors inherent in inexperienced builders.
When asked how to properly brick a house, the following recommendations will also help you. The facing brick layer should be 2-3cm away from the outer wall for natural ventilation and additional thermal insulation, so it is necessary to connect it with the main wall so that they together form a single rigid structure. For this purpose, during masonry, so-called attachment points that can be created using pieces of reinforcement, wire or anchor bolts (dowels).
At one end they must be rigidly attached to the “rough” wall, and at the other they must fit into the joint of the masonry. After the cement mortar hardens, an exceptionally strong connection between two parallel planes is created. Such fasteners are made evenly at a distance of 0.8-1 m from each other, if the main wall is not made of wood. If the house is made of timber or logs, strips of roofing sheet can be used as connecting elements, and the attachment points should be made more frequent - every 2-3 rows and at a distance of no more than 1 m.
Cement mortar for facing masonry It is prepared according to the same scheme as for the usual one: 1 part of cement to 3-4 parts of sand. The mass is thoroughly mixed and only then water is added, continuing to stir, until the required consistency. Some people also recommend adding lime paste to the solution.
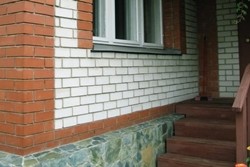
When facing, you can use two colors of brick
How to beautifully cover a house with brick? To ensure that the rows are even and the seams between them are of the same thickness, you will need a grading strip and a ruler. Laying begins with several “beacon” rows of bricks from the corner. Having measured the height of the control beacon, an adjacent corner of the same height is placed.
You can stretch a rope between them so that the rows connecting them are even. During the process, it is necessary to constantly check the height of the beacons, and to adjust the height of the rows, the thickness of the seam is increased or decreased using the amount of mortar. Each subsequent row is installed in the same way.
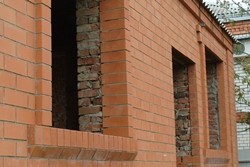
For the construction of window and door openings, lintels are used, similar to those used for the construction of main walls.
Upon completion of the work, it is necessary to protect the facade with a sheet of roofing material or polyethylene from precipitation to prevent the leaching of the not yet hardened mortar from the seams. This is especially true if sand-lime brick was used for cladding, which slowly absorbs the water contained in the masonry mortar.
Technology of lining a block house with bricks
Firstly, let us remind you that you can cover a house with brick using decorative bricks, otherwise there is simply no point in it.
For example, if you bought an old house and you don't like it appearance, then you can resort to this kind of decor. Since we are talking specifically about decorative brick, we need to clarify what it is.
Decorative brick can have several types. It may contain holes, or it may simply be made in the form of an ordinary red brick. But such bricks, as a rule, have the correct shape and have no defects.
Brick tiles can be used. It is sawn at the production stage, that is, at the factory itself. It turns out lighter than the brick itself, but at the same time retains all its qualities.
Cladding a house made of foam block, and the cladding must be done correctly, will help make such a house even warmer and more comfortable.
Cladding process
You can properly brick a house yourself, but it is better to use the services of a specialist in this field.
When starting work on facing a house with bricks, you need to remember that it is imperative to arrange a thermal insulation layer and ventilation of the walls of the house.
Wall ventilation is done by installing ventilation holes in the walls. They are needed to ensure that an optimal climate is maintained between the two walls and a greenhouse effect does not occur.
To create a ventilation system, you need to take care of creating its two main elements:
- Ventilation ducts;
- Upper and lower vents.
Ventilation ducts are very simple to create. They are seams that are not filled with mortar. Since brick cannot be laid on brick without mortar, but at the same time leaving space there, such seams are made vertical. They just don’t put mortar on the sides between two bricks in the third or fourth row. There is a gap there, which acts as a ventilation duct.
Vents are large holes that are made under the eaves of the building, that is, from above, and in the foundation, or base of the building, that is, from below. The vents that are below will be properly installed below the floor level. Those vents that are located above need to be arranged under the roof.
To prevent the floor from freezing in winter, the vents are covered with any material during the winter. Any insulation material can be used. In the old days, a cloth was used for this purpose, which was coated with a clay solution.
Mixing the solution
You can properly brick a house if you know how to do it and know what to do it with. The correctness of the masonry depends not only on the ideality of the chosen technology, but the materials themselves, that is, their quality, are largely decisive.
Now we are talking about what kind of mortar is used when laying bricks.
In order to properly prepare a good, proper cement mortar, you must adhere to the following rules and recommendations:
- Compliance with the proportions of preparing the solution;
- Thorough mixing of the solution;
- Using unspoiled cement;
- Preventing the entry of heterogeneous debris into the solution.
If everything is clear with the first and second rules, then the question arises about the third, that is, with damaged cement. The thing is that when stored for a long time, cement becomes damp and hardens, then they begin to grind it. However, he will no longer be the faction he was originally. Accordingly, the quality of the mortar prepared from this cement will not be at the proper level.
In addition to these rules for preparing cement, there are also rules that must be followed directly during the laying process itself:
- Before laying the brick, you must stir the cement mortar so that the sand that has settled to the bottom is mixed and the mortar itself reaches the desired consistency;
- The cement mortar must be applied as evenly as possible to ensure the strength and reliability of such joints;
- Seams, both horizontal and vertical, should be no more than 15 millimeters thick. In this case, it is better to make all seams of the same size, so you can choose the optimal range of seam width, which is 10-15 millimeters;
- If splashes of mortar get on a brick, it is better to remove them immediately, since after the mortar has hardened, it is quite difficult to remove it from the brick, and the integrity of the brick itself can be damaged.
Directly facing
The entire technology of cladding a block house is carried out in a sequence of various works, for which there are recommendations:
- Carrying out material calculations. This must be done in advance to avoid purchasing the missing number of bricks later. In principle, buying additional bricks is not a problem, but the problem is different. The second purchase assumes the presence of bricks from a different batch, which will differ in their shade, which is very noticeable;
- Therefore, the calculation must be performed as accurately as possible. You must remember to add to the calculated amount required bricks another 10-15 percent. This reserve is needed in order to provide a reserve in case of unsuitability of individual bricks, which may break or crack at different stages of construction;
- The so-called trial laying is carried out. You need to cover approximately 1 square meter area. After which the seam texture is selected, the seam thickness is specified, and so on. Test laying should be carried out with each new batch of mortar or brick;
- In order to correctly calculate the number of bricks, the first row is laid, and then it is removed, while the number of bricks is counted. This test row is laid without mortar, but maintaining the approximate distance between the bricks. This test row is also used to make sure that the dressing at the corners will be correct. If the dressing does not work, then you need to use somewhere not a whole brick, but half;
- If the masonry is carried out in one pre-selected way, then it should not be changed later. The same rule applies to the mortar used, that is, the cement mortar must be mixed constantly in the same proportion;
- As for the solution itself, there is no need to experiment. Due to the desire to save money, when preparing cement mortar, many people violate the recommendations proposed by the cement manufacturer. It should also be noted that, despite the presence of numerous different additives that are needed in order to perform work with cement mortar in frosty weather, it is better to generally stop all types of work related to cement mortar at temperatures below zero. Such additives deteriorate the quality of the solution, and, accordingly, the quality of the facing wall;
- Often bricks differ in their shade even in the same batch. However, this difference is not great, since one batch was used, that is, one batch. There is no such difference between bricks from the same pallet. So that these differences are not noticeable, and the color seems uniform, it is necessary to equally use bricks from different pallets during laying;
- During the laying process, you need to constantly monitor the evenness of the masonry. This can be done using a level and plumb line;
Connection of blocks and bricks
In order to connect two walls, that is, block and brick, reinforcement is used. After the foam block wall has been insulated, bricklaying begins.
In this case, two walls are connected with reinforcement. Reinforcing pins are made from it, the length being equal to the width of the brick wall plus the distance between this wall and the block wall and plus a couple of centimeters.
Such pins are installed every approximately 5 rows of brickwork.
First, they are driven into the block wall a couple of centimeters. You need to drive them in so that they lie on the surface of the brick. The step with which you should drive is 60-80 centimeters.
Then the next row of bricks is placed on these pins, while the pins themselves should be inside the masonry so that they do not create cold bridges.
How to deal with rashes
To properly brick a house means not only to do the laying correctly, but also to do it beautifully.
Sometimes this very beauty is disturbed by the so-called vysopy. These are white spots on the surface of the brick. They are formed due to the fact that the salts that are present in the solution come out.
To prevent this from happening, you must follow the following rules:
- Bricks should be kept in a dry climate. They can be placed under a canopy or in any covered room so that rainwater, which also contains salts, does not fall on them;
- During the laying process, you need to use the thickest possible solution, that is, the one that contains the least amount of water;
- Do not allow the mortar to come into contact with the bricks;
- It is necessary to stop work if it rains to protect the bricks from getting wet;
Final stage
![]()
Brick-lined house
So, after the masonry is ready, all that remains is to do some finishing touches.
To give the mortar between the bricks, that is, the seams, an aesthetic appearance, it is smoothed with a trowel, but not with an ordinary one, but with a special one.
In this case, the entire surface of the wall must be cleaned of rashes, if any, dust, mortar and other debris. You can get rid of rashes using a 10 percent perchloric acid solution.
You can also make the seams curly. For this, a special tool is used, which can easily be done at home. You need to take a piece of metal pipe, the diameter of which will be equal to the thickness of the seam. This pipe must be cut at an angle of 45 degrees.
This completes the cladding. In this way, you can cladding not only a house, but also any other foam block structure.
Conclusion
It is worth noting that a house lined with brick looks very beautiful if the masonry itself is done beautifully. To cladding a house with your own hands, you need to use the simple tips and recommendations suggested above. It would be nice if the person who carries out such work has the skills of a mason; if there are no such skills, then it is better to practice on smaller structures.
All photos from the article
No matter how good wooden house, its walls are much more susceptible to wear and tear than, for example, the walls of a brick building. Therefore, sooner or later there is a need for its cladding. One of the most reliable finishing options is lining the walls with bricks, which, in fact, is the subject of this article.
Below we will look at all the advantages and disadvantages of this solution, as well as the technology of how to properly line a wooden house with bricks.
When is cladding required?
Finishing wooden house brick may be required in the following cases:
- The house is built from low-quality wood and has an unpresentable appearance or its geometry is far from ideal.
- The building has a frame-panel construction. In this case, it can be pre-designed for this type finishing.
- The house is old and needs strengthening of the walls. This case is the most common.
Pay attention!
Not every wooden house can be clad in this way.
To determine whether a wooden house can be lined with bricks, you should pay attention to the eaves overhangs, under which the brick wall should fit.
In addition, it is prohibited to finish a building that has not yet shrinked.
Frame cladding calculator
A simple calculator looks like this:
Features of brick cladding
Before purchasing materials and starting work directly, you need to familiarize yourself with all the positive and negative aspects of such finishing, which we will do below. So, a wooden house lined with bricks – the pros and cons of such a solution:
| Qualities | Features of cladding |
| Positive | Brick cladding has quite a lot of positive qualities:
|
| Negative | As for negative qualities, among them are:
|
Advice!
Many home craftsmen, in the process of renovating a house, also remodel it, as a result of which they often ask on forums how to lay brick on a wooden floor in order to build a partition.
However, experts for a number of reasons do not recommend doing this, even if the floor boards are strong enough.
Cladding technology
Materials
If, after considering all the pros and cons, you have not abandoned the idea of cladding a wooden house, then you need to purchase the following materials:
- Brick - silicate, facing, etc.
- Materials for the mortar are river sand and Maki M300 cement.
- Reinforcement - will be needed when arranging the foundation.
Advice!
You should purchase bricks based on the fact that about 50 bricks are required per square meter.
Moreover, you should purchase 10-15 percent more material than is required according to the calculation.
Foundation
If the house is built on a wide foundation, then no additional foundation is required. However, in most cases, before covering an old wooden house with bricks, it becomes necessary to make a shallow foundation.
It is performed as follows:
- Along the perimeter of the house you need to dig trenches 50 cm deep and about 30 - 40 cm wide.
- Next, the bottom must be covered with a layer of sand and crushed stone. The total layer thickness should be about 20 cm.
- Then formwork is installed from boards or chipboards.
The photo shows an example of laying reinforcement
- After this, the associated reinforcement is laid, and the formwork is filled with concrete. This operation must be completed in one go.
Pay attention!
During the pouring process, concrete must be compacted with sticks to prevent voids from occurring.
After pouring the foundation, work should be stopped for 28 days until the concrete reaches grade strength.
Preparation
Before you start finishing, you need to prepare the walls yourself by following these steps:
- First of all, it is necessary to dismantle the casings, platbands and other unnecessary elements.
- If the house is old, it is necessary to clean the walls of moss, dirt, etc.
- After this, the walls must be treated with antiseptic impregnation, which prevents rotting and mold formation. (See also article.)
After this, you can proceed directly to finishing.
Wall covering
The cladding instructions are as follows:
- The work begins with waterproofing the foundation. To do this, it is necessary to lay several layers of roofing felt on the base.
- After this, the first row of bricks is laid at a distance of about 6-10 cm from the wall. This is necessary for air ventilation, which will prevent mold from forming on the walls. (See also article.)
The position of each brick is checked with a building level, after which any deviations from the horizontal are eliminated. In addition, it is necessary to stretch a thread along the wall, which will serve as a beacon for each row.
- Next, the second row is laid, and the gap between the bricks of this row does not need to be filled with mortar. The slots in this case will serve as ventilation ducts. Another similar row needs to be done at the top, under the roof itself.
- After this, all other rows are built. A lintel is placed above the doorway and windows, which can be used as metal corners or a concrete beam.
An important point is the fastening of the cladding to wooden walls. To do this, you can use anchors that are laid every five rows and attached to wooden walls. The step between the anchors is about half a meter.
Pay attention!
During the laying process it should be cleaned immediately outside bricks from the mortar, since after the composition dries it will be more difficult to do this.
Here, perhaps, are all the main nuances of facing a house with brick.
Conclusion
Cladding a wooden house is a fairly lengthy process, consisting of a number of construction work. However, after familiarizing yourself with the technology and the main nuances of finishing, every home craftsman can do it independently.
You can get acquainted with some additional useful information on the topic discussed in the video in this article.
Many owners of suburban areas, after a certain period of operation of their home, are faced with the need for additional cladding of the facade to improve its appearance and thermal insulation properties.
This task is especially relevant for a wooden house: over time, its walls lose their original attractiveness and begin to let in cold air. In such cases, one of the most suitable solutions is brick lining: the new facade will look stylish and high-quality, and will also help save a lot on heating costs.
Which brick is better
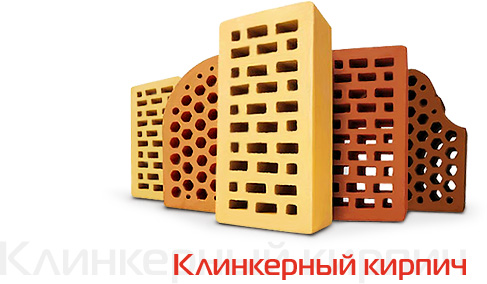
If you decide to clad a wooden house with brick, the first question that needs to be resolved is which type of brick is best to use. To do this, let us briefly consider the characteristics of the main types of bricks used in individual construction:
- Silicate. It is made from a mixture of lime and sand, has a relatively low water absorption rate (6-8%), low price and provides good sound insulation;
- Ceramic. Its production is based on the long-known technology of clay firing. This is a longer and more complex process, which is why such bricks are more expensive than silicate bricks. In addition, it absorbs moisture more strongly. But ceramic products lighter, stronger and retain heat much better;
- Clinker. The most expensive and high-quality type of ceramic brick. Differs more high temperature firing (about 1200°C). Properly made clinker brick has exceptional indicators of water absorption, strength and frost resistance.
 Thus, if the main task of the cladding is high-quality finishing and insulation of a wooden house, ceramic bricks are needed (when funds allow, clinker bricks). Well, if the main calculation is made to minimize cost and resistance to precipitation, then it is better to clad the house with sand-lime brick.
Finishing the facade of a house will require lower costs if you buy special facing bricks - a house made of timber, lined with building grade bricks, will require plastering and painting.
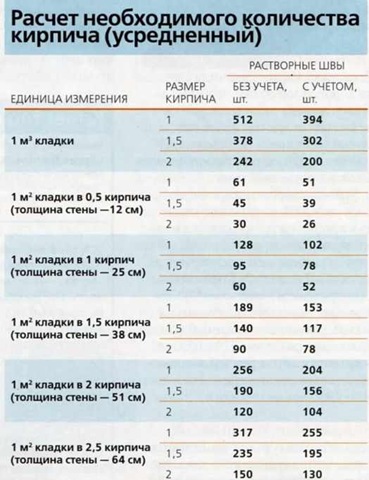
Calculation of the quantity of materials
In order for the finishing of the house to take place without unpleasant surprises, before it begins, it is necessary to make a calculation required quantity building materials, i.e. correctly determine how much brick, cement, sand, and concrete will be needed if you have to pour a separate foundation for the cladding. This is quite simple to do, the main thing is not to make mistakes in the simplest mathematical operations.
Features of the technology
House exterior cladding brick facade does not require special skills and can be done independently if you have minimal experience in construction work. At the same time, brick cladding requires precision, accuracy and adherence to a certain sequence of actions:
The finishing of the facade must be done from the bottom up with mandatory control of horizontal and vertical deviations. To do this you need to use a level and plumb line.
For more information on how to cover a wooden house with brick, watch our video below:
How much does it cost
Of course, the main question when choosing the material with which it is better to cover the facade is the total cost of the project. Let's try to estimate the order of magnitude of expenses using a real example.
Let's say we have a wooden house measuring 8 x 10 meters, we want to clad the house with brick to the height of the first floor (approximately 2.5 m).
This will require costs for:
- Brick cost. The surface area of the house is 90 square meters. m. Therefore, we will need approximately 4,000 bricks (including door and window openings, for which we allocated 10% of the area). If finishing will be carried out ceramic bricks, then the costs will be 60,000 rubles (we assume that one brick when purchasing such a batch costs 15 rubles).
- Cost of the solution. We will use ready-made construction mixture. In order to cover 90 sq. m. you will need 180 kg of a properly diluted mixture. Considering that the mixture is sold in 50 kg bags, we buy 4 bags, spending 600 rubles. (we assume that a bag of mixture costs 150 rubles).
- Cost of concrete. The volume that needs to be filled is approximately 11 cubic meters. m. (we assume a pouring depth of 1 m, although perhaps it would be more correct to take it equal to 1.5 m). The cost of concrete will be 11*3500=38500 rubles. Let's add here the cost of the reinforcement frame (approximately 10,000 rubles), and we get the cost of the foundation 48,500 rubles.
Thus, finishing our house will cost approximately 110,000 rubles. For this money we can cover all four walls of the first floor with ceramic bricks. This technology will provide warmth and comfort in the house, savings on heating costs and a low load on the foundation.
A few words about aesthetics
Since ancient times, a brick house has been considered a sign of the well-being and respectability of its owner. So if you want to seriously improve the appearance of your home, you can line it with brickwork. Today the market offers a large selection of special facing bricks, painted in a variety of colors. Particularly pleasing is the range of colors and textures of ceramic bricks, which also have improved performance properties.
You just need to line the walls of your house with modern ceramic bricks once, and they will be for a long time delight you with a smooth surface of a soft, noble color.
The external lining of a wooden or stone house with brick allows you to perform several tasks at the same time.
Preparatory work
- When a log or cobblestone house is designed, the permissible maximum pressure load on the foundation, floors and walls is taken into account.
Pay attention!
If the option of additional brick cladding of the facade of such a house is envisaged in advance, then weighting must be included in the calculations load-bearing walls.
If this is not done, there is a real danger of the building collapsing.
- Before work, carefully inspect all load-bearing supports of the floors. Such an inspection is especially necessary if the building is old, since the condition of the timber deteriorates over time. Floor beams should not be dry or damaged in the form of cracks or rotten or moldy spots. It is highly desirable that they be impregnated with an antiseptic and fire retardant.
- The space between the beams and the basement/basement area must have adequate ventilation.
- If the aging of the building has affected the strength of the load-bearing floor supports, they will need to be strengthened. This can be done either by increasing their number, or by completely replacing old beams with new ones and increasing their diameter.
- When making brick cladding of a wooden house with your own hands, remember that it must have support in the form of a foundation. Otherwise, it will shrink critically under its own weight.
- To avoid this, expand the foundation as necessary, by about 0.30 m. Do not forget to moisture-proof it using glassine or roofing felt.
- If this has not been done before, saturate the wood walls with an antiseptic and then with a fire retardant.
Building cladding
Now about how to properly brick a house.
Rules for working when cladding a wooden house
- The thermal insulation properties of wood are very good. However, for many regions of Russia, where winters are very harsh, they are not enough. Therefore, additional insulation for brick cladding of a wooden structure will not be superfluous.
Pay attention!
The best thermal insulation material, in this case, is mineral wool.
It, unlike polystyrene foam, does not create obstacles to the natural “breathing” of wood, and also promotes good ventilation.
- For lining, you can use both ceramic building bricks and silicate. The best binder is a solution consisting of cement, lime paste and sand in a ratio of 1/2/9.
- When carrying out work, make sure that the masonry is done correctly vertically and horizontally. Constantly check it using a building level and a plumb line.
- Brick and wood must be tied together with galvanized metal pins. They are driven into logs or beams. Their free end, 6/8 cm long, is fixed with mortar in the masonry. The horizontal step between such pins should be about 1 meter, and vertically – 3/4 of a row of brickwork.
- When lining a wooden house with bricks, it is necessary to leave a gap between it and the wall. It should be equal to 4/5 cm. This gap is needed to lay thermal insulation material and prevent moisture accumulation.
- For good breathability in brickwork you need to leave ventilation ducts every 2-3 m. They must be equipped with a grill or fine steel mesh to prevent rodents from getting under the cladding.
- Approximate consumption of building materials per 1 m² of building walls: 50 single bricks and 5/10 pins.
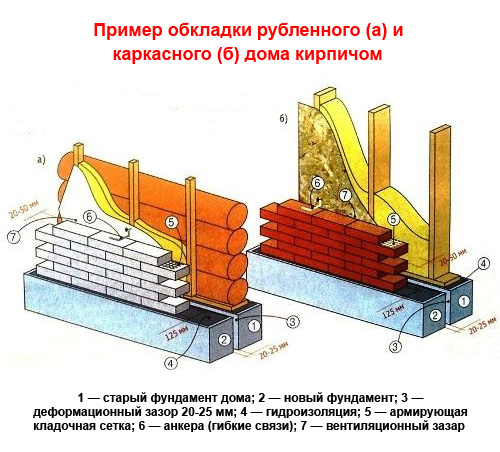
Brick lining of stone and block buildings
Such a wall design is called mixed or combined, because in this case two types of stone-like materials are used. The structure of the house is similar to a three-layer cake.
Its internal part is laid out from natural stone or slag, foam, and aerated concrete blocks. When facing the facade, ordinary or is used. An insulating layer of appropriate materials is laid between the outer and inner parts of the walls.
- Fixing a mineral wool heat insulator on inside walls should be done using special disc-shaped dowels. Their consumption per 1 square meter of surface should be no less than 5 pieces.
- To prevent the insulation from being blown through, it must be covered with a breathable material, for example, a membrane film.
- It is necessary to make an additional ventilation gap, 2/4 cm wide, which will separate the insulation and cladding.
- The thickness of the walls protecting a stone or block building from external influences should be half a brick.
- Vents must be left in the upper and lower cornice rows of the cladding. These are gaps between the ends of the bricks, 1/1.2 cm wide. The step between them should be no more than 4 meters. The optimal option is 8 breaths per brick wall(4 above and 4 below).
- Vents can be made from laid on ribs, so that air enters the internal ventilation gap through cavities in the material.
- Another option, which costs less, is to provide air passage using restrictive wooden slats. To do this, they must be placed in the middle vertical seams. Their bottom, when filled with cement mortar, will remain empty.
- The outer and inner layers of the “pie” must be connected. This must be done, taking into account the fact that they can become “cold bridges”, which lead to a significant decrease in the thermal insulation qualities of the cladding.
Pay attention!
Based on this, the best option is to use fiberglass reinforcement as an anchor, which has a low thermal conductivity coefficient.
Heat losses are also reduced by stainless steel fasteners.
Conclusion
External brick cladding of the house, if you follow all the rules of this work, will give, even to an old building, a solid, attractive and neat appearance (see also article). In addition, increasing the heat and moisture insulation qualities of a building will extend its service life for a long time.
In the video presented in this article you will find additional information on this topic.