
- Types and sizes of facing brick blocks
- What to pay attention to when laying facing bricks?
- Laying face brick blocks with your own hands
- Leveling the base and laying out the bricks
- Brick block cladding process
Among the types of brickwork, the most difficult is the laying of facing bricks. This procedure requires a more measured and precise approach than with any other type of construction of brick structures. In addition to ensuring uniformity, laying facing bricks with your own hands means maintaining accuracy and cleanliness during the work process. In most cases, the main purpose of facing brick blocks is considered to be finishing the exterior of the building. In addition, this type of building material is used to finish indoor structures, for example, fireplaces, columns and other decorative elements of the home interior.
Basically, facing bricks are used to decorate the outside of the house.
Types and sizes of facing brick blocks
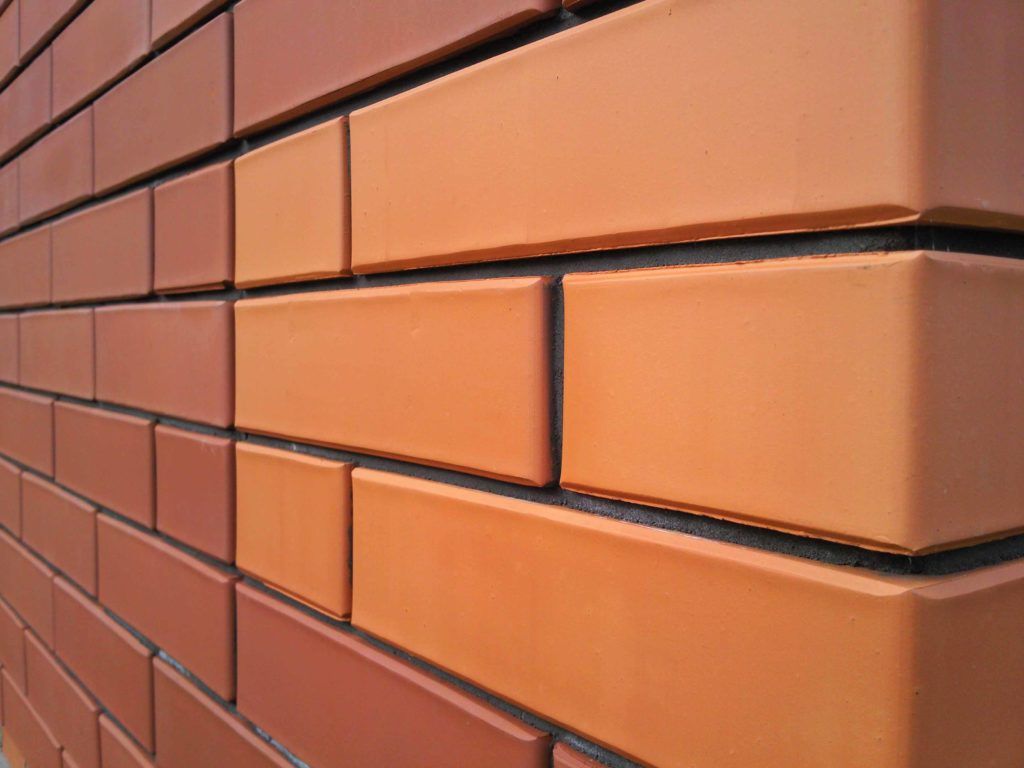
Facade structures made of face brick They are primarily constructed for decorative purposes, so when erecting buildings it is necessary to pay special attention to such masonry. If ordinary sand-lime or ceramic brick has a rough surface, then the facing building material is made in different shades or with a completely smooth coating. The range of shades of facing bricks is quite wide, so choosing the one that best suits your own taste will not be difficult.
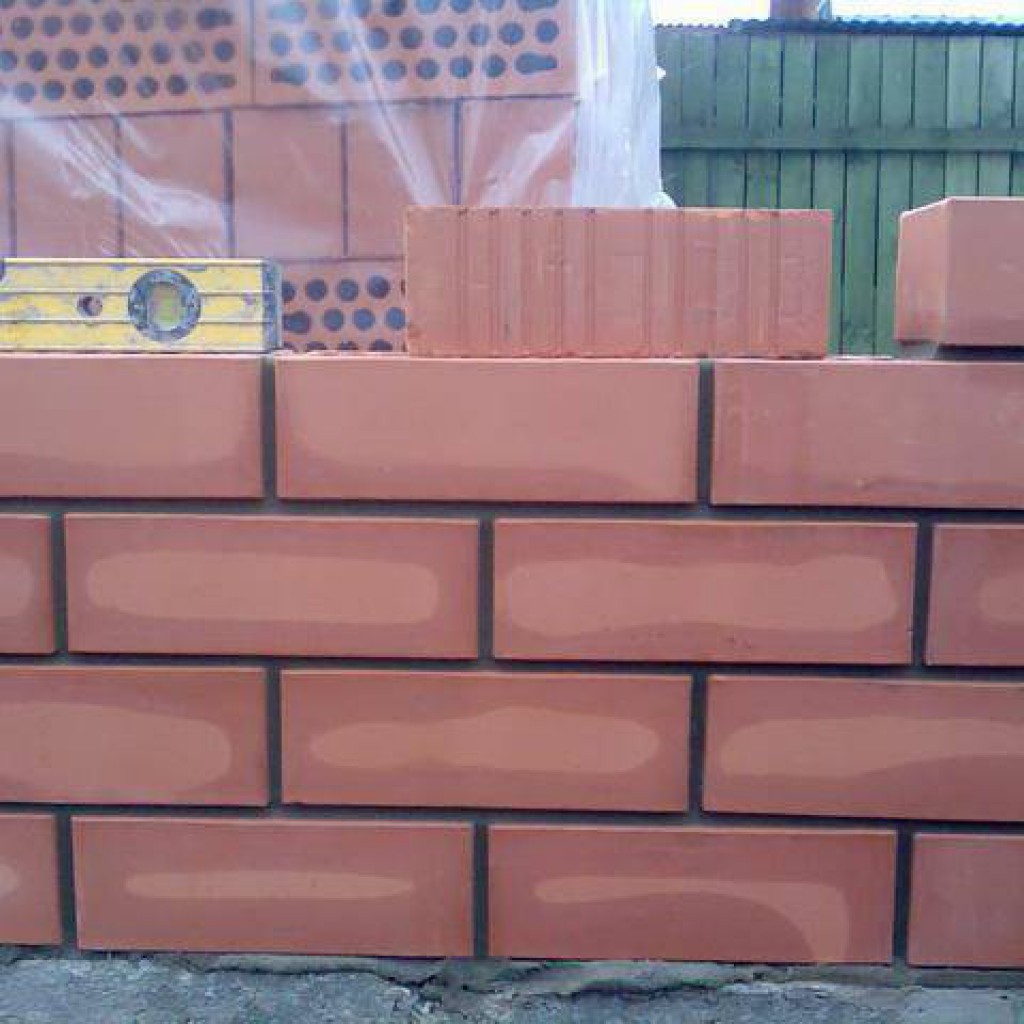
The main difference from ordinary brick blocks is the perfectly uniform shapes of the facing building material. Its outer part is made in compliance with clear dimensions, so it is necessary to inspect each block before laying for chips. The permissible differences in dimensions are 4 mm in length, 3 mm in width and 2 mm in thickness.
In addition to the shade and texture, facing brick blocks differ in workmanship and safety margin. Facing bricks are divided into clinker and simple. The first ones have low level water permeability, while the latter have a higher degree of liquid absorption.
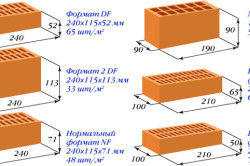
The standard size of facing brick blocks is similar to the size of a regular ceramic bricks– 25×12×6.5 cm. The size of narrow facing bricks is 25×6×6.5 cm. And the basic parameters of a thick facing brick block are:
- 25x12x8.8 cm;
- 25×10.7×6.5 cm;
- 23x10.7x6.5 cm.
Return to contents
What to pay attention to when laying facing bricks?
Laying out facing brick blocks is carried out using almost the same technology as. In this case, it is necessary to take into account certain nuances of this process, since the structure being built will act as a decorative structure.
To determine the identity of the bricks, it is necessary to lay them out dry. This way you can weed out brick blocks that differ in size. Cutting building materials is carried out using a grinder, on which a special disk for processing stones is installed.
The use of the disc for metal processing is unacceptable. It is not advisable to trim brick blocks using a chisel and hammer. Of course, the pruning process takes longer, but it is safer because it allows you to do all the work neatly.
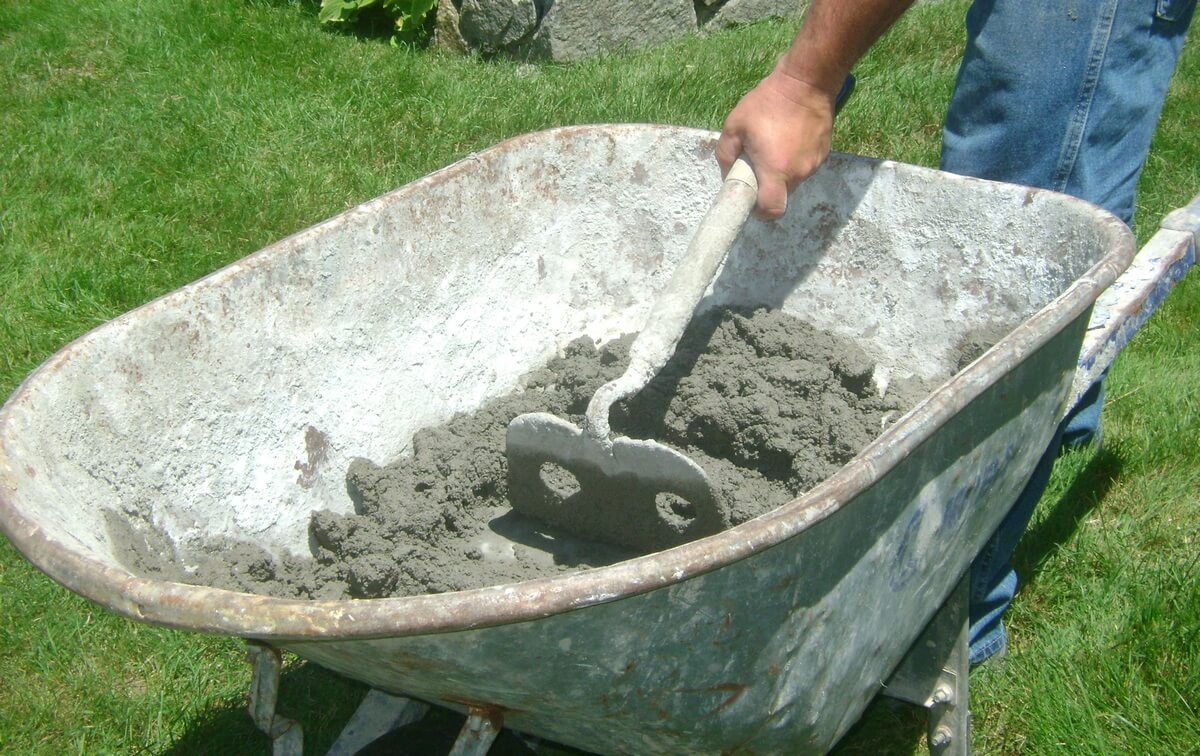
Facing bricks must be laid on a regular cement-sand mortar. In this case, you will need to buy high-quality sand or sift out the existing one well.
If desired, the solution can be given the shade of a facing brick by adding a special pigment sold in construction stores.
The mixture is best prepared in small portions, as it quickly loses its viscous properties.
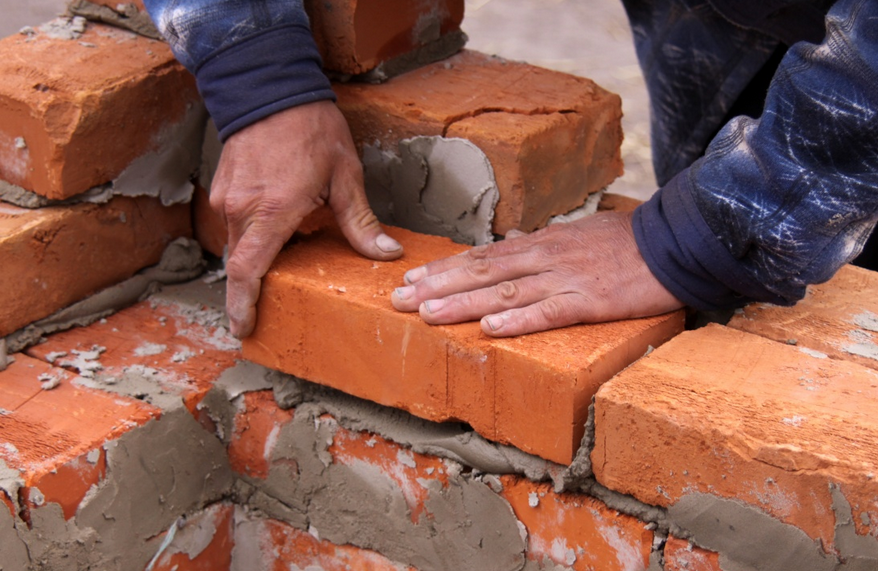
During the laying process, the mixture on the block must be placed in such a way that it does not reach its edge by 1-1.5 cm. Experienced builders recommend using a special form that is designed for standard size facing brick.
With its help, you can arrange the mixture in an even layer in the required amount. When mixing the solution, it is worth remembering that it should be a little thicker than usual. This is required so that the mixture does not glass and does not spoil the decorative surface of the facing brick blocks. If it does get dirty, you need to clean the coating immediately, otherwise it won’t be easy to do after it’s completely dry.
Once you have finished laying one row, you need to clean the face of the laid bricks using a damp cloth or sponge. This must be done carefully and slowly, the main task is to preserve the original appearance of the building material. When laying, the following joint dimensions should be taken into account:
- protrusion of the seam beyond the front surface - no more than 1-2 mm;
- vertical seam thickness – 10 mm;
- horizontal seam thickness – 12 mm.
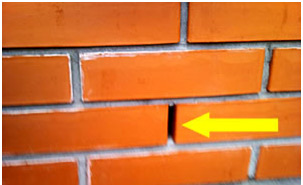
When laying out bricks, it is worth observing a certain pattern: every fourth vertical seam should remain empty; there is no need to fill it with the mixture. This is required to ensure ventilation in the space behind the wall.
To increase reliability during the work, it will be necessary to use various methods of laying brick blocks. The simplest of them are single-row and chain dressings.
Return to contents
Laying face brick blocks with your own hands
Before starting work, it is worth considering that laying out facing bricks is a rather labor-intensive process. In particular, this applies to hyperpressed bricks. If you are building a three-dimensional structure, without outside help you can't get by.
In most cases, facing brickwork is carried out simultaneously with the construction of the walls of the building. It is connected to the thermal insulation layer using a special intra-wall network. But what to do if you want to do decorative facade does it appear from facing bricks after the house is built? Below we consider in detail the process of laying brick blocks with connection to the finished building.
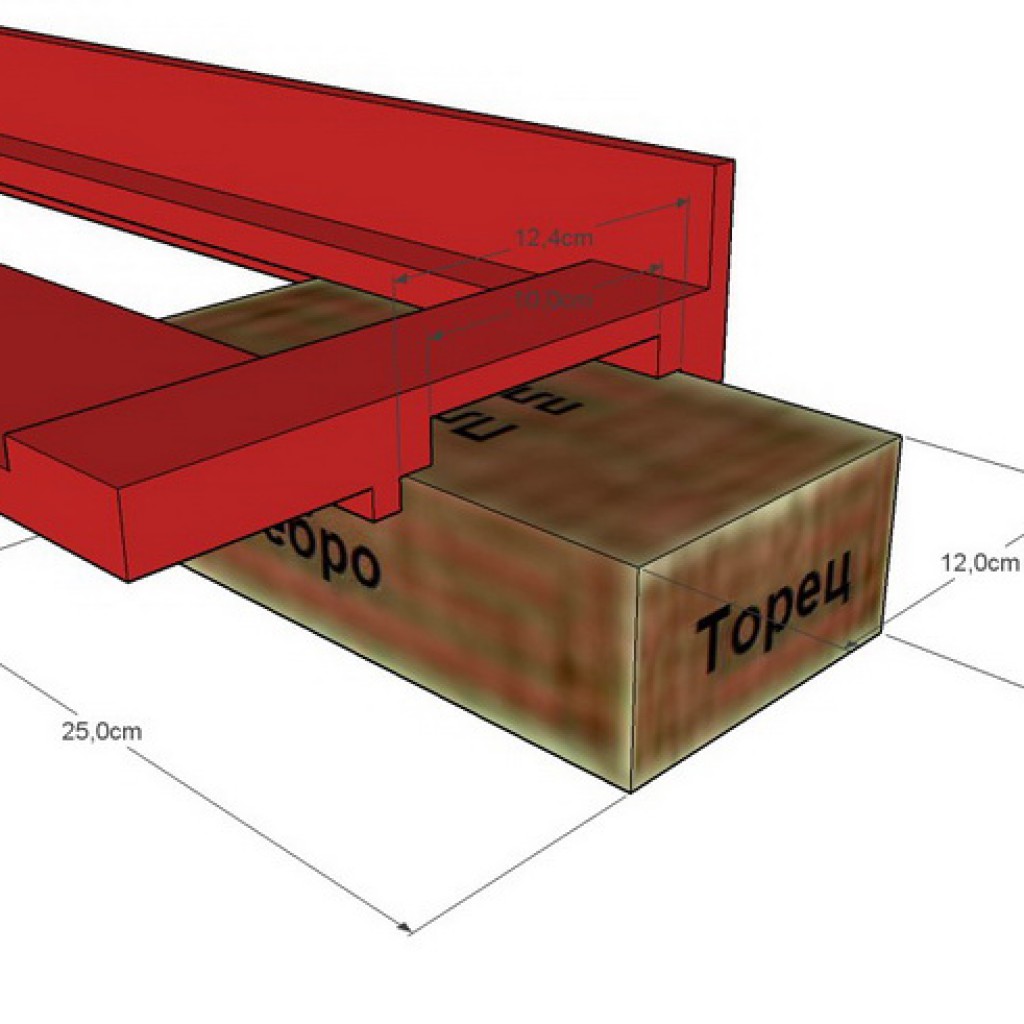
It is important that the base of the structure protrudes beyond the façade wall by at least 12 cm. This will provide reliable support for the brick facing being built. Before starting work, you will need to increase the reliability and thickness of the base.
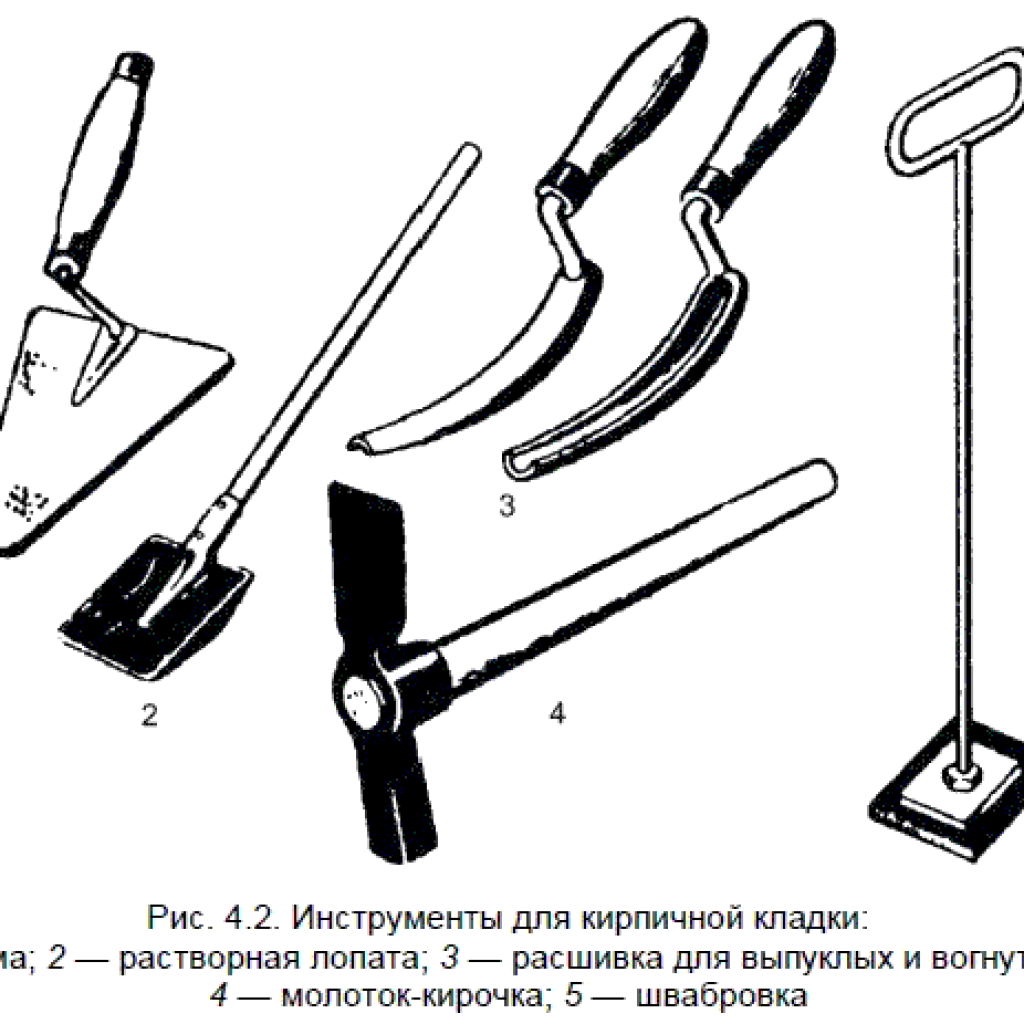
Brickwork will require the following equipment:
- concrete mixer or construction mixer;
- several buckets;
- strong thread;
- Master OK;
- plumb line;
- hammer;
- rod with a square cross-section of 10×10 mm and a length of 80 cm;
- rod with a circular cross-section with a diameter of 10 cm.
Facing brick laying technology often throws inexperienced builders into panic, especially if the work is carried out independently and without experience in such work. In most cases, it all comes down to the fact that the masonry is done like ordinary stone, although it has some differences. This material is used when it is necessary to decorate the facade of a building. It can often be seen on columns or fireplaces. Even if it is repurposed to decorate the outside of the building, it is often used to furnish the premises inside. This technology will create an unforgettable ambience in any room.
Properties, types and parameters of bricks
Do-it-yourself torn brick will only look good if the product itself is chosen correctly. Of course, a lot depends on the installation process itself. Unlike other devices with which the market is saturated, facing bricks must have a special appearance. It should clearly distinguish colors and shades.
The building material is characterized by a red or yellow color. Unlike the standard stereotype, this product can have a wide variety of color schemes. The front side of the brick also comes in two types: smooth and decorative. Features at the link.
The main difference is that the facing material has special parameters. It clearly defines the angles, dimensions and ends. A quality product should not have significant damage, deep scratches or chips.
The size is considered normal if:
- The length is at least 4.4 millimeters.
- Width at least 3.3 millimeters.
- Thickness of at least 2.3 millimeters.
Depending on the quality of the product and its duration in operation, clinker and simple bricks are distinguished. Simple is highly resistant to water penetration, therefore it has a larger number of holes. Silicate double, known under the brand name M 150, is often used.
Cladding of window openings brick must adhere to clear dimensions, and therefore it is important to know the basic dimensions:
- Ordinary brick - 250 X 120 X 65;
- narrow - 250 X 60 X 65;
- thickened - 250 X 120 X 88; 250 X 107 X 65; 230 X 107 X 65.
Facade masonry. Peculiarities.

Like any work that requires attention from the worker, facade masonry cannot begin without special knowledge, namely:
- To perform the installation process correctly, it is recommended to make vertical shrinkage and expansion joints. They must be located at least 4 meters apart along the entire height of the building.
- Be sure to let the material dry. Allow more time for this.
- You should initially lay out the masonry without mortar. This will help get rid of defective products.
- The first row begins to be laid vertically. The same masonry should be done at the final height and at the transition to the opening. Also make a similar vertical structure near the load-bearing structures.
Laying facing bricks, the video can be viewed as they are laid, requires strict adherence to the thickness of the mortar joint. It should not be higher than 1.5 centimeters. Try to limit exposure to moisture while working. At the highest point of the masonry, it is recommended to lay waterproofing material. The best option For installation, a hard mixture will be used.
Masonry under the template
In this case, it is not recommended to apply a layer of the mixture more than 1 centimeter thick. It is recommended to pay special attention to the front edge. There should be at least 1 centimeter left of the solution before it. In this case it is better to use a template. Its role can be played by a wooden strip, which is 60 centimeters wide and up to 1 centimeter thick. At the bottom of such a rail there is a small protrusion, which is convenient for holding it with your hand. The lath rests against the wall and the solution is applied to it.
Today you can find metal templates. This is a small rod that has a square cross-section. In this case, the solution is made thick so that it does not leak under the weight of the structure.
The solution is installed on the outer edge of the building material. If the surface is horizontal, then it must be installed vertically. A mixture of sand and cement is poured onto it. Next, a trowel is used, which allows you to remove excess residue and lay it in a row of masonry.
Correct installation of facing bricks.

Laying ceramic bricks, a video on this material is best viewed right away, involves difficult work. This product has a special specificity, and therefore self-installation can become significantly more complicated. Here you need not only attention, but also precision in performing actions. If the amount of work is large, then you cannot do without an assistant. In this way, the cost of laying bricks will increase significantly.
The photo will help to do the work correctly; it occurs at the same moment as the construction of the building itself. In this case, you should use a special mesh that will allow maximum interconnection of both types. If there is a need to insulate the structure, an additional layer of insulating material is installed.
If the building has already been erected and it becomes necessary to lay facing bricks, additional measures must be taken. In this case, the base should protrude beyond the wall by at least 12 centimeters. The selected distance will make an excellent emphasis for future construction. It is also necessary to strengthen it and slightly expand it.
During the work process, the following tools and units may be needed:
- Trowels.
- Concrete mixer.
- Forests.
- Buckets.
- Hammer.
- Threads.
- A rod is 80 cm long and has a cross section of 10x10 mm.
- Plumb.
- Round rod for widening seams. It should be 10 cm in diameter.
Also, several steps should be used:
- Base alignment.
- Layout.
- Facing.
- Cleaning.
During installation, the work surface must be cleaned immediately. For this purpose, it is better to use a sponge moistened with water, but wrung out. Under no circumstances should you wait until the mixture hardens.
How to cover a window opening with bricks? The beginning of the work is to level the base. Here you need to use a rule and a level. Next, the material should be placed without the use of cement. This is necessary to get a general picture of cutting the brick and increasing the seam.
Where the opening for a window or door is installed, it should not be interrupted. In further use, it may appear in an inappropriate place. It is in such places that the bricks need to be trimmed.
Further work consists of laying the facing product. Installation should begin from the corner. The cladding, after laying the brick, begins on the 6th row. To ensure even laying, a thread is used that must be pulled tight.
The best solution consistency for performing such work is a ratio of 1:4. It is better to take fine sand, which is often mined in quarries. If you have an assistant, the mixture is mixed in a concrete mixer. A small quantity is created this way and a mixer is used. Careful observation is necessary when drawing up proportions.
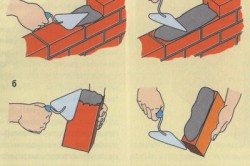
Hyper-pressed brick, a video of its use must be watched several times before use, requires the use of a rod that is laid on its edge. Laying the cement mortar begins a little higher. In this case, it plays the role of a template. A light blow from a hammer or trowel will force the material into position. If, at the time of laying and tapping the product, its front side becomes dirty with the solution, it is immediately washed with a rag or a moistened and wrung out sponge.
If necessary, a mesh is installed. Dowels are often used to secure it. During the installation process you will need:
- Size 6 dowels are driven into the wall.
- The wire is attached to its cap and wound.
- The end of the wire must be mounted inside the masonry. It should be trimmed if it sticks out.
- The binding is done in 4 rows and 70 centimeters wide.
The technology for performing this procedure may change, but a prerequisite is its high-quality execution. The remaining mortar should not be poured into the space between the masonry. Be sure to leave a small gap to increase thermal insulation.
More on the topic.
Among the various types of brickwork, the most complex and time-consuming is the process of laying facing bricks. Laying facing bricks requires much more precision than is given to laying simple bricks; accuracy and cleanliness are also required in this work. In many cases, the main function of facing bricks is finishing the facade of a house or other structure. In addition, fireplaces, columns and other indoor surfaces are lined with this material, thereby it will decorate your interior.
Qualities, types and sizes of facing bricks
In order for facing bricks to decorate your facade or interior, you should also pay great attention when laying this material. Unlike ordinary bricks, for facing bricks, first of all, there must be a high-quality front side that has different kinds colors and shades. In addition to the standard colors (red, yellow) that are often found in Everyday life, there are also bricks in different colors to suit your taste. The front side of a brick can be either a decorative or a smooth surface.
But the most important difference is that, compared to simple brick, facing brick has perfectly even geometric dimensions, perfectly even corners and ends. There should be no various deformations or chips on the front side of the brick. The main assumptions in the deviation of geometric dimensions are, along the length, 4.4 mm; 3.3mm in width and 2.3mm in thickness.
In addition to color and texture, facing bricks also differ according to the following characteristics in terms of the quality and durability of the masonry. There are also clinker and simple facing bricks. In simple bricks, water absorption is quite high, this is due to the fact that there are a large number of pores. And clinker bricks water absorption is significantly lower.
The main dimensions of facing bricks are almost similar to the dimensions of a simple brick: 250 x 120 x 65 mm.
The parameters of the narrow brick are 250 x 60 x 65 mm.
The main parameters of thickened bricks are 250 x 120 x 88 mm; 250 x 107x 65 mm; 230 x 107 x 65 mm, etc.
Basic tips for laying facing bricks. Laying facing bricks is very similar to laying a simple type of brick. But there are some features of the masonry. These features relate primarily to appearance finished wall.
Each row of bricks should be laid out dry to allow identification of non-standard size bricks. To cut bricks, use a grinder with a special disc for stone, and in no case should you use a disc for metal. It is also not recommended to break off pieces of brick with a hammer. Of course, the less you have to cut, the better. To bind facing bricks, a mixture of cement, sand and water is required. The sand for this solution must be sifted. In order to give the solution a certain shade of brick, pigments or special color mixtures are added to it. Mixtures of various shades can be easily purchased at construction markets and stores. It is recommended to prepare the solution in small quantities so that its properties are not lost.
The mortar is placed on the bricks so that it does not reach the edge of the brick by about 1-1.5 cm. For this, a template is usually used, with which you can easily lay the mortar in a thin and narrow layer. The mortar should be a little hard so that the brick does not “float” when placed on the mortar. It is also not recommended to move the brick after it has set slightly with the mortar. If the front side of the brick is dirty with mortar, then in this case it should be cleaned immediately. Otherwise, it will be very difficult to clean it after it dries.
After laying a certain amount of brick, they should be wiped from the front side with a damp cloth or sponge. In this matter, the main thing is not the speed of work, but the main thing is the quality and beauty of the wall. After jointing the brick, the seam should not protrude on the front side by more than 1-2 mm. The vertical seam should be approximately 10 mm wide, and the vertical seam up to 12 mm thick. There is also another trick, so that the wall can breathe, every 4 vertical seams in the bottom row are not filled with mortar.
In order to give a brick wall good reliability, various types of brick ligation are used. The simplest are single-row or chain ligation.
The cost of facing bricks and its installation
It is also worth noting that this product is available in various forms on the markets, and today purchasing facing bricks will not require much effort or difficulty. Since there are different shades and sizes of facing bricks, the cost of facing bricks varies within different limits. Typically, the cost of facing bricks averages from 20 to 30 rubles per piece. There are hundreds of names and types of bricks, and each type of brick has its own price.
If you decide to purchase facing bricks, you should immediately pay attention to a manufacturer who has been producing for a long time this product. The manufacturer must have a permit and a quality certificate for his manufactured material. The cost of facing bricks can be easily found out from manufacturers or dealers who sell this material. Bricks from foreign manufacturers are of great quality; their price for 1 piece can reach up to 1 euro.
The cost of laying facing bricks is determined in accordance with the project. If the house has many floors, then the cost of this work will be significantly cheaper than for houses with much less area. The cost of laying facing bricks mainly depends on the type building materials: type of mixture, type of brick, etc. Usually, most often the cost is assigned by the contractor per 1 square meter. The contractor can also determine the price for 1 piece. laid brick. Most often, you need to contact trusted performers who have already been recommended to you.
Laying face bricks at home with your own hands
If you decide to lay facing bricks with your own hands, then it should be noted that such masonry is considered the most complex and time-consuming, which requires precision and special attention. If the volume of your work is large, you will not be able to cope with this work yourself. You will definitely need a partner. Usually, the laying of facing bricks occurs simultaneously with the construction of the house, and they are connected to each other with a special masonry mesh and, if desired, insulated inside.
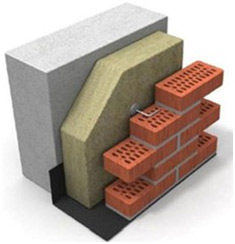
However, let's look at the case of laying facing bricks with our own hands, when the facing brickwork is done after the house has been built. The most important thing to note in this case is that the base must protrude beyond the wall by at least 12 cm. This distance across the width of the brick will help create a good stop for the wall being built. In this case, it will be necessary to strengthen and expand the base.
Next, let's look at what construction tools we need. This includes: a concrete mixer (concrete mixer), buckets, threads, trowels (trowels), scaffolding, a plumb bob, a hammer, a rod with a square section of 10x10 and a length of 80 cm, and for jointing the seams you will need a round rod with a diameter of 10 cm.
First of all, let's look at all the work step by step:
- align the base
- we are laying bricks
- brick cladding
- cleaning (washing) bricks
How to lay facing bricks
The very first thing you should start with is leveling the base horizontally with mortar using building rules. You can also lay out the very first row using a level. Next, we proceed to laying bricks around the entire perimeter. First, this is done without a solution and dry. This layout is done in order to correctly identify the place where the brick will have to be cut and where it is better to place the seams in order to better connect in the corners. In those places where there are window and door openings, the row should not be interrupted, otherwise later the same layout will be above the window or door. In these cases, the brick will simply have to be trimmed.
Next, the facing bricks are laid. The corners are started first. This means that you will have to start laying first in the corners of the house at a height of 4-6 rows. After this, the thread is pulled over each row and the laying of facing bricks under the thread or cord begins.
For this work, it is better to prepare a solution of a ratio of 1:4. If possible, you can take fine quarry sand with a small amount of clay. If you are not working alone, mix the solution in a concrete mixer; you can also mix the solution in small portions with a powerful mixer. The most important thing is to constantly maintain the proportion of the solution.
We place a 10x10 square rod on the edge of the brick, after that we place the mortar slightly above the rod and then install the brick by hitting it with the handle of a trowel or a hammer until it touches the rod. If, of course, you come across a large brick and it touches the cord, in this case the square rod is removed and the brick is installed to the level of the thread. In this simple way it will be possible to achieve identical seams between the bricks.
If the front part of the facing brick is dirty with mortar, then it can be cleaned with a dry cloth, the main thing is to do this before the mortar dries.
The fact that you should attach yourself to the wall plays a very important role. In the option we are considering, there are no protruding rods from the wall or plaster mesh. Therefore, in our case we will attach it to the wall using dowels and binding wire, which bends very well. How this is done: a 6-piece dowel is driven into the wall and a wire is screwed to its head, the length of which should be equal to the width of the brick. The ends of the wire should not stick out, but should be inside the masonry. The height should be knitted every 4 rows, and the width every 60-70cm. There are many ways to bind and therefore it is not necessary to use this method. The main thing is that there is a good bond between the masonry and the wall.
Under no circumstances should the space between the masonry and the wall be filled with mortar. There must be a gap, which also provides good thermal insulation of the premises.
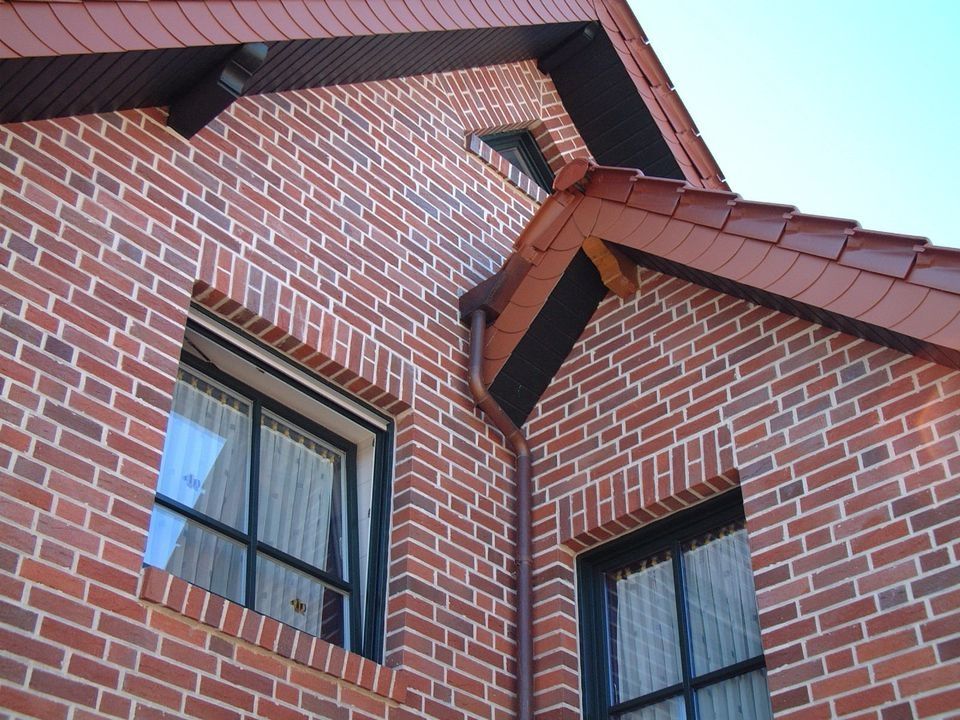
Door and window slopes are laid with a butt, a column of one brick. If you wish, you can use a brick of a different color for the slopes. The joints between the bricks are made during laying, so as not to move the scaffolding repeatedly. After this, the seams are filled with mortar, after which they are rubbed using a round rod. When the jointing is finished, you should thoroughly wipe the facing brick with a dry cloth. This completes the laying of facing bricks.
Laying facing bricks is recognized by experts as one of the most difficult jobs performed by professional masons. To do it yourself, it is not enough to know how to do ordinary masonry.
Facing bricks give the building an external appeal, and masonry done in accordance with all the rules is characterized by an increased service life and high strength.
It is used for finishing facades and creating fireplace structures, columns or decorative structures, gazebos and other buildings. Laying facing bricks requires preparation, skills and the use of special tools.
Types of masonry and varieties of facing bricks
To create high-quality decorative masonry on the facade of a building, modern manufacturers create various types of bricks, the most popular of which are:
- silicate;
- hyper-pressed;
- clinker;
- ceramic.
The brick blocks made for cladding also differ in parameters.

Not only the height, length and width of each individual block are important, frost resistance, moisture absorption, thermal conductivity and weight are also important.
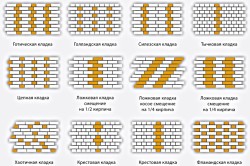
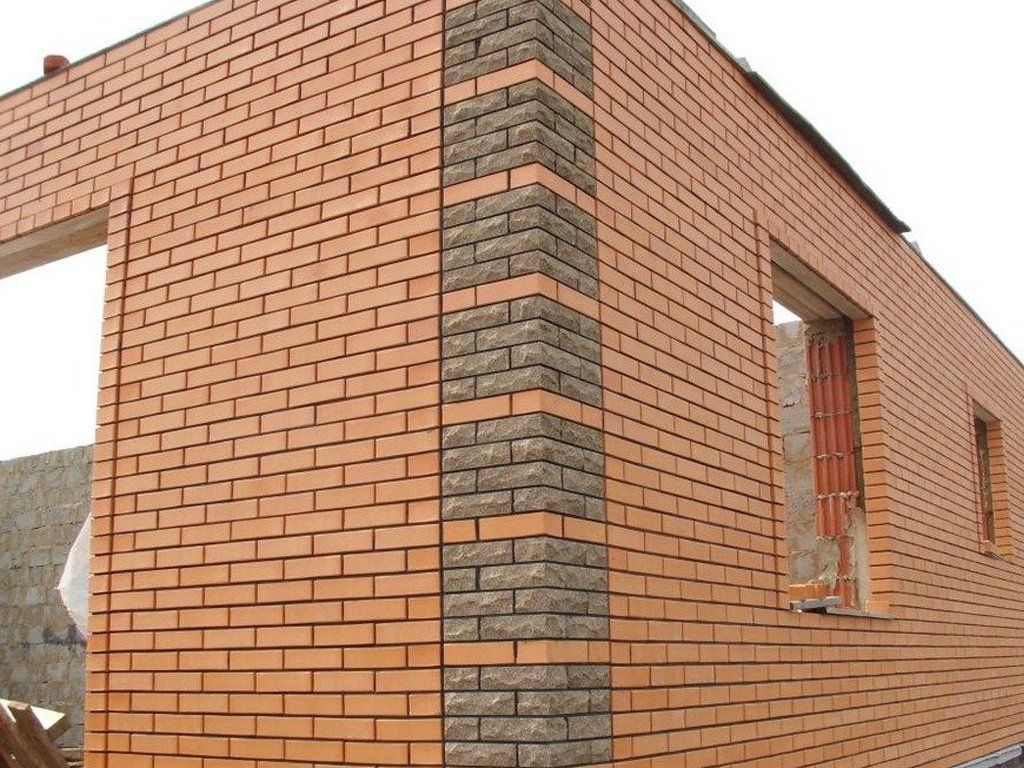
Depending on the planned result, choose one of existing species masonry:
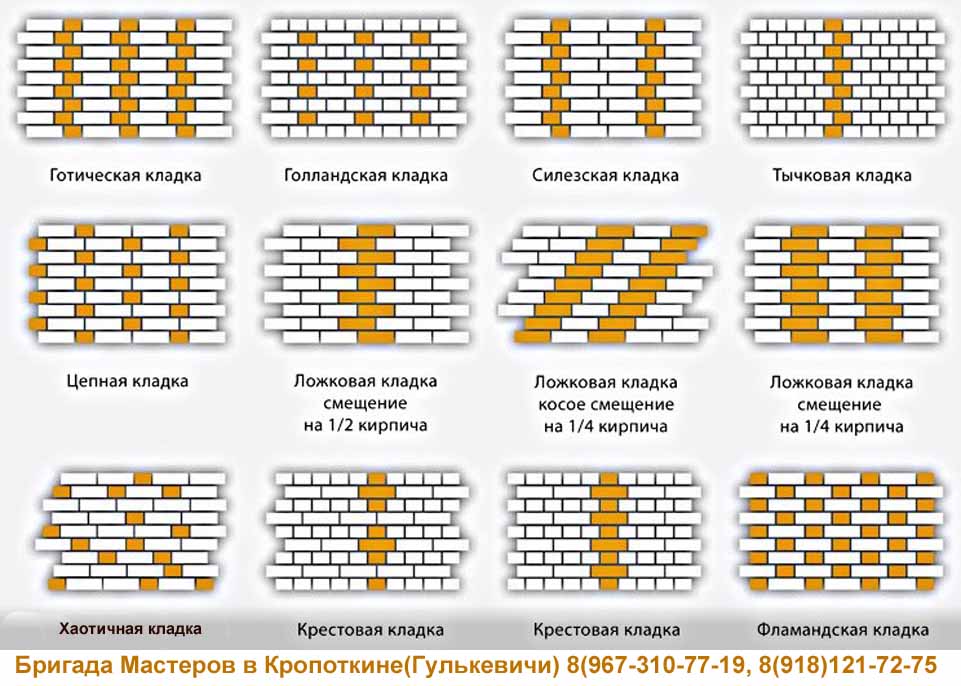
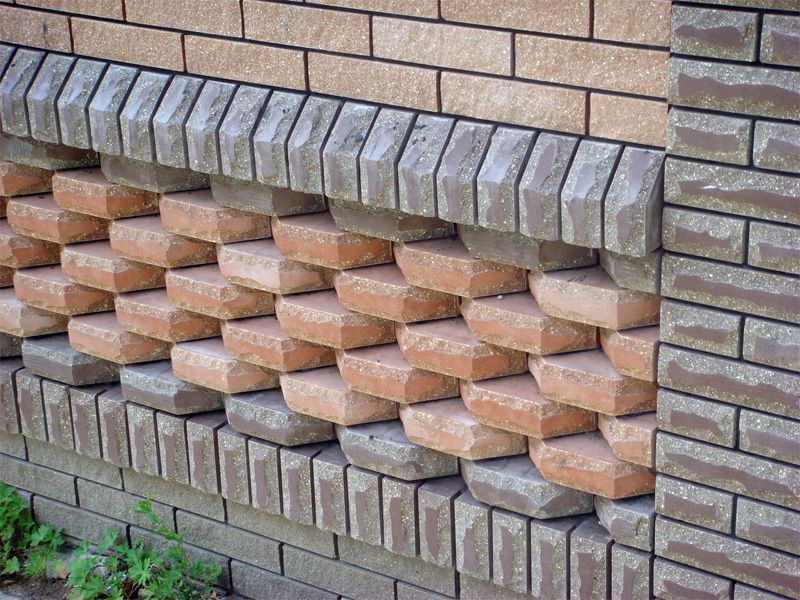
 Thus, the laid bricks make one side of the block visible. This may be the widest or narrowest side, or only the ends of the blocks may be visible. There are several types of facing bricks designed to create a decorative surface:
- In “half a brick” - displacement of the vertical seams of the spoon and facing masonry to the middle of the brick horizontally.
- Stacked - all vertical seams are on the same line.
- “American” - alternating rows of spoon and bonded masonry.
- Flemish - alternating bricks in one row, laid with spoon and butt joints.
There are other types, but the ones listed are especially popular among owners. country cottages and private houses. In addition, laying facing bricks in accordance with the named technology can be done independently without the involvement of specialists.
Tools
 Prepare the solution in strict proportions
 Before you begin the work, you need to prepare all the tools that you will need to create the decorative cladding of the facade:
- building level;
- nylon lace;
- a trowel to apply and evenly distribute the solution;
- grinder for cutting bricks, as when doing masonry facing bricks it cannot be broken; all edges must have a flat surface;
- a metal rod with a square section of 1x1 cm to create smooth seams of absolutely equal thickness;
- round rod with a cross section of 1x1 cm, intended for jointing.
After completing the preparation, you should place everything you need so as not to complicate the work and not create obstacles to movement around the construction site.
Beginning of work
 The laying of the cladding begins from the base
 Brickwork facing bricks begin from the base of the house if, during the pouring and insulation of the foundation of the building, a protrusion for this type of work was prudently left.
The main feature of this type of masonry is smooth, neat seams, correctly formed using a metal rod. Masons call this bar masonry.
The thickness of the vertical seam should not exceed 1 cm, and the horizontal one - 12 mm. When laying out the first row, you need to make sure that the entire structure is “breathable”.
For high-quality air circulation in the first row of masonry, after every fifth brick, the vertical seam is not filled with mortar.
 The seam should be no thicker than 1 cm
 When starting to mix the solution, it is necessary to take into account the special requirements for its quality. According to them, workers will need 1 part cement and 4 parts sifted clean sand.
If necessary, at the request of the home owner, a pigment is added to the composition to obtain a mixture of a certain color.
Apply the solution only to the bottom row, using a rod with a square cross-section or a special template. This will allow you to distribute the mortar so that it does not reach the edge of the brick block laid in the bottom row.
Preparation for starting work consists of leveling the surface of the base, cleaning it from dirt and eliminating any detected defects. The evenness is checked with a level, after which they begin dry laying out the blocks along the entire perimeter of the facade. This will allow you to plan corner connections, as well as connections in places where door and window blocks are installed.
At this stage, you can choose one or another type of facing masonry, clearly convinced of its attractiveness.
Masonry
 Raise the masonry by 5 bricks, forming a corner
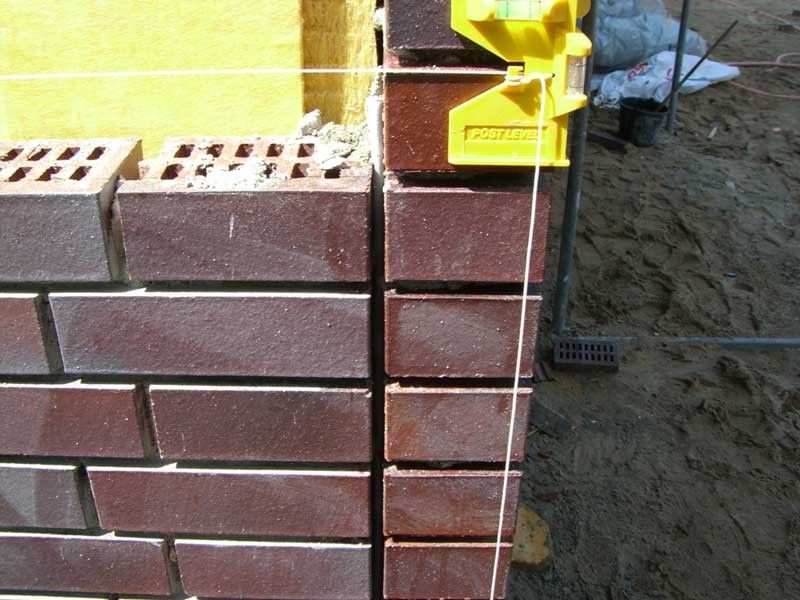
 Work begins with the formation of corners. To do this, the bricks are raised 5 rows, creating a full angle. To begin with, all corners are raised, after which a string is pulled between the created masonry, providing control over the front part of the masonry.
To horizontal seams were the same, a rod with a square cross-section is first laid on the surface of each row, then the mortar is placed so that the rod is underneath it, after which the brick is laid and tapped with a mallet until it comes into contact with the rod.
Do not allow the solution to get on the front of the masonry. If necessary, it is removed without waiting for it to harden. The string is lifted from row to row, using it to control the horizontality of the row.
 The reliability of the structure is ensured by steel wire laid in every 4 rows
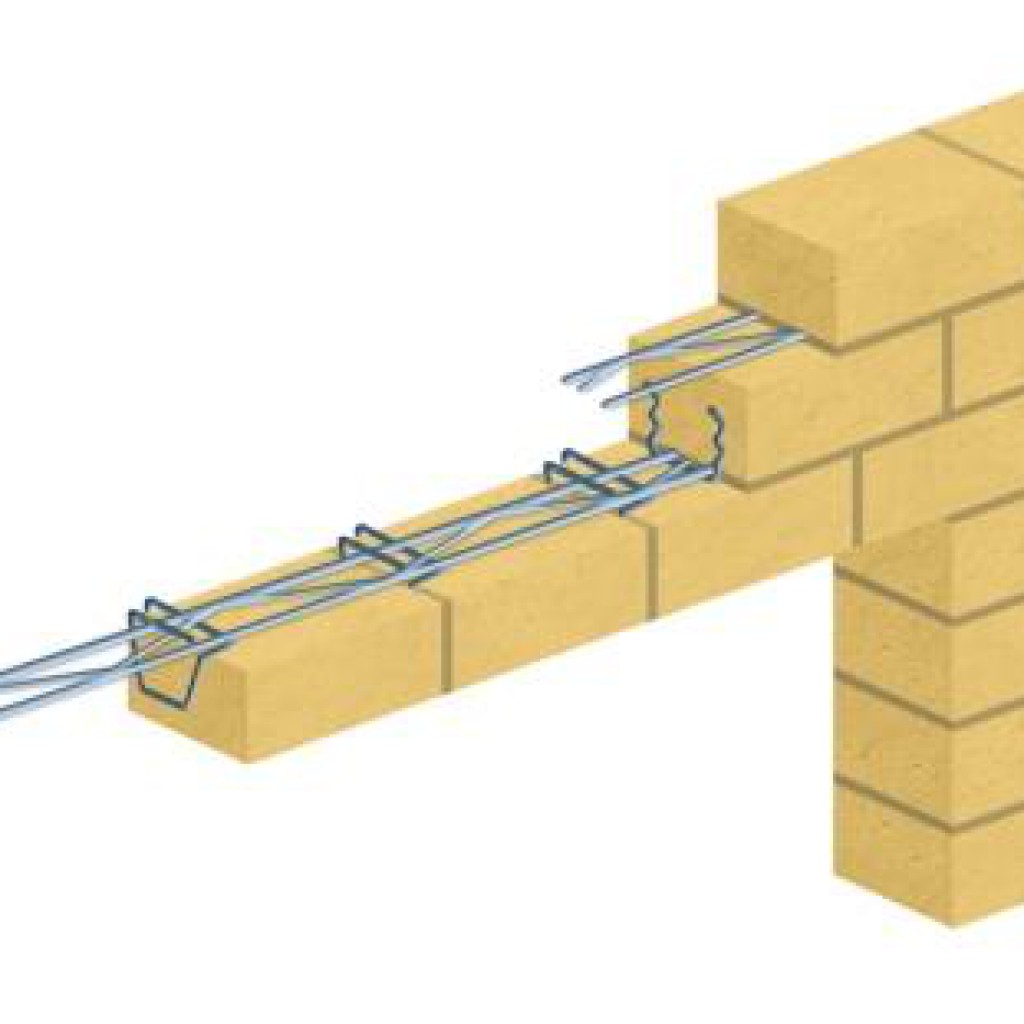
 To ensure the strength and reliability of the structure, care must be taken to create a high-quality connection of the facing masonry to the main wall of the house. To do this, every four rows a steel wire is attached to the main wall using self-tapping screws, which is then placed in a horizontal seam.
There are other methods of tying, when instead of flexible wire, reinforcing rods, plaster mesh or other parts are used, but in any case, tying is performed no less frequently than in every fifth row of masonry.
 The space left between the facing masonry and the walls of the building will help ensure the creation of a ventilated “breathing facade” and prevent the formation of condensation.
In most cases, unless there are special wishes of the homeowner, window and door openings are lined with bonded masonry. With this design, you get an even, strict frame that stands out against the general background. For more information about laying walls, watch this video:
The work is completed by grouting the joints, provided that there is no contamination on the surface. Otherwise, they first tidy up the walls, and then start grouting with a specially prepared solution to which the desired pigment has been added. The seams filled with mortar are rubbed with a rod with a round cross-section, constantly removing excess mortar and ensuring the cleanliness of the surface.